background image


Worldwide distribution right of DF Sales Ltd – 22-27 Cooper Road, Brunel Way, Thornbury, BS35 3UW 

© Copyright Bath Institute of Medical Engineering – All Rights Reserved 


2


Getting started…


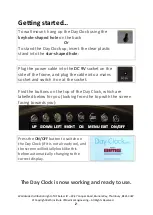
To wall mount: hang up the Day Clock using the 

keyhole-shaped hole

 on the back 

Or 


To stand the Day Clock up, insert the clear plastic 
stand into the 

star-shaped hole


Plug the power cable into the 

DC 9V

 socket on the 

side of the frame, and plug the cable into a mains 
socket and switch it on at the socket. 


Find the buttons on the top of the Day Clock, which are 
labelled below for you (looking from the top with the screen 
facing towards you): 


Press the 

ON/OFF

 button to switch on 

the Day Clock (if it is not already on), and 
the screen will initially look like this 
before automatically changing to the 
correct display. 


The Day Clock is now working and ready to use. 


U

U

P

P


D

D

O

O

W

W

N

N


L

L

E

E

F

F

T

T


R

R

I

I

G

G

H

H

T

T


O

O

K

K


M

M

E

E

N

N

U

U


E

E

X

X

I

I

T

T


O

O

N

N

/

/

O

O

F

F

F

F


Summary of Contents for Day Clock

Page 1: ...tion right of DF Sales Ltd 22 27 Cooper Road Brunel Way Thornbury BS35 3UW Copyright Bath Institute of Medical Engineering All Rights Reserved How to use your Day Clock Telephone 44 0 117 330 2277 Designed by Version 1 2 ...

Page 2: ...ring All Rights Reserved Contents What does the Day Clock do 1 Getting started 2 How can I switch on off the blue lights on the corners of the Day Clock 3 How does the Day Clock know what time it is 3 What do I have to do when the clocks change in Spring and Autumn 4 Troubleshooting and getting help 7 Technical and Safety Information 9 ...

Page 3: ...ek and will display the right information as soon as you plug it in It will need adjusting in the Spring and Autumn when the clocks change The Day Clock will not display the exact time or the date The Day Clock has been carefully designed to help people with memory problems to make decisions about how to plan their day so the different information is displayed as follows Morning 7am to 12 noon Aft...

Page 4: ...nto the DC 9V socket on the side of the frame and plug the cable into a mains socket and switch it on at the socket Find the buttons on the top of the Day Clock which are labelled below for you looking from the top with the screen facing towards you Press the ON OFF button to switch on the Day Clock if it is not already on and the screen will initially look like this before automatically changing ...

Page 5: ...in to switch the blue lights back on How does the Day Clock know what time it is The Day Clock has an internal clock which runs on a small back up battery This makes sure the Day Clock shows the information for the right day and time The back up battery ensures that the display is correct even when it is unplugged and plugged back in again or after a power cut The Day Clock will also continue to w...

Page 6: ...nd in Autumn you will need to move it back one hour so that the display stays correct Find the buttons on the top of the Day Clock which are labelled below for you If you press the wrong button at any time and are not sure what to do you can switch the Day Clock off and on again without causing any problems just press the ON OFF button and try the instructions again from here 1 Press the EXIT butt...

Page 7: ...Press OK to enter the Set time date options 3 Press OK to select the highlighted option in green This will then turn the text Red 4 Use the left and right arrow buttons to select the correct time date 5 Press OK to save your selection and return to the time date options 6 Use the Up and Down arrow buttons to move between the different options and set your time date ...

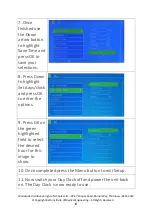
Page 8: ...wn arrow button to highlight Save Time and press OK to save your selections 8 Press Down to highlight Set days clock and press OK to enter the options 9 Press OK on the green highlighted field to select the desired hour for this image to show 10 Once completed press the Menu button to exit Setup 11 Now switch your Day Clock off and power the unit back on The Day Clock is now ready to use ...

Page 9: ...lugged it will automatically display the correct information when it is plugged back in unless the internal back up battery eventually runs out The Day Clock is not showing the right information If the Day Clock is consistently wrong by one or two hours check that it has been adjusted correctly for the time of year e g to British Summer Time or Greenwich Mean Time Check this using the instructions...

Page 10: ...gain If the screen does not display anything Check that the power cable is plugged in at both ends and switched on and press the ON OFF button on the top of the frame see page 2 If you are using the Day Clock as a digital photo frame and the screen is blank check that your SD memory card or USB stick contains images which are in JPEG format I have a problem with the Day Clock that I cannot solve P...

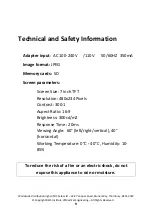
Page 11: ... input AC 100 240V 110V 50 60HZ 350mA Image format JPEG Memory cards SD Screen parameters Screen Size 7 inch TFT Resolution 480x234 Pixels Contrast 300 1 Aspect Ratio 16 9 Brightness 300cd m2 Response Time 20ms Viewing Angle 60 left right vertical 40 horizontal Working Temperature 0 C 40 C Humidity 10 85 To reduce the risk of a fire or an electric shock do not expose this appliance to rain or mois...

Reviews: