background image


21

  button to select available country. 

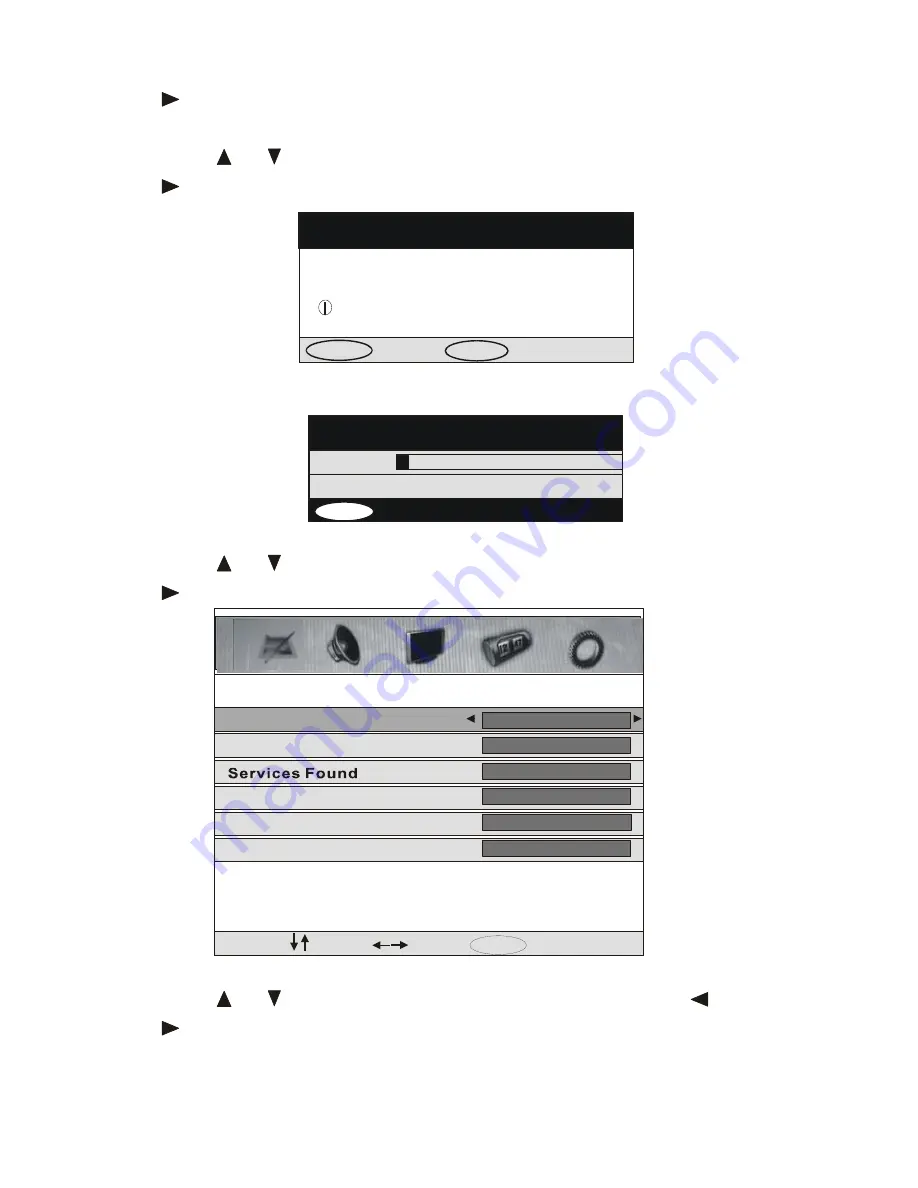
(2). Auto Tuning 

Press 


or 

  button firstly to move cursor to this item, then use   

  button to enter into auto tuning menu, as followed: 


Now press 

ENTER

 button to start auto tuning 


(3). Manual Tuning 

Press 


or 

  button firstly to move cursor to this item, then use   

  button to enter into manual tuning menu, as followed: 


a. Channel 

Press 


or 

  button firstly to move cursor to this item, then use 

 or  

  button to select channel no. 

b. Start Search 

Auto Tuning

Press Enter Key to Start .

ENTER

Enter

Return

MENU

Auto Tuning

Searching

DTV           0                                  64.50MHZ

Exit

MENU

Channel

Manual Tuning

2

Start Search

Signal Quality

Signal Strength   

Frequency

Begin

0

0%

0%

50.50MHZ

Select

Adjust

0~9

Input

Summary of Contents for TFD-2201DVBT

Page 1: ...22 TFT LCD TV WITH DVB T DVD COMBO TFD 2201DVBT Instruction Manual...

Page 2: ...C adapter corresponds to the local electrical supply If you are unsure about your power supply please ask the local power company Caution To avoid electric shock never touch the inside of the LCD TV M...

Page 3: ...table specified by the manufacturer or sold with the apparatus 2 An appliance and a cart combination should be moved with care Quick stops excessive force and uneven surfaces may cause the appliance a...

Page 4: ...Never use the unit on a bed sofa rug or other uneven surfaces Doing so may block the ventilation openings in the bottom of the unit If you place the LCD TV Monitor in a bookcase or some other enclose...

Page 5: ...___________________ Please make sure that the following items are included with your LCD TV Monitor If any item is missing please contact your dealer TFT LCD TV Monitor Remote control Operation manual...

Page 6: ...H Up direction button 7 CH Down direction button 8 VOL Right direction button 9 VOL Left direction button 10 Menu button 11 TV AV function switch button 12 DVD disc slot in 13 DC input jack Car cord i...

Page 7: ...Remote control reference guide 3 4 1 2 7 8 9 10 11 1 2 1 3 1 4 1 5 1 6 17 1 8 1 9 20 21 22 23 24 25 26 27 28 29 30 31 3 2 33 34 35 36 3 7 38 39 40 4 1 42 43 44 5 6 SUB DVBT 1 Remote control function...

Page 8: ...playback or display red subject of teletext or select TV RADIO program in DTV mode 24 Display green subject of teletext or audio function in DTV mode 25 Disc repeat playback or display yellow subject...

Page 9: ...tteries at the same time Never mix new and old batteries or batteries of a different type 4 If you don t intend to use the remote control for an extended period remove the batteries to prevent possibl...

Page 10: ...llite TV CATV net You can use 75 coaxial cable to connect the outdoor antenna Outdoor Antenna Connection Use 75 coaxial cable plug or 300 75 impedance converter to plug in antenna input terminal on th...

Page 11: ...c operation 1 Press the POWER button on the unit or the STANDBY button on the remote control to switch on the power the indication light will be in blue color Press the POWER or STANDBY button again t...

Page 12: ...types 11 5 Press the MUTE button to cut off the sound output press this button again to resume sound output 6 Press the DISPLAY button to display the preset TV channel play information 7 Press the AS...

Page 13: ...r to pick up the picture signal of TELETEXT Firstly you must view the 3 rd part of chapter V to complete the TV channel searching 2 Press the CH or CH button to select the previous page or the next pa...

Page 14: ...LUE COLOR BUTTONS Press these 4 color buttons to access directly to corresponding color page displayed at the lower parts of teletext screen 5 PC screen Press the INPUT button to select the VGA input...

Page 15: ...t Picture Mode PICTURE Standard Contrast Colour Tint Sharpness Colour Temperature DNR 50 50 50 50 Normal Warm Off Select Adjust 4 Colour Press or button firstly to move cursor to this item then use or...

Page 16: ...ess the LCD MENU button to return to the root menu or press EXIT button to exit menu setting directly 2 SOUND SETTING Press the LCD MENU button on the remote control firstly then press or button to se...

Page 17: ...return to the root menu or press EXIT button to exit menu setting directly 3 TV TUNING SETUP A FOR ANALOGUE TV SIGNAL SOURCE ONLY Based on analogue TV signal press the LCD MENU button on the remote c...

Page 18: ...Sound System Press or button firstly to move cursor to this item then use or button to select a corresponding sound system c Colour System Press or button firstly to move cursor to this item then use...

Page 19: ...tenna configuration some of the channels may not be turned to the best reception Press or button firstly to move cursor to this item then use or button to select AFT Auto Fine Tune On Off f Manual Sea...

Page 20: ...kipped and could not be searched Press yellow button again the mark will disappear it means you cancel skip program selection c Lock Press or button firstly to move cursor to selected program channel...

Page 21: ...n on the remote control firstly then press or button to select TUNING SETTINGS MENU displayed on the screen as below On this menu the TUNING setting icon of is in frame 1 Country Press or button first...

Page 22: ...stly to move cursor to this item then use button to enter into manual tuning menu as followed a Channel Press or button firstly to move cursor to this item then use or button to select channel no b St...

Page 23: ...uring channel s program being searched this item just display selected channel s signal frequency 4 Program Edit This item allows you to sort TV programs according to your preferences Press or button...

Page 24: ...ot be watched Press blue button again the mark will disappear it means you cancel lock program selection d Radio Press or button firstly to move cursor to selected program channel And press red button...

Page 25: ...u as followed a Time Zone Press or button firstly to move cursor to this item then use or button to select available GMT time as your mind b Audio Language Press or button firstly to move cursor to th...

Page 26: ...Press or button firstly to move cursor to this item then use or button to select sleep time to let unit is in standby state automatically 2 OSD Timer Press or button firstly to move cursor to this it...

Page 27: ...ents NOTE This available aspect size may be different in difference input source 3 Blue Screen Press or button firstly to move cursor to this item then use or button to select On Off Selecting On it m...

Page 28: ...Code Change PIN Code New PIN Code Select Delete 0 9 ENTER Input Confirm Enter the original old password 0000 by numeric button firstly then enter the new password that you want to set And at last pre...

Page 29: ...again the mark will disappear means you cancel this item operation e Delete Digital Program 28 Press or button firstly to move cursor to this item then press ENTER button and a mark will display on t...

Page 30: ...is loading unloading and during playback this is normal and can be ignored If you inject the disc with wrong side the disc could not come out automatically and the screen show No Disc When press butt...

Page 31: ...of the normal picture In the ZOOM mode you can use buttons to move the picture for optimum viewing c REPEAT PLAY You can use the REPEAT button to repeat the play of various sections of your DVD Press...

Page 32: ...the TV or amplifier when the system is on MUTE There are chances of the speakers getting damaged when the sound is resumed f POWER ON OFF Press the POWER or STANDBY button to switch the system on or o...

Page 33: ...re removed the program item will be removed z For different discs PROG button may have different functions z If press the button once the DVD video player will be stopped At this point press the ENTER...

Page 34: ...nd they will appear on screen automatically z As you press the SUBTITLE button the subtitles may not appear immediately during some screens 33 k MP3 OPERATION 1 To play MP3 disc you can press the INPU...

Page 35: ...root menu or exit the setting menu Note In this manual the DVD setup menu maybe changed and different from your real TV s screen shown without further notice Because this manual is just a sample to he...

Page 36: ...st sound as followed 3 PREFERENCE PAGE SETUP You can choose PREFERENCE PAGE mode as a followed menu Note Preference Page Setup is fun Is only useful to set as the 35 followed status a Disc stop playin...

Page 37: ...m MENU PLAYBACK Press D MENU button to display disc menu or return to the root menu when playing the disc n TITLE PLAYBACK FOR DVD MUSIC ONLY Press TITLE button firstly and then press direction or nu...

Page 38: ...hone jack Connect the earphone with the socket and adjust the volume to what you want Once plugged in the speaker output will be cut off automatically PC audio in operation This unit possesses PC audi...

Page 39: ...connection or loose connection System mute Checking and correcting all the connections Canceling mute Disc playing abnormally Disc dirty or scratched Cleaning or changing disc Disc not playing Disc p...

Page 40: ...audio signal input cable is connected properly Color distortion 1 Ensure that the equipment is connected properly 2 Ensure that the AV video signal input is connected properly Pictures sound are inte...

Page 41: ...ith any cold parts in the unit condensation may form When condensation forms inside the unit may not function well Once condensation disappears the unit will return to normal functioning Placing the u...

Page 42: ...asives 2 Cleaning discs When a disc becomes dirty clean it with a cleaning cloth Wipe the disc from the centre outwards Do not use solvents such as benzene thinners commercially available cleaners or...

Page 43: ...NTSC3 58 NTSC4 43 SECAM TV Standard PAL BG I DK SECAM DK L TV tuning system Auto Preset tuning Tuner Integrated and frequency synthesis CATV optional S1 S41 ch Hyper Band Number of channels 99 TV FUN...

Page 44: ...able may not be supported For an optimal picture it is recommended to choose a mode listed in the table 2 You have 13 available modes compatible with windows 3 It can happen that the image is disrupte...

Page 45: ...at a collection point for the recycling plant so that its electrical and electronic parts can be recycled The selective collection and recycling of the harmful residues of electric and electronic home...

Reviews: