background image

Introduction

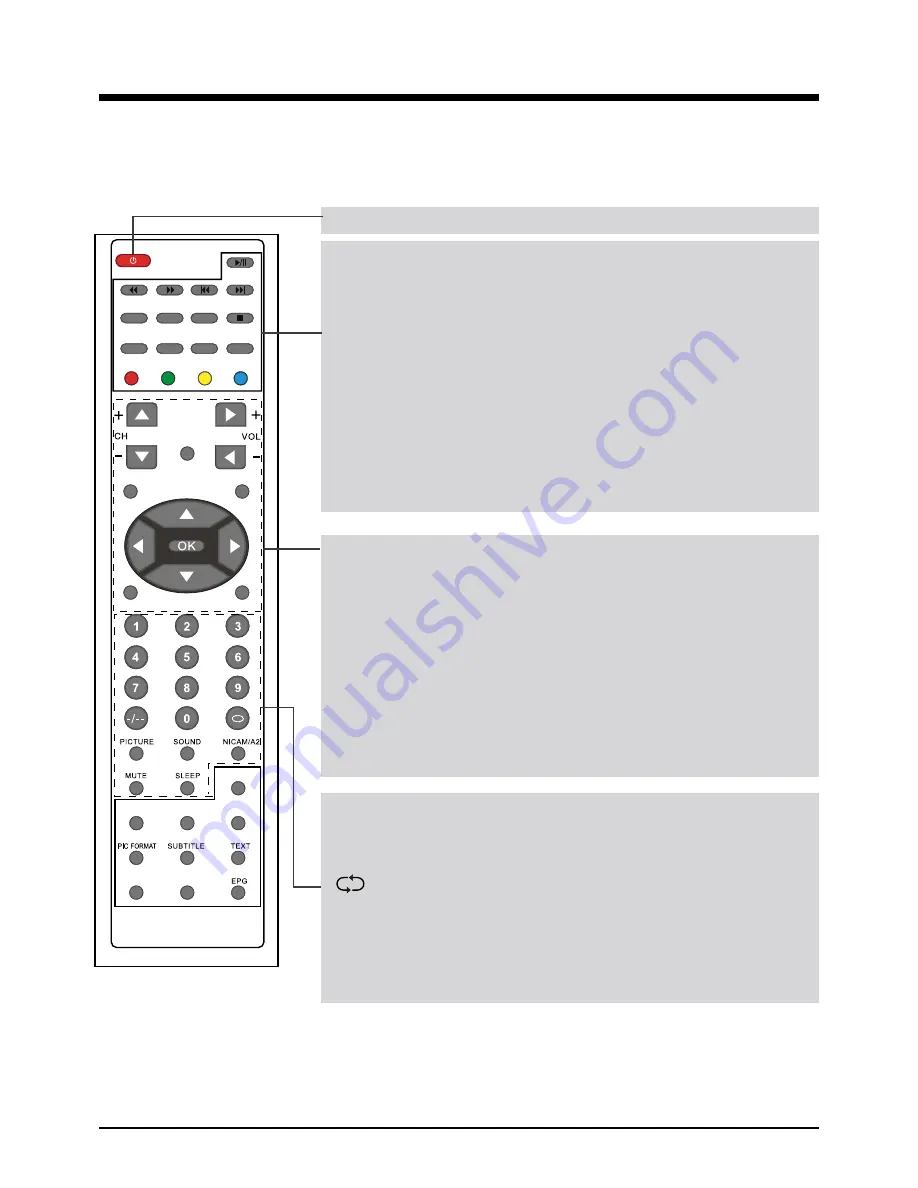
3. Remote Control

The remote control is using Infra-Red(IR). Point it towards the front of the LCD TV. The remote

control may not work correctly if it is operated out of range or out of angle.

POWER

(red button): Turn the TV on/standby.

Buttons for TELETEXT operating

You could use the buttons only in TELETEXT .

TV/TXT

: Turn off/on the Teletext display.

CANCEL

: Cancel the Teletext display.

REVEAL

: Reveal any hidden text.

HOLD

: Hold or carry on the current subpage.

SIZE

: Press to see top half of page double size, Press again 

to see the bottom half of page double size. Press again for 

normal size.

SUBPAGE

: Press to subpage, again to cancel.

INDEX

: Go to index.

Colour buttons

: Short cuts-follow the coloured links in the 

text.

Buttons for Basic operating

MENU

: Press to display the OSD menu.

INPUT

: Display the input source menu.

CH+/-

: Channel/P/-.

VOL+/-

: /-.

REC

: Press to start record the program in DTV mode.

DVB

: Switch to DVB source.

EXIT

: Press to exit the OSD menu.

THUMBSTICK(

< / > / ∧ / ∨

OK)

: Allows you to navigate 

the on-screen menus and adjust the system settings to your 

preference.

Buttons for Basic function

NUMBER BUTTONS

: Choose channel directly. Press number

buttons and press 

OK

 button to play the channel. 

        : Return to the previous channel viewed.

PICTURE

: Select the picture mode.

SOUND

: Select the sound mode.

NICAM/A2

: Selects Nicam or Mono sound.

MUTE

: Mutes the Audio.

SLEEP

: StandbyTimer

INPUT

MENU

EXIT

DVB

TV/RADIO

FAV                   FAV+                 FAV-

DISPLAY        LANGUAGE

REC

TV/TXT CANCEL REVEAL

HOLD

SIZE SUBPAGE INDEX

 6

Summary of Contents for DFT-1945DVBT CUP

Page 1: ...Instruction Manual 22 LCD TV WITH DVB Model NO LED 2251DVBT...

Page 2: ......

Page 3: ...n Introduction 1 Front View 2 Rear View 3 Remote Control Basic Operation OSD Menu 1 PICTURE menu 2 SOUND menu 3 FUNCTION menu 4 TV menu 5 DTV menu Media operation Simple Troubleshooting 2 3 4 7 4 5 6...

Page 4: ...ic Equipment WEEE Your product is designed and manufactured with high quality materials and components which can be recycled and reused This symbol means that electrical and electronic equipment at th...

Page 5: ...ming pools Pull the plug out immediately and seek professional help if the mains plug or cable is damaged liquid is spilt onto the set or if it is accidentally exposed to water or moisture anything ac...

Page 6: ...e buttons MENU Press to display the OSD menu press again to exit the menu CH Press to scan through channels VOL Press to adjust the volume INPUT Press to display the input source menu POWER Turn on st...

Page 7: ...he mains adaptor 2 USB For software update only 3 HDMI Connect it to the HDMI of DVD or other equipment 4 VGA For PC display Connect it to the D Sub 15 pins analog output connector of the PC 5 PC IN C...

Page 8: ...NDEX Go to index Colour buttons Short cuts follow the coloured links in the text Buttons for Basic operating MENU Press to display the OSD menu INPUT Display the input source menu CH Channel Program V...

Page 9: ...osed properly Buttons for DTV operating TV RADIO Disc menu change between DTV and Radio FAV Display the favorite program list FAV Favorite program up down PIC FORMAT Press to change the display mode o...

Page 10: ...TV PC HDMI YPBPR Hint you should operate the OSD menu according to the hint submenu Press MENU button to display the OSD menu as below Use button to select the main menu and press button to enter the...

Page 11: ...a place which is bright the brightness colour and sharpness are lower than those of other modes Game Usually used when you play games the brightness is just lower than that of MOVIE mode Note If you...

Page 12: ...HEATRE PERSONAL You may select the sound mode directly by pressing the SOUND button on the remote control BASS Low frequencies intensity TREBLE High frequencies intensity BALANCE Left and right stereo...

Page 13: ...ssing button on the item CHILD LOCK Enter the CHILD LOCK menu by pressing button on the item CHILD LOCK Turn on off the function KEY LOCKED Lock the buttons function on the TV by turning on the functi...

Page 14: ...sing button on the item Change the settings according to your actual conditions and select YES item to start auto tuning or select NO to cancel FIRST TIME INSTALLATION MOVE ADJUST EXIT MENU COUNTRY DE...

Page 15: ...button on the item State of the channel GREEN favorite YELLOW skip BLUE lock Channel and channel name Operating channel Hints for operation CHANNEL Select the channel you want to manual tuning SOUND...

Page 16: ...cel the operation by pressing OK button or select another channel and press button Then select the channel you want to be change to and press OK button to exchange NAME Name the channel Select the cha...

Page 17: ...nput out of number or Capital letters Press YELLOW button to set the input out of Lowercase letters or Capital letters Press BLUE button to the next position for your position Press YELLOW button to d...

Page 18: ...AUDIO SUBTITLE RATING CI DTV ADVANCED SETTING DEFAULT OFF BOX MAN TETRIS HITRAT DTV NATIVE GAME AREA Select the suitable area AUTO TUNING Pressing button on the item then select YES and press OK butt...

Page 19: ...ion of the picture V POSITION Adust the vertical position of the picture POSITION RESET Press button to reset the setings above H POSITION Adust the horizon position of the picture V POSITION Adust th...

Page 20: ...to enter Use button to select and press OK button to program Press EXIT button to back to the previous page Press REC button on the remote control in DTV mode to enter the RECORD menu RECORD START Pr...

Page 21: ...de for recording 3 Select the wakeup channel as you like 4 Set the date for TV wake up 5 Set the time for TV wake up and start recording 6 Set the time for the recording standing TIMESHIFT START When...

Page 22: ...e quality Check the aerial connections Check that the channel is tuned in properly Adjust the picture settings brightness colour sharpness contrast hue Make sure that the TV is not located close to el...

Page 23: ......

Page 24: ......

Reviews: