Dentsply Sirona SiroCam UAF Plus Operating Instructions Manual Download Page 32

8 Troubleshooting

Dentsply Sirona

Operating Instructions SiroCam UAF Plus

32

66 90 643 D3762

D3762.201.01.01.02    08.2018

8

Troubleshooting

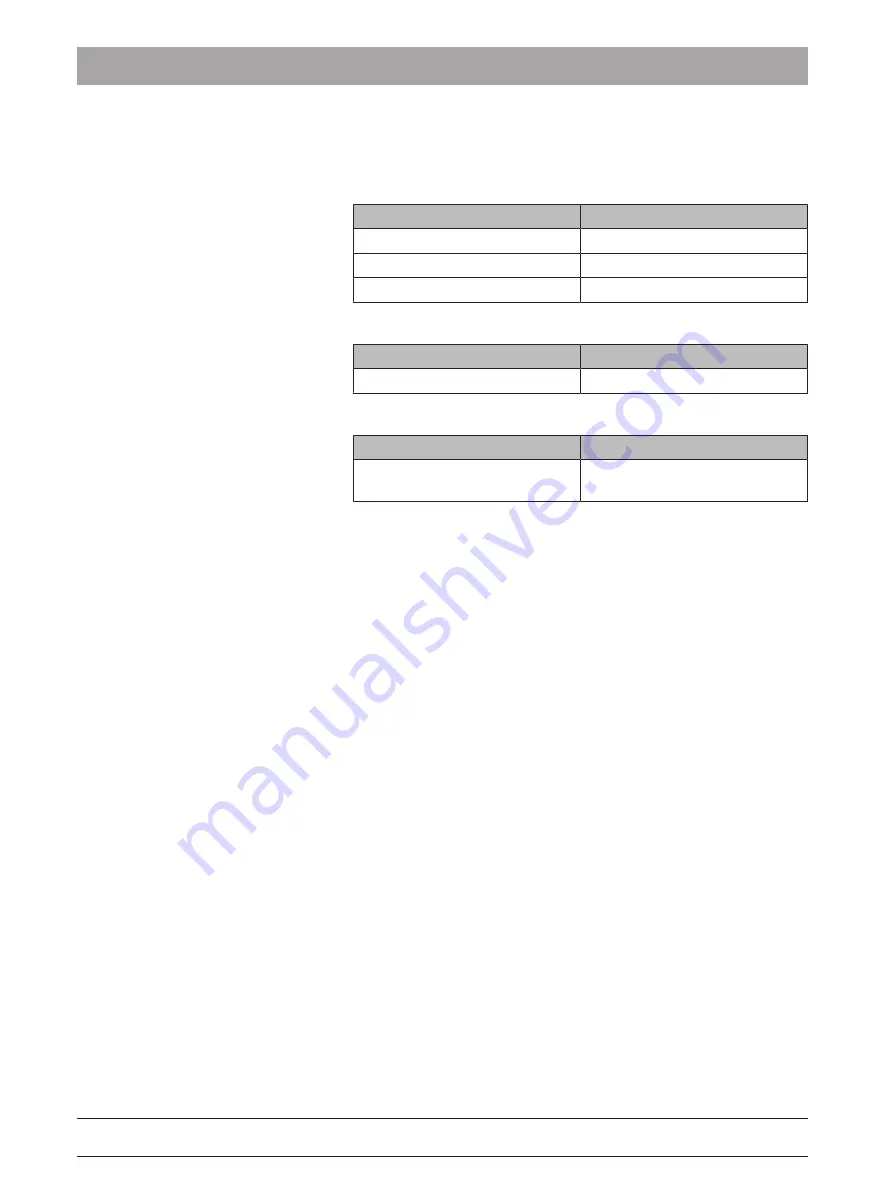
Images appear out of focus

Potential Cause

Recommendation

Protective sheath is wrinkled

Ensure sheath fits correctly

Camera head is dirty

Perform camera lens cleaning

Liquid has spilled into handpiece

Contact dealer for support

Images appear too dark

Potential Cause

Recommendation

LEDs are not functioning

Contact dealer for support

No images appear

Potential Cause

Recommendation

USB cable is incorrectly con-
nected or is not connected

Ensure USB cable is connected
correctly to PC workstation

NOTE: If the above actions do not resolve your issue, please contact a
Dentsply Sirona support representative or an authorized dealer for
further assistance.

Summary of Contents for SiroCam UAF Plus

Page 1: ...New as of 08 2018 SiroCam UAF Plus Operating Instructions English ...

Page 2: ...ems 8 1 5 2 PC workstation 8 2 Safety 9 2 1 Symbols 10 2 2 WEEE 11 3 Installation 12 3 1 Install Sidexis 4 video modules 12 3 2 Install Sirona UAF Plus module 14 4 Operation 16 4 1 Prior to initial use 16 4 2 Camera description 16 4 3 Connect the camera 16 4 4 Camera options 17 4 4 1 Turning the camera on or off 17 4 4 2 Keyboard shortcuts 17 4 5 Protective sheaths 18 4 6 Operate the camera 19 4 6...

Page 3: ... 24 4 11 Video options 25 5 Cleaning 26 5 1 Handpiece 26 5 2 Lens surface 26 5 3 Cleaning products 26 6 Technical data 27 6 1 Optical 27 6 2 Physical 27 6 3 Electrical 27 6 4 Ambient 28 6 5 Specifications 28 6 6 Electromagnetic Emissions 28 6 7 Electromagnetic Immunity 29 7 Error messages 31 8 Troubleshooting 32 9 Accessories and consumables 33 ...

Page 4: ... and save still images Easy to hold and handle and simple to operate Easily portable between operatories These Operating Instructions are designed to assist you prior to initial use and whenever you require information later on We wish you a great deal of success with the SiroCam UAF Plus Your SiroCam UAF Plus Team 1 2 Contact information Customer service center For technical questions use the con...

Page 5: ...lways keep the user manual handy in case you or another user require s information at a later point in time Save the user manual on a PC or print it out If you sell the software make sure that the user manual is included with it either as a hard copy or on an electronic storage device so that the new owner can familiarize himself with its functions and the specified warning and safety information ...

Page 6: ...n quick succession Ctrl N On the keyboard Press the Ctrl and N keys si multaneously Drag drop Pulling along and letting go Click the left mouse button on an element hold it and then release the mouse button on a possible target Activate deactivate a check box Selecting deselecting a check box with a mouse click in order to activate deactivate its underlying function Activate deactivate an option b...

Page 7: ...bodily injury NOTE A possibly harmful situation which could lead to damage of the product or an object in its environment IMPORTANT Application instructions and other important information Tip Information for simplifying work 1 3 4 Formats and symbols used The formats and symbols used in this document have the following meaning Prerequisite 1 First action step 2 Second action step or Alternative a...

Page 8: ...operating systems Windows 10 Professional 64 bit Windows 8 1 Professional 64 bit Windows 7 Professional SP1 32 and 64 bit 1 5 2 PC workstation The PC should meet the following minimum requirements for the SiroCam UAF Plus Processor Dual core min 2 GHz Main memory 1 GB minimum Graphic settings 1024 x 768 pixels minimum Graphics card 24 bpp 128 MB minimum Hard disk 5 GB free hard disk capacity minim...

Page 9: ...an adequate distance from electricity transformer rooms static continuity units two way amateur radios and cellular phones To ensure proper operation the latter meaning electricity transformer rooms static continuity units two way amateur radios and cellular phones can be used only at a minimum distance of 1 5m from any part of the camera Any instrumentation or equipment for professional use locat...

Page 10: ...rformance ensure that all software programs residing on the workstation are virus free and have been adequately tested so they will not impact imaging applications after installation 2 1 Symbols Sirona Dental products display markings to indicate compliance with regulatory requirements and applicable technical standards Indicates Type BF equipment in accordance with applicable medical device safet...

Page 11: ...n point for the reuse or recycling of waste electrical and electronic equipment The separate collection and reuse or recycling of Electrical and Electronic waste equipment will help to conserve natural resources and ensure that it is recycled in a manner that protects the environment and human health For more information about where you can drop off your waste equipment for recycling please contac...

Page 12: ... Sidexis 4 version 4 2 or higher is installed ü Sidexis 4 is closed ü The camera is not connected to the PC 1 Log onto your PC with an administrator account 2 Insert the SiroCam UAF Plus CD into your PC s CD DVD drive 3 Browse for the Sidexis Video Modules setup folder and open it 4 Double click on the setup file to start the installation Ä The setup window opens 5 At the Welcome screen click Next...

Page 13: ...Dentsply Sirona Operating Instructions SiroCam UAF Plus 3 Installation 3 1 Install Sidexis 4 video modules 66 90 643 D3762 D3762 201 01 01 02 08 2018 13 7 When setup is complete click Finish ...

Page 14: ...n 4 2 or higher is installed ü Sidexis 4 is closed ü The camera is not connected to the PC ü You are logged into your PC with an administrator account ü The SiroCam UAF Plus CD is in your PC s CD DVD drive 1 Browse for the Sirona UAF Plus Module setup folder and open it 2 Double click on the setup file to start the installation Ä The setup window opens 3 At the Welcome screen click Next 4 Please w...

Page 15: ...Dentsply Sirona Operating Instructions SiroCam UAF Plus 3 Installation 3 2 Install Sirona UAF Plus module 66 90 643 D3762 D3762 201 01 01 02 08 2018 15 5 When setup is complete click Finish ...

Page 16: ... for the first time make sure you have cleaned it thoroughly Procedures for cleaning the camera handpiece and the lens surface can be found in the Cleaning section of this document 4 2 Camera description Number Description 1 Camera head with lens 2 Multi function button 3 Camera handpiece 4 Cable with USB connector 4 3 Connect the camera Connect the camera to a USB 2 0 or 3 0 port on your computer...

Page 17: ...ttom of the Sidexis window Click on the Show Video button on the camera settings page If the camera is on perform any of the following actions to turn the camera OFF Return the camera to its holder Press and hold the camera button for about 1 second Press the ESCAPE key on your keyboard Click on the X button in the video window 4 4 2 Keyboard shortcuts The following keyboard shortcuts are availabl...

Page 18: ...amera into the protective hygienic sleeve Ensure that the plastic side of the hygienic sleeve packaging is facing up 2 Insert the camera into the hygienic sleeve until the camera head is snug inside it Ensure that no air bubbles or wrinkles have formed between the lens surface and the protective hygienic sleeve 3 Holding the white edge of the protective hygienic sleeve firmly pull the top plastic ...

Page 19: ...4 2 or above is installed 1 Start Sidexis 4 Ä During Sidexis 4 startup the camera LEDs will blink three times to indicate a valid installation of the video module and to confirm that the camera is ready for normal operation 2 Click on the Patient button in the phase bar and select a patient If you do not select a patient you will be prompted to select one before images are imported and saved in Si...

Page 20: ...e camera will auto focus automatically during operation When positioning the camera find an optimal distance from the object or image area For example a distance of about 4 mm may be considered optimal when focusing on a single tooth Viewing Live Video 4 8 Display and capture still images To capture one or more still images perform the following steps ü Live video is streaming inside the Sidexis w...

Page 21: ...hich images you wish to retain and which ones to remove 4 9 1 Saving images To select images to be saved perform the following steps ü Captured still images are available 1 If the images are already selected to be saved meaning that they are shown with checkmarks next to them no further action is needed These images will be saved at the end of the current video session 2 If the patient is register...

Page 22: ...hem no further action is needed These images will not be saved at the end of the current video session All images to be discarded 4 9 3 Changing selections If you wish to save one or more images and discard the rest perform the following steps ü Captured still images are available 1 To change the selection of one or more images individually click the symbol either checkmark or X mark next to the i...

Page 23: ...ply Sirona Operating Instructions SiroCam UAF Plus 4 Operation 4 9 Save or discard images in Sidexis 4 66 90 643 D3762 D3762 201 01 01 02 08 2018 23 One image selected to be saved the others to be discarded ...

Page 24: ... are imported in Sidexis For information about the controls refer to the graphic and descriptive table below Video window controls Video Window Control Description A Scrolls through multiple still im ages one by one from top to bot tom Arrow at top of column per forms similar function but scrolls from bottom to top B Changes the mark for all the im ages in the column toggling be tween save and dis...

Page 25: ...cture tree 3 Click on Options 4 To close the video window automatically and to retain all images marked to be saved ensure that the Close video form right after camera deactivation Save stored video images box is checked 5 To mark all still images automatically to be saved ensure that the Mark saved video images for later import box is checked 6 If the patient is registered already any images mark...

Page 26: ... a recommended cleaning product and wait 30 seconds Do not expose the camera cable connector to any amount of liquid 7 After the camera has been wiped two times remove potential chemical build up from the camera by wiping it with a sterile lap sponge saturated with de ionized water 8 Use a sterile dry lap sponge to dry the camera or cable as needed 9 Place the camera in a clean environment ready f...

Page 27: ... 6 2 Physical Camera length mm 195 Camera diameter mm 26 maximum Camera head diameter mm 11 Camera weight g 210 with cable Cable length m 2 4 measured from camera back sleeve to connector Cable connection USB 2 0 or 3 0 Housing material Glass fiber reinforced plastic Camera window material Sapphire Protection Liquid tight camera head 6 3 Electrical Output signal UVC signal via USB 2 0 or 3 0 compl...

Page 28: ...ions CAN CSA C22 2 No 601 1 M90 Medical Electrical Equipment Part 1 General Requirements for Safety EC 93 42 EEC Medical Device Directive IEC60601 1 Medical Electrical Equipment Part 1 General Requirements for Safety IEC60601 1 2 Medical Electrical Equipment Part 1 General Requirements for Safety 2 Collateral Stan dard Electromagnetic Compatibil ity Requirements and Tests UL60601 1 Medical Electri...

Page 29: ...red with synthetic material the relative hu midity should be at least 30 Electrical fast transient burst according to IEC 61000 4 4 1kV for input and output lines 2 kV for power sup ply lines 1 kV for input and output lines 2 kV for power sup ply lines The quality of the line power supply should be that of a typical commer cial or hospital environment Surge voltages accord ing to IEC 61000 4 5 1 k...

Page 30: ... in meters m Field strengths from fixed RF trans mitters as determined by an elec tromagnetic site survey 2 should be less than the compliance level 3 in each frequency range Interference is possible in the vicin ity of equipment bearing the follow ing graphic symbol 1 The higher frequency range applies at 80 MHz and 800 MHz 2 The field strengths of fixed transmitters such as base stations of radi...

Page 31: ...tallation please refer to the following table for recommended actions Potential Cause Recommendation Installed version of Sidexis soft ware is not supported Please install Sidexis 4 2 or above first and repeat the instal lation of the Sidexis 4 Video Mod ules Video module is not installed Please repeat the installation of the Sidexis 4 Video Modules Sidexis 4 is not installed Please install Sidexi...

Page 32: ...ns cleaning Liquid has spilled into handpiece Contact dealer for support Images appear too dark Potential Cause Recommendation LEDs are not functioning Contact dealer for support No images appear Potential Cause Recommendation USB cable is incorrectly con nected or is not connected Ensure USB cable is connected correctly to PC workstation NOTE If the above actions do not resolve your issue please ...

Page 33: ... D3762 D3762 201 01 01 02 08 2018 33 9 Accessories and consumables Accessories Illustration Designation Lot size Purchase order number SiroCam UAF Plus holster 1 pc 6679810 Consumables Illustration Designation Lot size Purchase order number SiroCam UAF Plus hygienic sheaths 1 box 300 pcs 6679802 ...

Page 34: ... be required due to technical improvements Sirona Dental Systems GmbH Sprache englisch Printed in Germany D3762 201 01 01 02 08 2018 Ä Nr 000 000 Sirona Dental Systems GmbH Fabrikstr 31 64625 Bensheim Germany www dentsplysirona com Order No 66 90 643 D3762 ...

Reviews: