


39
DENT Instruments
PowerScout HD
Meter Installation
I
NSTALLATION
S
EQUENCE FOR
W
ALL
M
OUNT
E
NCLOSURE
M
ODELS
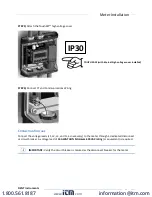
The following section illustrates the PS12HD-C-D-N model. The PS24HD-C-X-N, PS3HD-C-D-N, and
PS48HD-C-X-N components are slightly different but follow the same procedure.
STEP 1)
Remove top cover screws (4x) and high voltage cover screws (2x) – provided
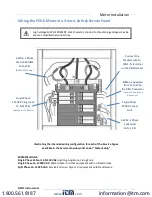
STEP 2)
Locate, mark, and drill wall mounting points (2x–6x—user supplied)
The plastic enclosure itself can be used as a template for marking the drill locations on the wall.
If the meter is not available for use as a drill template, a drawing indicating the spacing between
mounting holes can be found in the appendix. The centerline holes are intended for fastening to wall
studs. If hollow wall fasteners are used, the outer 4 mounting points are recommended.
#8 Fastener
www.
.com
1.800.561.8187


