background image

3.2. STATUS BAR 

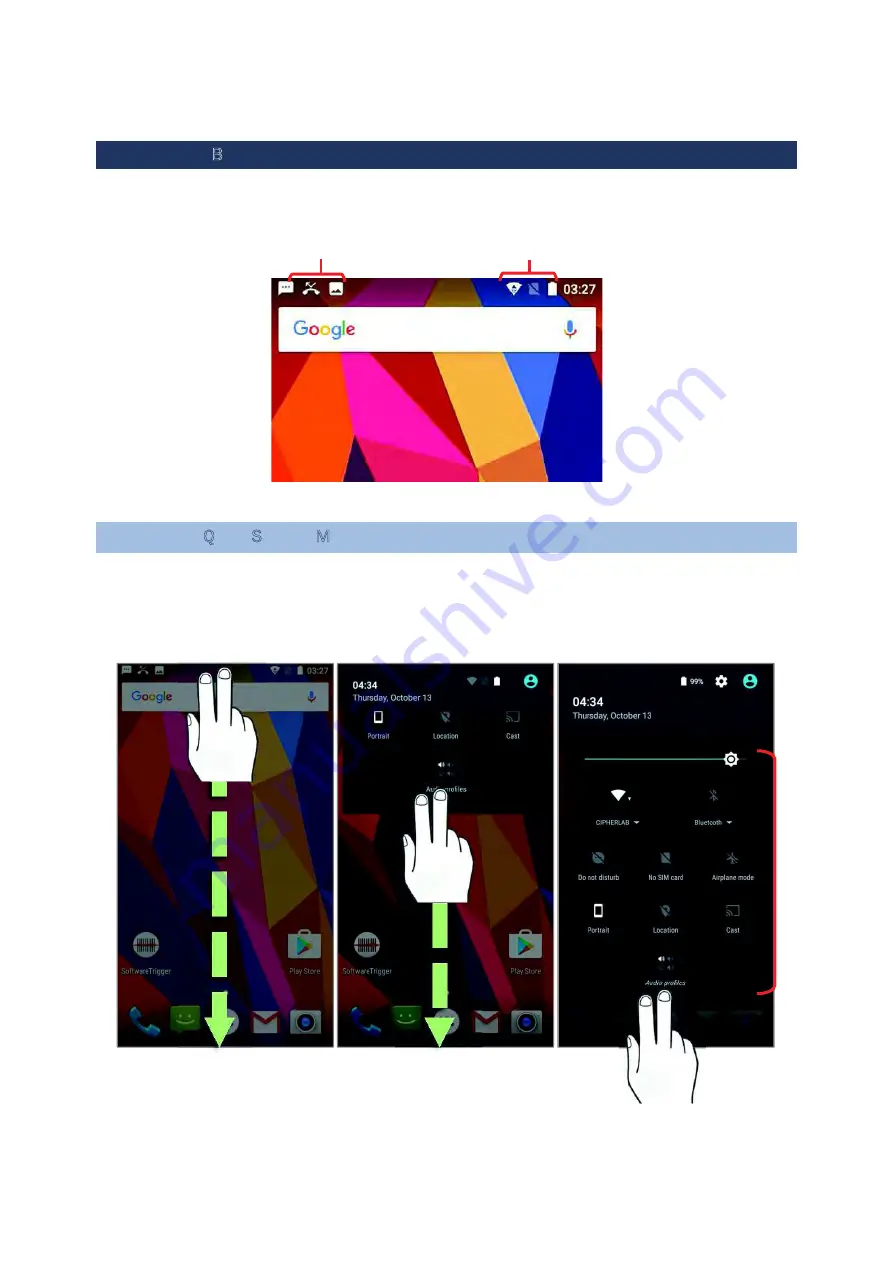
The left side of the status bar shows 

notification icons

, and the right side of the status 

bar shows 

status icons

.

3.2.1. OPEN QUICK SETTING MENU   

The

status icons

 are related to essential settings regarding the device’s remaining power, 

Bluetooth status or Wi-Fi connectivity status. The status bar offers a quick access for you to 
easily make adjustments of the settings. To open 

Quick Setting

 menu, use you two fingers, 

swipe from the top to the bottom of the screen. You can tap on each status icon on the menu 
to switch among different modes or enter the settings. 

Status icons

Notification 

Quick   
Setting 

Summary of Contents for RS 31 BHT-1600

Page 1: ...1 RS31 BHT 1600 Mobile Computer Android 6 0 Marshmallow Version 1 02 YKX 3GT GR...

Page 2: ...us in writing The owner does not warrant that this document is error free No part of this publication may be reproduced stored in a retrieval system or transmitted in any form or by any means electro...

Page 3: ...by one or more of the following measures Reorient or relocate the receiving antenna Increase the separation between the equipment and receiver Connect the equipment into an outlet on a circuit differ...

Page 4: ...e these wireless telecommunications devices The standard for compatibility of digital wireless phones with hearing aids is set forth in American National Standard Institute ANSI standard C63 19 There...

Page 5: ...use undesired operation of the device Le pr sent appareil est conforme aux CNR d Industrie Canada applicables aux appareils radio exempts de licence L exploitation est autoris e aux deux conditions su...

Page 6: ...LAN devices Avertissement Le guide d utilisation des dispositifs pour r seaux locaux doit inclure des instructions pr cises sur les restrictions susmentionn es notamment i les dispositifs fonctionnan...

Page 7: ...pour les bandes 5250 5350 MHz et 5650 5850 MHz et que ces radars pourraient causer du brouillage et ou des dommages aux dispositifs LAN EL...

Page 8: ...on can be achieved if the products can be kept as far as possible from the user body or set the device to lower output power if such function is available A minimum separation distance of 0 5 cm must...

Page 9: ...rst time Main battery The main battery powers the handy terminal to work It takes approximately 4 hours to charge an empty main battery to full The charging LED above the screen will light up in red w...

Page 10: ...nning The scanning light goes off once the data is decoded or when the decode timeout period has passed Scan a 2D barcode 1 Open ReaderConfig and tap Scan Test on the menu bar 2 Aim the scanning windo...

Page 11: ...TENANCE This handy terminal is intended for industrial use The handy terminal is rated IP67 however damage may be done to the handy terminal if it is exposed to extreme temperatures or soaked in water...

Page 12: ...USA AND CANADA E LABEL...

Page 13: ...EUROPE EU DECLARATION OF CONFORMITY...

Page 14: ......

Page 15: ...v2 1 EDR and 802 11a b g n technologies the handy terminal also includes a GSM GPRS EDGE WCDMA UMTS HSDPA HSUPA HSPA LTE module to gain greater speeds and optimal mobility In particular an integrated...

Page 16: ...g n GSM GPRS EDGE WCDMA UMTS HSDPA HSUPA HSPA LTE and near field communication NFC A 4 7 color transmissive display with 720x1280 pixels to deliver excellent visibility in all lighting conditions Conf...

Page 17: ...Chapter 1 QUICK START This chapter helps you get ready for starting using the handy terminal IN THIS CHAPTER 1 12 1 Overview 16 1 2 Charging Communication 25...

Page 18: ...1 1 OVERVIEW N o Description N o Description 1 Front Camera 2 Proximity ALS Sensor Hole 3 Receiver 4 Status LED 5 Power Button 6 Side Key...

Page 19: ...9 Charging Pins 10 Speaker 11 Touchscreen 12 Sub Microphone 13 Headset Jack 14 Scan Window 15 Battery Cover Latch and Lock 16 Volume Buttons 17 Micro USB Port 18 NFC Detection Area 19 Battery Cover 2...

Page 20: ...away from the device 3 Insert the main battery with the contact pins facing the lower end Fix the top edge of the battery first 4 Press down the lower edge of the battery 5 Fix the lower edge of the b...

Page 21: ...n 2 Insert your fingernail into the groove between the case and the top of the cover with a little force lift the battery cover up and away from the device 3 Lift the battery up from its lower end 4 R...

Page 22: ...2 card and SAM card should be facing upwards 3 Replace the battery cover and push the battery lock back to the lock position Note Both SIM1 and SIM2 card slots support 2G 3G 4G cards However you can h...

Page 23: ...shields the handy terminal from impact due to bumps drops and scratches To fit the handy terminal in the hardshell 1 Fix the upper end of the handy terminal in at a 45 degree angle 2 Press the two low...

Page 24: ...inal opens to show the Home Screen Note For the handy terminal to power on the battery cover must be secured in place POWER OFF To power off the handy terminal press and hold the power button for more...

Page 25: ...mediate choice of home screen By selecting AppLock you will directly enter AppLock application please refer to AppLock User Guide for detailed instructions on AppLock settings to start configuring the...

Page 26: ...ive window or keyboard Home button Displays the Home screen Recent apps button Opens a list of recently used applications 1 1 7 CONNECTING HEADSET The headset jack is located on the top of the handy t...

Page 27: ...ain battery is removed RTC retention will be maintained for at least 30 minutes Backup battery The backup battery is mounted on the main board Its role is to temporarily keep the handy terminal in sus...

Page 28: ...an electrical outlet While the device battery is being charged the LED on handy terminal will indicate charging status Note The Direct Cable is for charging only For data communication use the micro U...

Page 29: ...m the PC client To transfer all types of files between your device and PC choose File transfers To transfer videos and photos you can select Photo transfer PTP in which your device will share only vid...

Page 30: ...you through the fundamental usage and features of this device IN THIS CHAPTER 2 1 Battery 29 2 2 Memory 39 2 3 Touch Screen 50 2 4 Notifications 55 2 5 Date and Time 57 2 6 Language Keyboard Input 58...

Page 31: ...battery and can retain data in the DRAM for 30 minutes when it is fully charged as long as wireless modules on the handy terminal are inactive The backup battery can be charged by the main battery or...

Page 32: ...battery level remaining in the main battery To check the exact remaining percentage of power and battery life 1 Use two fingers to swipe down from the top of the screen to open Quick Settings 2 The p...

Page 33: ...attery notification will be displayed on the screen 2 Data loss with RAM may occur when battery level is low Always save data before the battery runs out of power or keep a fresh battery for replaceme...

Page 34: ...ery level percentage is also shown to provide a clear grasp of the remaining battery power The screen also shows the rate of battery discharge since the last battery charging session how long the devi...

Page 35: ...whole time This mode will limit the use of location services vibration and most background processing data On Battery Settings screen tap on More and then select Battery saver Switch on the function a...

Page 36: ...n Battery Settings screen tap More and then select Battery optimization On dropdown list select All apps all the applications will be optimized by this function by default You can individually turn of...

Page 37: ...to 15 the handy terminal prompts a warning reminding you to charge the main battery Connect the handy terminal to an external power source or replace the main battery pack as soon as possible To repl...

Page 38: ...the pop up menu The handy terminal will power off 3 Open the battery cover and insert a charged main battery as in Installing Battery 4 Press the power button to power on the handy terminal Note Befor...

Page 39: ...tery cover Upon the removal of the cover the system will prepare to enter suspend mode with the red light lit which will last for 3 to 5 seconds 3 Flip the device over to observe the Status LED on the...

Page 40: ...me See Screen Timeout Settings Reduce the screen brightness level see Screen Brightness Shut down automatic data syncing of applications such as Email Calendar and Contacts Enable Battery saver mode a...

Page 41: ...ved or drained the backup battery on the main board takes over to supply the handy terminal and keep it in suspension A fully charged backup battery will retain the data in the RAM for 30 minutes When...

Page 42: ...mpacted the device s overall performance To figure out how the system and apps have been taking up the memory over a longer period tap the dropdown list to choose a different time span To look at how...

Page 43: ...lace Tap All Apps Settings Storage USB to check usage of the internal and external storage spaces CHOOSE DEFAULT STORAGE By default all the videos photos and downloaded files are directly saved to the...

Page 44: ...client On Storage USB screen this disk can be managed separately To start 1 Connect your handy terminal with PC with supplied USB cable swipe down from the status bar to reveal Notifications Panel tap...

Page 45: ...format allows the card to be readable on other devices such as PC or a digital camera 5 At the window asking you whether to change the write disk from internal storage default to the SD card tap OK t...

Page 46: ...nal storage On Storage USB screen tap the SD card Before you start make a backup of the files on this disk if you would like to keep them 2 On SD card content screen tap More and then tap Settings 3 B...

Page 47: ...RD AS INTERNAL STORAGE Using SD card as internal storage allows you to extend your existing device storage and to store huge applications This SD card will be reformatted and encrypted with a file for...

Page 48: ...te that In this setting you will have no control of which files to be stored on SD card Warning Do not physically remove the SD card from the device without ejecting this card in advance To eject this...

Page 49: ...t an SD card is detected tap SET UP 2 Tap Use as internal storage and then NEXT 3 Tap ERASE FORMAT to format this card 4 You will then be asked to whether to move media files to this new SD card make...

Page 50: ...ormat to have this SD card re formatted into a file type inaccessible by other devices 4 On Move data now screen tap MOVE to migrate data from the device s storage to SD card and have the SD card beco...

Page 51: ......

Page 52: ...CREEN BRIGHTNESS Tap All Apps Settings Display Brightness Adjust screen brightness by dragging the slider to the right to increase brightness or left to reduce brightness Switch on the Adaptive bright...

Page 53: ...vice is rotated and them select Stay in portrait view to turn the rotation function off or tap Rotate the contents of the screen to enable it OR Use two fingers to swipe down from the top of the scree...

Page 54: ...tation function Tap All Apps Settings Accessibility and switch off Auto rotate screen By doing so the auto rotation option will be hidden on Quick Settings menu as well as in Settings Display Note Aut...

Page 55: ...2 3 3 SCREEN TIMEOUT SETTINGS Tap All Apps Settings Display Sleep Select the time lapse for screen timeout...

Page 56: ...2 3 4 TEXT SIZE Tap All Apps Settings Display Font size Select the font size between Small Normal Large and Huge...

Page 57: ...battery is ready to be removed Please refer to Battery Hot Swap to perform a successful battery hot swapping Note For Scanner decode and Scanner beam LED to function LED notification must be enabled...

Page 58: ...ul when working in noisy environments You may also set the handy terminal to vibrate only in which all system sounds will be muted and replaced by the vibrator On any screen press down Volume Up or Vo...

Page 59: ...e manually 1 Tap All Apps Settings Date time 2 Tap Automatic date time and select Off to disable using network provided time 3 Deselect Automatic time zone 4 Tap Set date Use the sliders to select the...

Page 60: ...ge the system language default keyboard type and configure keyboard input and speech settings 2 6 1 CHANGE DISPLAY LANGUAGE On Language input screen tap Language and then select your desired system la...

Page 61: ...tual keyboard will vary depending on the data type text or numbers this field requires SELECT KEYBOARD INPUT METHOD On Language input screen select Current Keyboard to change your current keyboard or...

Page 62: ...n until a settings button appears A menu will open allowing you to adjust input language if you would like to use an input language different from the system language or keyboard settings By tapping A...

Page 63: ...input methods you enabled in Current Keyboard under Language input are available by tapping on the on screen keyboard to use other input methods simply tap it to cycle through the options English US K...

Page 64: ...T Tap and hold text on the screen to enable a text editing menu for selecting all text or copying and pasting text within or across applications Some applications may use different ways to select or e...

Page 65: ...d To enter Numeric Symbol keyboard tap On Numeric Symbol keyboard tap to access more symbols or tap to return to Android English US keyboard On Android English US keyboard you can input number or symb...

Page 66: ...English US Keyboard...

Page 67: ...ENTER UPPERCASE LETTERS Tap and hold the Shift key and tap a character key to enter an uppercase letter The letters will return to lower case once an uppercase letter is entered English US Keyboard...

Page 68: ...2 7 SOUND AND VOLUME Use the volume buttons on the left side of the handy terminal to adjust system and ringer volume...

Page 69: ...ur programmable keys volume up volume down and the left and right function keys side keys After redefining the programmable keys the changes will immediately take effect ENABLE WAKEUP Select the Enabl...

Page 70: ...CODE Tap the key you would like to assign A screen opens showing a list of available keycodes or applications On the Keycodes tab page scroll down to view the entire list of keycodes and tap a keycode...

Page 71: ...page to open a list of available applications Scroll down to view the entire list of applications and tap an application to apply After an application is selected an icon will appear next to the assi...

Page 72: ...ply the same setting to other devices To do this tap More and then Export This configuration file will be saved in the internal storage as keys_config txt To share it with other devices tap and hold t...

Page 73: ...to be used in Programming Keys make sure the file is saved in the phone s internal storage with the file name keys_config txt On Programming Key screen tap More and then Import The new setting will be...

Page 74: ...RESTORE FUNCTION To restore a key to its previously assigned function tap menu key and then tap Reset to default...

Page 75: ...lt while running the ReaderConfig application If you need to scan barcodes that are encoded in a different symbology enable the symbology first 2 9 2 DIGITAL CAMERA An integrated 8 megapixel rear came...

Page 76: ...check system statuses and manage notifications The add on utilities for applications regarding data collection processing and transmission are introduced in the following chapters IN THIS CHAPTER 3 1...

Page 77: ...SCREEN When the handy terminal is fully charged press the Power key for three seconds to turn on the handy terminal A locked screen will appear Slide the lock button in either direction to unlock the...

Page 78: ...s and a dock bar containing an All Apps button The home screen allows multiple pages for placing shortcut icons and widgets You may customize the home screen according to your preferences Shortcut ico...

Page 79: ...O HOME SCREEN 1 On the home screen you would like to customize tap All Apps 2 Locate the application to add tap and hold the application icon 3 The home screen will appear Drag the application icon to...

Page 80: ...pear on the bottom Tap Widgets to enter the widget selection list 3 In the widget selection list scroll to locate your desired widget 4 Tap and hold the widget until the home screen layout appears Dra...

Page 81: ...nd hold it to enter layout edit mode a floating option X Remove will appear on top of the screen to which you can drag the unwanted shortcut to remove it Drag the icon to the preferred position and re...

Page 82: ...LLPAPER 1 Tap and hold any empty spot on the home screen 2 Tap Wallpapers in the menu that appears 3 Select an image to apply as the wallpaper 4 Tap Set wallpaper at the bottom of the wallpaper previe...

Page 83: ......

Page 84: ......

Page 85: ...e to customize tap and hold the application shortcut you would like to move drag the icon on the top of another icon to create a folder 2 As these icons overlap a folder is created 3 After you let go...

Page 86: ...older will expand from a small circle to a full rectangle to show all the shortcuts in it Tap Unnamed Folder and edit the folder name 3 Tap Done on the on screen keyboard 4 Tap elsewhere on the screen...

Page 87: ...hold the folder you would like to remove 2 Drag the folder to the top of the screen where the option X Remove is located Note Please note that when you remove a folder the shortcuts contained in it w...

Page 88: ...s regarding the device s remaining power Bluetooth status or Wi Fi connectivity status The status bar offers a quick access for you to easily make adjustments of the settings To open Quick Setting men...

Page 89: ...pe down from the status bar to open Notifications Panel Tap on the individual notification card to carry our immediate action or to open the corresponding application DISABLE NOTIFICATION You can chan...

Page 90: ...le notification simply swipe the notification card right or left You can also dismiss all notifications at a time by tapping Ongoing notifications and notifications that require subsequent activity to...

Page 91: ...ntacts Manages contact information and shares or exports imports the information to other devices or SD card Downloads List all files downloaded on the handy terminal Drive An Android built in applica...

Page 92: ...ion providing access to a digital distribution service including a digital media store the Google Play Store operated and developed by Google Reader Config Sets scanner preferences data output format...

Page 93: ...WEEN APPLICATIONS Swipe up or down to cycle through the listed applications tap on your desired one to open it on the screen END APPLICATION Slide an application to the left or right or tap the X on t...

Page 94: ...RS31 BHT 1600 Press the power button to suspend the handy terminal The handy terminal will automatically suspend when the time period set in Screen Timeout Settings has passed without any activity 3 4...

Page 95: ...ting a pattern Voice Unlock Pin or Password method you can access advanced settings and Smart Lock to customize personal lock settings Warning To save battery power suspend the handy terminal when not...

Page 96: ...wireless network connection to the Internet is established on the handy terminal Note To avoid any additional charges to your wireless data plan Wi Fi connection to the Internet is recommended for dow...

Page 97: ...r an available system update file on the SD card Note Make sure the SD card is inserted in the handy terminal If not the screen will show that your system is currently up to date If there is a later v...

Page 98: ...ack up your photos and videos Tap All Apps Photos to sync the files on your device with Google Photo Library 2 To back up other documents such as audio or video files on the device s storage you can m...

Page 99: ...ce back to its original state in which it is powered on by you for the first time It is strongly recommended that you follow the instructions in Back up Your Data to back up important data before perf...

Page 100: ...ntegrated on the handy terminal lets you configure and connect to network wirelessly IN THIS CHAPTER 4 1 Use Wireless Wide Area Network 99 4 2 Use Wireless Local Area Network Wi Fi 109 4 3 Use Bluetoo...

Page 101: ...ou insert a SIM card and turn on data connection for the first time 1 When a SIM card is inserted a dialog will appear confirming the mobile carrier detected you may tap Touch to set up to enter the s...

Page 102: ...bile carrier 1 Tap All Apps Settings More Cellular networks Access Point Names 2 Tap the button and tap each field to input the APN name and settings obtained from your mobile carrier 3 When finished...

Page 103: ...with a maximum of eight devices by turning the handy terminal into a Wi Fi hotspot BLUETOOTH TETHERING To share data connection through Bluetooth tethering 1 Pair the handy terminal with the device o...

Page 104: ...USB cable A USB icon will appear at the top of the screen and in the Notifications panel a description Connected as USB Storage will appear 2 Tap All Apps Settings More Tethering portable hotspot 3 T...

Page 105: ...sharing through Wi Fi The handy terminal will start broadcasting its SSID for other devices to connect 3 Tap the Wi Fi hotspot label to manage Wi Fi hotspot settings set when to turn the Wi Fi hotspot...

Page 106: ...Apps Settings Data usage 2 The Overview tab page opens showing a summary of data usage for your mobile network and Wi Fi connection Open the tab page of your mobile carrier to view a chart of data usa...

Page 107: ...r your mobile carrier A dialog box appears confirming whether you would like to enable data roaming Tap OK to confirm RESTRICT BACKGROUND DATA 1 On the data usage tab page for your mobile carrier tap...

Page 108: ...the handy terminal is connected to a Wi Fi network 4 1 2 DATA CONNECTION SETTINGS TURN ON OFF DATA CONNECTION To manually turn on off mobile data connection 1 Tap All Apps Settings Data usage 2 Select...

Page 109: ...SELECT DATA CONNECTION TYPE Tap All Apps Settings More Cellular network tap Preferred network type to select...

Page 110: ...Lock SIM card 3 Enter the PIN to enable SIM card lock Once enabled you are required to enter the PIN code in order to use the phone CHANGE PIN CODE To change the PIN code 1 Tap All Apps Settings Secur...

Page 111: ...e networks Select a network to connect OR 1 Tap All Apps Settings Wi Fi 2 Tap the Wi Fi switch to scan for available networks Select a network to connect If the network is an open one the handy termin...

Page 112: ...A and the Phase 2 authentication in the drop down box None MSCHAPV2 GTC Select a CA certificate and User certificate if required certificates may be installed under All Apps Settings Security Install...

Page 113: ......

Page 114: ...ntly downloaded or placed on the internal storage Wi Fi Direct Enables your device to connect with a Wi Fi Direct capable device MAC address Displays the MAC address of the device when connecting to W...

Page 115: ...to assign an IP address when connecting to a wireless network You may set for the device to connect to a network using a static IP address 1 Tap a network in the available Wi Fi hotspot list 2 Tap Ad...

Page 116: ...rk in the Wi Fi hotspot list 2 Tap Modify network in the pop up menu 3 In the dialog box that opens modify the network settings and tap Save 4 2 8 DISCONNECT WI FI NETWORK To disconnect a connected ne...

Page 117: ...boards pointing devices etc Object Push Profile OPP Pushes and pulls objects to and from a push server Hands Free Profile AG1 5 HFP Allows using a hands free device to place and receive calls Advanced...

Page 118: ...hile enabling the Bluetooth visibility of this device OR 1 Tap All Apps Settings Bluetooth 2 Tap the switch to turn on this function while enabling the Bluetooth visibility of this device Note After t...

Page 119: ...LUETOOTH NAME To change the Bluetooth name of this handy terminal 1 On the available Bluetooth devices screen tap More and select Rename this device in the pop up menu 2 Type a new name in the field a...

Page 120: ...r a passkey or confirm the assigned passkey on the device to pair if a smart pairing method is applied Enter confirm the passkey on the device to pair 3 Once pairing is done the Bluetooth device will...

Page 121: ...handy terminal can collect information from NFC tags exchange information with other NFC supported devices and even change information on the NFC tag if authorized Before starting to communicate thro...

Page 122: ...terminal in close proximity with the other device you would like to share data with 3 When the two devices connect a Touch to beam notification will appear on the screen 4 Touch the screen to initiat...

Page 123: ...k over Wideband Code Division Multiple Access WCDMA Insert the SIM card before turning on the power Refer to Installing SIM Card SAM Card and Memory Card Note If the SIM card is not in position you ma...

Page 124: ...ed on notifying that a SIM card is detected 1 Tap Touch to set up 2 The SIM cards screen opens showing the name of the mobile carrier and the current phone settings 3 To open the SIM management screen...

Page 125: ...hone Power is on a signal icon appears on the status bar The number of bars indicates the strength of the connection 2 Tap All Apps Phone The Phone application opens 3 Tap the settings button to open...

Page 126: ...the call If you need to frequently make calls to an interactive voice system you may tap next to the number and select Add 2 sec pause for soft pause a pause of 2 seconds to the buttons or a hard paus...

Page 127: ...es the following buttons Button Description Opens the dial pad Turns on the speaker Mutes the call Places the call on hold Add call Adds another person to the call Start Stop recording Record this con...

Page 128: ...PLACE CALL USING CONTACTS To make a call using contacts 1 In the phone application page tap 2 Tap a contact to initiate a call...

Page 129: ...on the handy terminal tap to pick it up Incoming calls will be logged in the Phone application in the case of a missed call a notification will be displayed See Check Missed Calls To mute the rington...

Page 130: ...ation icon will appear on the status bar the LED on the top of the screen will also blink red for notification The number of missed calls will also be displayed next to Phone icon Unlock the screen an...

Page 131: ...plication page tap the History button to open a list of history calls Or you can tap settings button and then Call History Button Description Connected calls Missed calls 2 Tap the phone icon next to...

Page 132: ...add the first call to the conversation A three party conference call is initiated To add a fourth member tap The three party call will be put on hold Enter another number to call and tap to initiate t...

Page 133: ...adset to the handy terminal for audio output during calls USE BLUETOOTH HEADSET See Pair Bluetooth Devices to connect the handy terminal to a Bluetooth device The speaker phone becomes muted when a Bl...

Page 134: ...SING READER CONFIGURATION UTILITY The Reader Configuration utility allows you to manage the barcode reader integrated on the handy terminal IN THIS CHAPTER 6 1 Configure Reader 133 6 2 Read Printed Ba...

Page 135: ...with a Reader Config to configure the scan engine built inside Use it to create a profile of settings that best suits your needs LAUNCH READER CONFIG To launch Reader Config 1 Tap Apps Reader Config...

Page 136: ...neral Settings is where all reader settings are accessed from Tap each item to enter its sub menu The functions under General Settings include Scanner Preferences Data Output Enable Reader enabled by...

Page 137: ...PREFERENCES Options on the Scanner Preferences page differ according to the type of scan engine built within the handy terminal To open Scanner Preferences page 1 Open Reader Config as described in L...

Page 138: ...er Char Gap Size Sets the intercharacter gap size for Code 39 and Codabar Switch between Normal and Large Normal Scan Mode Sets the reader s scanning behavior Level The decoding process is activated b...

Page 139: ...tween 2 and 30 10 DATA OUTPUT Data Output allows users to set the way to output decoded data To open Data Output settings page 1 Open Reader Config as described in Launch Reader Config 2 Tap Data Outp...

Page 140: ...Prefixes the output data with code type information Deselected Disabled Display Code Length Suffixes the output data with code length information Deselected Disabled Prefix Affixes 0 to 10 characters...

Page 141: ...p Notification Settings Setting Description Default LED Enable LED when good read Selects to enable disable LED light left for scanning good read See Status LED for details Deselected Disabled Vibrato...

Page 142: ...omize and transmit start stop characters Verify transmit check digits Enable disable addon digits Convert to another symbology Transmit symbology ID To open Symbology settings page 1 Open Reader Confi...

Page 143: ...141 Using Reader Configuration Utility 1D Symbologies 2D Symbologies ENABLE DISABLE SYMBOLOGY Tap the label of each symbology to enable or disable it...

Page 144: ...142 SYMBOLOGY SETTINGS Tap the Detail label below each symbology to access detailed settings for the specific symbology For details about the featured settings See 2D Imager...

Page 145: ...tion allows enabling code ID transmission for easy identification of the scanned barcode Setting Description Default Transmit AIM Code ID Sets whether to include AIM code ID character in the decoded d...

Page 146: ...s an option menu which is accessible on the menu bar of the main settings page This menu allows you to test scan barcodes import export all settings in a re usable format reset all settings back to fa...

Page 147: ...Utility SCAN TEST To test scan a barcode 1 Open Reader Config as described in Launch Reader Config 2 Tap the settings button on the menu bar to open the option menu 3 Tap Scan Test in the option menu...

Page 148: ...plement identical Reader Config settings on multiple devices To import settings 1 Open Reader Config as described in Launch Reader Config 2 Tap the settings button on the menu bar to open the option m...

Page 149: ...bed in Launch Reader Config 2 Tap the settings button on the menu bar to open the option menu 3 Tap Export An export page opens allowing you to enter the name and location of the profile to save 4 Tap...

Page 150: ...ble Factory Reset 1 Open Reader Config as described in Launch Reader Config 2 Tap the settings button on the menu bar to open the option menu 3 Tap Reset to Factory defaults A warning dialog appears c...

Page 151: ...149 Using Reader Configuration Utility ABOUT Tap About in the Reader Config option menu to display software version and copyright information...

Page 152: ...g of barcodes 1 Open Reader Config as described in Launch Reader Config 2 Tap Scan Test on the menu bar A Test Scan Form opens for displaying the scanned data 3 Aim the scanning window at the barcode...

Page 153: ...Using Reader Configuration Utility The decoded data will appear on the page When finished viewing tap to leave the test scan page or to save the decoded data as a txt file or clear all data on the scr...

Page 154: ...socket x2 Micro SAM socketx1 COMMUNICATION DATA CAPTURE Communication USB Client USB 2 0 OTG WPAN Bluetooth Class II v4 1 and v2 1 EDR WLAN IEEE 802 11 a b g n networking WWAN Built in WWAN modem for...

Page 155: ...charging time 4 hours 25 Please Charge batteries in temperatures from 0 C to 35 C To ensure that the battery is being charged under a safe condition the battery may disable charging when ambient temp...

Page 156: ...tions Status LED Single LED which lights red when charging green when charging is complete and blue when wireless radio is on Audio Integrated with one speaker dual array digital microphones with echo...

Page 157: ...on condensing Storage 5 to 95 non condensing Resistance Impact Resistance Multiple drops onto concrete at 1 2 m 4 ft on all six sides Tumble Test 150 tumbles 300 drops at 0 5 m per applicable IEC tumb...

Page 158: ...005 Software Development Kit Android 6 0 Marshmallow SDK Reader API JAR for reader configuration SAM API JAR for SAM controller Software Utilities Software Package Reader Configuration Software Trigge...

Page 159: ...157 Specifications...

Reviews: