background image


19 

 
5-3

Setting the Data Transmission Format 

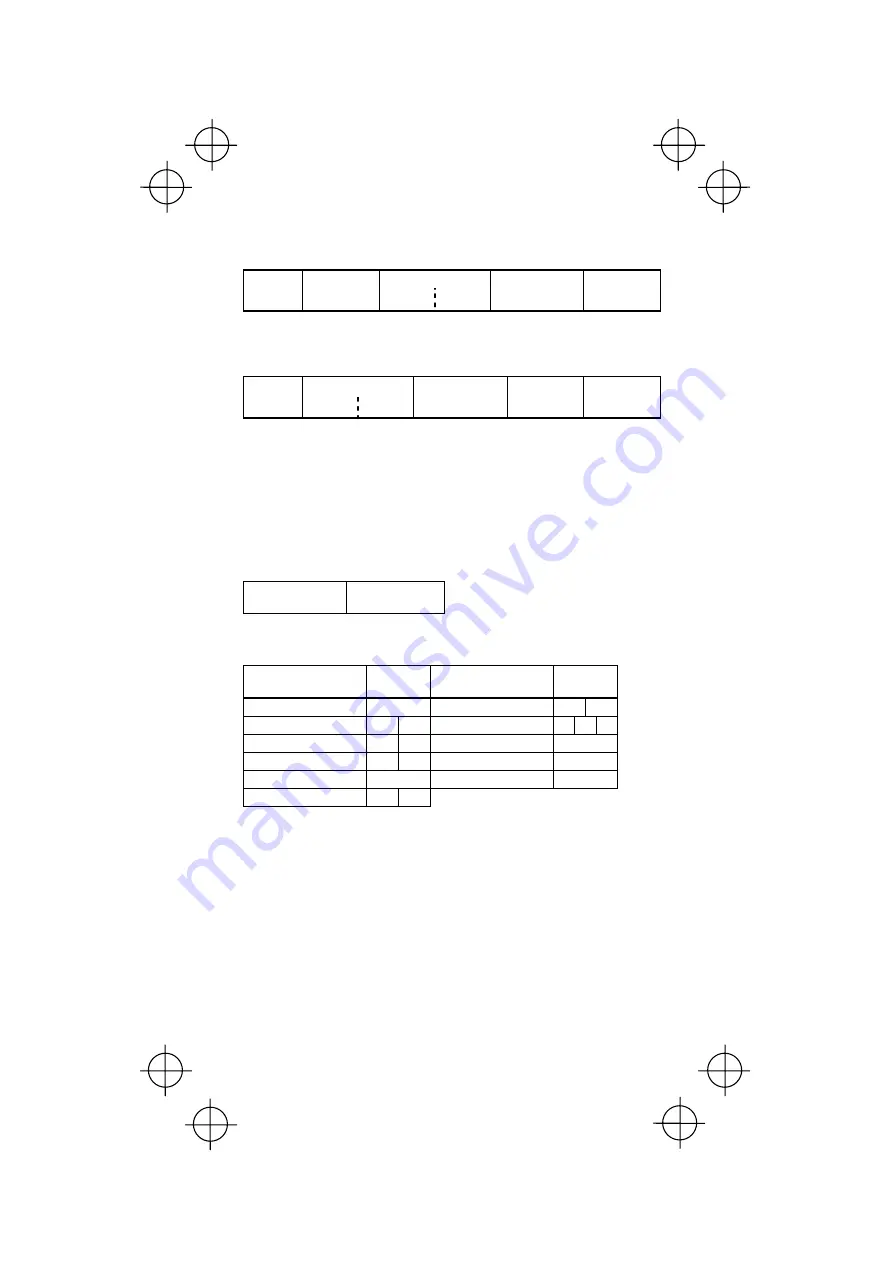
In the following format, data will be transmitted: 

Number of digits 

Header Code 

mark 

n1 n2 

Bar code data 

Terminator 


If you specify that the code mark follows bar code data, then data 
will be transmitted in the following format: 

Number of digits 

Header 

n1 n2 

Bar code data 

Code mark 

Terminator 


You may choose whether or not to transmit the code mark and the number of 
digits, as well as choosing the data transmission format of the header, 
terminator, and bar code data by using bar-coded parameter menus. 

In addition, you may define an arbitrary header and terminator from the ASCII 
character set (00h to 7Fh) and some control codes keyed in, as described in 
Section 5.6. 

The default transmission format is shown below. 

Bar code data 

Terminator 

(ENTER) 


Code Mark 

Bar code type 

Code 

mark 

Bar code type 

Code 

mark 

UPC-A A 

Codabar 

UPC-E C 

Code 

39 

EAN-13 A 

Code 

93  L 

EAN-8 B 

FF 

Code 

128 K 

Standard 2 of 5 

EAN-128 

Interleaved 2 of 5 


Code marks for UPC/EAN with supplemental codes are the 

same as those for the corresponding UPC and EAN codes.

Summary of Contents for HC36 II DTU-K

Page 1: ...Barcode Handy Scanner HC36ⅡTU K HC36ⅡDTU K Operational Manual ...

Page 2: ...ates uses and can radiate radio frequency energy and if not installed and used in accordance with the instruction manual may cause harmful interference to radio communications Operation of this equipment in a residential area is likely to cause harmful interference in which case the user will be required to correct the interference at his own expense Copyright DENSO WAVE INCORPORATED 2005 FIRST ED...

Page 3: ... 3 2 Windows Me 9 3 3 Windows 2000 10 3 4 Windows XP 11 4 USAGE 12 5 SETTING PARAMETERS 13 5 1 Parameter Setting Procedure 14 5 2 Communication Parameter Setting 16 5 3 Setting the Date Transmission Format 19 5 4 Setting Readable Bar Codes 30 5 5 Setting Other Parameters 32 5 6 User Selection Header Terminator Setting 34 5 7 Setting the Minimum Maximum Numbers of Digits Readable 37 6 SPECIFICATION...

Page 4: ...pplication etc Please store this manual carefully Terms and Abbreviation Handy Scanner Scanner These are abbreviation of Barcode Handy Scanner HC36Ⅱ TU K HC36ⅡDTU K PC It is abbreviation of a Personal Computer Windows 98 98SE It is abbreviation of Microsoft Windows 98 98SE Operating System Windows Me It is abbreviation of Microsoft Windows Me Operating System Windows 2000 It is abbreviation of Mic...

Page 5: ... 98 98SE Windows Me Windows 2000 Professional Windows XP Home Edition Windows XP Professional About HUB connection This scanner is connectable also with the bus power HUB not to mention the self power HUB because of a low power device 2 2 Including in this package Barcode Handy Scanner One Operational manual This book One Safety precaution manual One ...

Page 6: ...g bar codes Auto Off mode Center mark This mark is aligned with the center of bar code at reading LED indicator Light up when a reading is completed Cable A cable is for connecting a bar code scanner with a PC USB connector It connects with USB connector of a PC Plug A LED indicator Center mark Reading window Trigger switch Cable USB connector ...

Page 7: ... bar code Do not operate the scanner in an operating environment where static electricity exceeding the guaranteed voltage will be applied Do not pull a cable strongly Do not insert an object such as a sharp stick in the reading window It might damage the scanner dust cover Maintenance Do not wipe with either thinner nor benzine Do not decompose Storage Installation Keep the scanner away from the ...

Page 8: ...unplugging is allowed for USB devices However when the computer is in suspend mode do not plug or unplug their cables When the host computer is processing the communications adapter connection do not plug or unplug any other USB device cables Never disconnect the USB cable when the communications adapter is in communication Doing so will not only lose data but affect the system badly Directly conn...

Page 9: ...indows 98 98SE 2 Connect the scanner interface cable to the computer or USB hub 3 Add New Hardware Wizard starts Click Next to proceed 4 Select the Display a list of all the drivers in a specific location so you can select the driver you want and click Next ...

Page 10: ...7 5 The following screen appears Select USB Human Interface Device and click Next 6 When the following screen appears click Next ...

Page 11: ...vice is working normally open the Windows Device Manager If USB Human Interface Device is added to the sub tree of Human Interface Devices as shown below the scanner is connected normally If the device is not listed or it is marked with or perform the above connection process again from the beginning ...

Page 12: ...ndows Device Manager If USB Human Interface Device is added to the sub tree of Human Interface Devices as shown below the scanner is connected normally If the device is not listed or it is marked with the device is not working normally Perform the connection process above again If marked with the device is disabled so enable it in the Property dialog If marked with a the device is working normally...

Page 13: ...f installation the finish screen appears instead of the screen above Click Finish to return to Windows 4 To check whether the USB device is working normally open the Windows Device Manager If USB Human Interface Device is added to the sub tree of Human Interface Devices as shown below the scanner is connected normally If the device is not added or it is marked with or remove this driver with the u...

Page 14: ...n completion of installation the finish screen appears instead of the screen above Click Finish to return to Windows 4 To check whether the USB device is working normally open Windows Device Manager If USB Human Interface Device is added to the sub tree of Human Interface Devices as shown below the scanner is connected normally If the device is not added or it is marked with or remove this driver ...

Page 15: ...when reading Make the bar code label as flat as possible when it is distorted The handy scanner may not read labels under direct sunshine or in extremely bright places Reading of bar codes turned upside down is possible Take out the labels when it covered with plastic films In case you need to read the same labels twice under Continuous reading mode please move the reading window away form the lab...

Page 16: ...er the PC is turned off To scan bar codes given in those bar coded parameter menus press the trigger switch Beeper Volume Adjustment You may adjust the beeper volume to three levels High Medium and Low The factory default is High Scanning the bar code below will cycle through the High Medium and Low Other Parameters Parameters other than the beeper volume may be set according to the procedure give...

Page 17: ...es during the Bar Code Menu setting Exceeding 3 minutes will cancel all menu setting with the long beep and will automatically set the scanner to the previous mode i e the mode before the bar code setting occurred Bar Code Menu setting procedure Note Note Follow the flow chart page 15 Reading the Setting Start bar code Read the bar code s for setting required function Read the Setting Completion b...

Page 18: ...d End Y N Set communication conditions See p 16 to 18 Set transmission format See p 19 to 29 Set readable codes See p 30 and 31 Set other parameters See p 32 and 33 NOTE All Defaults means that all setting parameters such as Communication parameters Data transmission format Reading codes and Other parameters are changed to default settings ...

Page 19: ...esignated for the keyboard Off lowercase On uppercase PC s Caps Lock status Caps Lock on Scanner setting Read data Transmission data PC indication Caps on mode aB Ab aB Caps off mode aB aB Ab PC s Caps Lock status Caps Lock off Scanner setting Read data Transmission data PC indication Caps on mode aB Ab Ab Caps off mode aB aB aB ...

Page 20: ...d correctly on the PC If so select an appropriate keyboard type on the following Bar Code Menu such that the read date is successfully transmitted U S English 101 key keyboard series German 102 key keyboard series French 102 key keyboard series U K English 102 key keyboard series Italian 102 key keyboard series Swedish 102 key keyboard series ...

Page 21: ... interval Choose the appropriate speed according to the PC capability If the selected transmission interval is too short bar code data may not display correctly e g character missing 1 ms 6ms 10 ms 16ms 30 ms 50 ms 100 ms ...

Page 22: ... transmission format of the header terminator and bar code data by using bar coded parameter menus In addition you may define an arbitrary header and terminator from the ASCII character set 00h to 7Fh and some control codes keyed in as described in Section 5 6 The default transmission format is shown below Bar code data Terminator ENTER Code Mark Bar code type Code mark Bar code type Code mark UPC...

Page 23: ...be displayed on the PC screen as listed below according to the conditions If the code mark and number of digits are set to If Codabar start stop codes are set to see page 23 The PC screen shows Note Enable Transmit a b c d N08a123456a Enable Disable default N06123456 Disable default Transmit a b c d a123456a Disable default Disable default 123456 NOTE When the code mark is set to follow bar code d...

Page 24: ...ros to maintain the 11 character length format 2 You may choose whether or not to transmit the country code 3 You may choose whether or not to transmit the check digit 4 You may choose whether or not to convert data into the ISBN ISSN format according to the EAN Standard 5 A bar code may or may not contain a check digit You may choose whether or not to check the check digit Also you may choose whe...

Page 25: ...e mark position Before bar code data After bar code data Code mark for UPC E EAN 13 EAN 8 Interleaved 2 of 5 Code 39 Codabar C A B I M N E F FF I M N E A B I C N C A B Z Y X Transmission of No of digits not applicable to UPC EAN codes Enable Disable ...

Page 26: ...format of UPC A Enable Disable Transmission of pad characters 0 to maintain the fixed length format of UPC E Enable Disable C D transmission for UPC A Enable Disable C D transmission for UPC E Enable Disable C D transmission for EAN 13 Enable Disable C D Check Digit ...

Page 27: ...are transmitted In such transmission no pad characters 0 will be transmitted independent of the setting Enable Disable Conversion to the ISBN ISSN format for EAN 13 If the conversion is enabled EAN 13 codes will be converted to the ISBN or ISSN format when the prefix character is 978 or 977 respectively Enable Disable C D transmission for Standard 2 of 5 This setting will take effect when Reading ...

Page 28: ...ble C D transmission for Codabar NW 7 This setting will take effect when Reading Codabar NW 7 with C D is specified see page 31 Enable Disable Calculation system for C D of Codabar NW 7 MOD 16 7 check system C D transmission for Code 39 This setting will take effect when Reading Code 39 with C D is specified see page 31 Enable Disable C D Check Digit ...

Page 29: ... Suppress zeros Pad with zeros Transmission of start stop codes for Codabar NW 7 Transmit a b c d Transmit A B C D Disable Transmission of start stop codes for Code 39 Enable Disable Conversion to full ASCII for Code 39 Enable Disable ...

Page 30: ...will be able to scan only those codes having either of the specified two numbers of digits Enable Disable Number of digits readable for Standard 2 of 5 If Enable is selected the numbers of digits of two Standard 2 of 5 codes scanned first and second following this setting or after powering on will be set as the numbers of digits readable The scanner will be able to scan only those codes having eit...

Page 31: ...28 Header None STX ETX CR LF CR LF TAB ESC ENTER Right CTRL User defined Note Note Before choosing this setting you need to define a desired header Refer to Section 5 6 ...

Page 32: ...29 Terminator None STX ETX CR LF CR LF TAB ESC ENTER Right CTRL User defined Note Note Before choosing this setting you need to define a desired terminator Refer to Section 5 6 ...

Page 33: ...s Reading UPC A UPC E EAN 13 and EAN 8 Enable Disable Reading UPC EAN with add on Enable Disable Reading Standard 2 of 5 Enable without C D Enable with C D Disable Reading Interleaved 2 of 5 Enable without C D Enable with C D Disable ...

Page 34: ...ading Codabar NW 7 Enable without C D Enable with C D Disable Reading Code 39 Enable without C D Enable with C D Disable Reading Code 93 Enable Disable Reading Code 128 EAN 128 Enable Disable C D Check Digit ...

Page 35: ...Repeat mode Turning on the scanner immediately makes it ready to scan and keeps it in the ready to scan mode Even if the code reading is completed you may read the same code repeatedly by pressing the trigger switch by the required number of times provided that the reading window remains in contact with that bar code and the indicator LED lights in green 5 Continuous reading mode Turning on the sc...

Page 36: ...canner reads the first half of the bar code so that the half data is stored the beeper keeps sounding intermittently In double touch reading make the first and second runs closely in succession without a long pause inbetween If the pause between the first and second runs is over one second then the scanner will cancel out the reading discard the stored data and stop beeping Enable Disable Beeper c...

Page 37: ...g table See pages 35 to 36 When data entry is completed read the user selection header terminator reading completion label with the handy scanner If you would like to enable the user selection header terminator set the header terminator user selection at page of 28 and 29 follow the page 15 Ex For selecting a character at header Z hexadecimal digits 2B 5A Two characters User selection Header Start...

Page 38: ...select 80h to E6h FEh or FFh 2 Control characters 00h to 1Fh and 7Fh may not be designated in some application software since those characters are entered through the left CTRL key Example SOH Left CTRL A Enter A while keep pressing the left CTRL key 3 The Left SHIFT Left CTRL and Left ALT keys cannot be operated independently To use these keys the next key setting is required to given each key so...

Page 39: ...36 Bar coded values for hexadecimal entry F F1 F2 F3 F4 F5 F6 F7 F8 F9 F10 F11 F12 Right Ctrl F E D C B A 9 8 7 6 5 4 3 2 1 0 ...

Page 40: ...Bar coded values for decimal entry given on page 36 If the number of digits is in a single digit any of 1 to 9 then scan 0 for the upper digit Canceling Procedure 1 Scan the Set min number of digits or Set max number of digits for the target bar code type 2 Enter 00 by scanning 0 twice on the Bar coded values for decimal entry NOTE If you scan All defaults the minimum and maximum numbers of digits...

Page 41: ...number of digits No of digits readable for Code 39 Set min number of digits Set max number of digits No of digits readable for Codabar NW 7 Set min number of digits Set max number of digits No of digits readable for Code 93 Set min number of digits Set max number of digits Readable digit number setting for Code 128 EAN 128 Set min number of digits Set max number of digits ...

Page 42: ...39 Bar coded values for decimal entry 9 8 7 6 5 4 3 2 1 0 ...

Page 43: ...40 MEMO ...

Page 44: ...solution Lift height Contrast PCS value Elevation angle skew Tilt angle pitch Light source Sensor Reading Indication Reading specifications Buzzer vibration frequency Interface Host communication Connector Rated voltage Operating voltage range Ripple Input power requirements Current consumption Auto off mode Typical at DC5 0V ...

Page 45: ...resolution 0 19 mm 7 48 mils PCS value 0 9 min Lift height 0 80 mm 0 3 15 in Scanner resolution 0 33 mm 13 0 mils PCS value 0 45 min Lift height 0 100 mm 0 3 94 in Scanner resolution 0 33 mm 13 0 mils PCS value 0 9 min 20 3 LED red Wavelength 644 nm CCD Green LED Buzzer Approximately 4 3 kHz USB interface USB Specification 1 1 USB Plug A DC5 0V 4 4 5 25V 0 1Vp p max 30kHz max Reading mode 60mA Sta...

Page 46: ...43 Production Operating temperature range Operating humidity range Storage temperature range Storage humidity range Environmental conditions Ambient illuminance range daylight fluorescent lamp ...

Page 47: ...ing or freezing wet bulb temperature 30 max 10 60 sharp temperature change dewing or freezing not allowed wet bulb temperature 30 max 5 95 RH sharp temperature change dewing or freezing not allowed wet bulb temperature 30 max 3 000 lx max 500 3 000 lx ...

Page 48: ...ined in the scanned bar code is wrong Use a correct bar code The power saving function built in the PC is activated Deactivate the power saving function Problem 3 Incorrect bar code data displayed on the PC screen Probable cause What to do The connected keyboard does not match the keyboard type setting you have made Set the correct keyboard type see page 11 The keyboard s Caps Lock or Num Lock sta...

Page 49: ...ta correctly via the connected numeric keypad Probable cause What to do The handy scanner is set to With a keyboard or Without a keyboard Set to With a numeric key pad see page 9 The numeric keypad is directly connected to the mouse keyboard double purpose connector without a branch adapter The keyboard mentioned to the left cannot be used Use the numeric keypad designated for connecting to a PC v...

Page 50: ... 9 0 6 9 0 6 UPC E 4 9 0 1 5 6 7 0 1 4 0 1 0 EAN 13 4 9 4 0 0 3 9 7 EAN 8 UPC E 2 digit add on EAN 13 5 digit add on 9876543210 Standard 2 of 5 without C D 01234567895 Standard 2 of 5 with C D 9876543210 01234567895 440236 0 10 780330 9 90000 290951 ...

Page 51: ... C D A123456A CODABAR NW 7 without C D B 00012B CODABAR NW 7 with C D CODE39 CODE39 without C D TEST SHEETN CODE39 with C D 1G1AZ37A4CR423456 CODE93 1213477567 CODE128 11970417 EAN 128 1234567890 001234567895 A123456A B 00012B CODE39 TEST SHEETN 1G1AZ37A4CR423456 1213477567 11970417 ...

Page 52: ...DENSO WAVE INCORPORATED 4 2 12 Toranomon Minato ku Tokyo Japan 105 0001 http www denso wave com 454893 2170 ...

Reviews: