background image

B

8

9

6

7

3

1

REMOTE CONTROL UNIT RC-542

SELECT

TITLE

MENU

DISPLAY

RETURN

SUBTITLE

AUDIO

ANGLE

MARKER

4

5

3

DISC SKIP

1

2

RANDOM

SET UP

REPEAT A-B REPEAT

CALL

PROG/DIRECT

POWER

OPEN/CLOSE

2

4

3

7

8

5

6

1

0

CLEAR

9

10

FL DISPLAY

V.S.S.

CONTROL

2

STOP

SLOW/SEARCH

PLAY

STILL/PAUSE

- SKIP -

ENGLISH

18

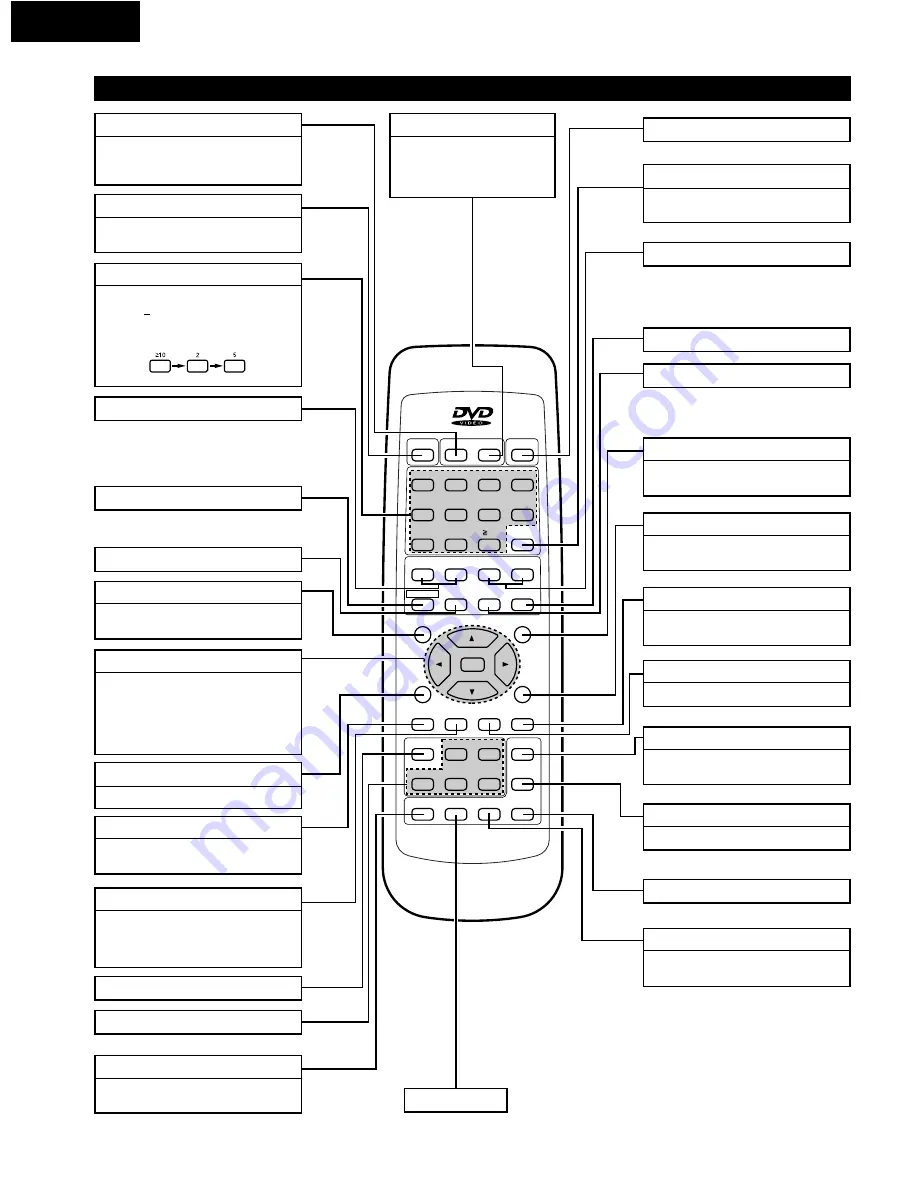
(3) Names and Functions of Remote Control Unit Buttons

POWER button

Press this to switch the power between
on and standby.

SKIP buttons

STOP button

Cursor buttons/SELECT button

Use the 

and 

ª

buttons to select in the

vertical direction.
Use the 

0

and 

1

buttons to select in the

horizontal direction.
Press the SELECT button to select the
item selected with the cursor buttons.

SUBTITLE button

Press this to switch the DVD’s subtitle
language.

AUDIO button

For DVDs, press this to switch the audio
language.  For video CDs, press this to
switch the channel between “LR”,  “L”
and “R”.

Number buttons

Use these to input numbers.
Use the 

10 button to input numbers of

10 or over.
Example:  To input 25

SET UP button

Press this to display the default setting
screen.

FL DISPLAY button

Press this to display audio information on
the currently playing disc on the
fluorescent display.

STILL/PAUSE button

OPEN/CLOSE button

SLOW/SEARCH buttons

PLAY button

DISPLAY button

Press this to display the GUI screen.

MENU button

Press this to display the DVD menu
recorded on the disc.

TITLE button

Press this to display the title menu
recorded on the disc.

REPEAT button

ANGLE button

Press this to switch the angle.

MARKER button

Press this to mark places you want to see
again.

PROG/DIRECT button

Press this to switch between the normal
play, programmed play.

RETURN button

Press this to return to the previous menu
screen.

A-B REPEAT button

Use this to repeat sections between two
specific points.

CLEAR button

Press this to clear numbers that you have
input.

DISC SKIP button

V.S.S. button

Sets the virtual surround sound.
(Functions when playing DVDs
recorded in Dolby Digital with
two or more channels.)

CALL button

Press this to check the program contents.

RANDOM button

Disc Number button (1 ~ 5)

CONTROL button

Summary of Contents for DVM-3700

Page 1: ...ANDOM REPEAT DISC SKIP CONTROL OPEN CLOSE PLAY DISC 1 DISC 2 DISC 3 DISC 4 DISC 5 B 8 9 6 7 3 1 REMOTE CONTROL UNIT RC 542 SELECT TITLE MENU DISPLAY RETURN SUBTITLE AUDIO ANGLE MARKER 4 5 3 DISC SKIP...

Page 2: ...e presence of important operating and maintenance servicing instructions in the literature accompanying the appliance NOTE This DVD video player uses the semiconductor laser To allow you to enjoy musi...

Page 3: ...5 DVD Video Automatic Disc Loading System STILL PAUSE STOP SLOW SEARCH SKIP RANDOM REPEAT DISC SKIP CONTROL OPEN CLOSE PLAY q e w r y tu i 8 7 3 1 5 o 0 2 4 6 DISC 1 DISC 2 DISC 3 DISC 4 DISC 5 9 0 1...

Page 4: ...likely to be walked on or pinched by items placed upon or against them paying particular attention to cords at plugs convenience receptacles and the point where they exit from the appliance 14 Cleanin...

Page 5: ...broadcast rent or play discs in public without the consent of the copyright holder 2 La reproduction la diffusion la location le pr t ou la lecture publique de ces disques sont interdits sans le cons...

Page 6: ...onal ALPHA Processing On the DVM 3700 these filters have been dramatically improved resulting 1 Playing Repeatedly 32 33 2 Playing Tracks in the Desired Order 34 35 3 Playing the Tracks in Random Orde...

Page 7: ...terioration is kept to the minimum by processing the data as digital data This feature can be used as the picture quality setting individually tailored for DVD playback Digital Cinema Mode Using the O...

Page 8: ...disc does not correspond to the Region number of this DVD video player this DVD video player cannot play this disc The Region number for this DVD video player is 1 1 For example Title 1 Title 2 Chapt...

Page 9: ...rge the center hole Do not write on the labeled printed side with a ball point pen or a pencil Water droplets may form on the surface if the disc is moved suddenly from a cold place to a warm one Do n...

Page 10: ...g to an AV TV Use the included video audio cord to connect the TV s video input connectors and audio input connector to the DVM 3700 s video output connectors and audio output connector DVM 3700 S Vid...

Page 11: ...t connectors Cr Cb and Y The red Cr blue Cb and brightness Y signals are output independently achieving more faithful reproduction of the colors The color component input connectors may be marked diff...

Page 12: ...OUT COAXIAL OPTICAL R VIDEO IN 2 Connecting an optical fiber cable commercially available to the digital audio input connector OPTICAL NOTE Store the dust cap in a safe place and be careful not to lo...

Page 13: ...See page 56 NOTE 2 Compressed audio is converted to PCM before output Linear PCM audio is the signal recording format used for music CDs While the signals are recorded at 44 1 kHz 16 bit for music CDs...

Page 14: ...OUT PCM BITSTREAM REMOTE CONTROL CONTROL 1 2 Cr Cb Y L IN OUT OUT COAXIAL OPTICAL R VIDEO IN 5 Connecting to a Stereo Component DVM 3700 TV Stereo component NOTE Use commercially available 75 ohm pin...

Page 15: ...head to the beginning of the next track or chapter 4 STILL PAUSE button 3 Press this button to stop play temporarily 5 SLOW SEARCH button 6 Press this button in the play mode to search in the reverse...

Page 16: ...sic CDs The title and elapsed track time are displayed here during playback These indicate the type of disc currently playing Angle Indicator Random Indicator Repeat Indicator Program Indicator Music...

Page 17: ...ifferent types of batteries Do not short circuit disassemble heat or dispose of batteries in flames Remove the batteries when not planning to use the remote control unit for a long period of time If t...

Page 18: ...numbers of 10 or over Example To input 25 SET UP button Press this to display the default setting screen FL DISPLAY button Press this to display audio information on the currently playing disc on the...

Page 19: ...e power w Press the OPEN CLOSE button 5 DVD Video Automatic Disc Loading System Disc tray NOTES Be sure to turn on the power before opening and closing the disc tray Do not strike on the button with a...

Page 20: ...Automatic Disc Loading System 5 DVD Video Automatic Disc Loading System 5 DVD Video Automatic Disc Loading System 5 DVD Video Automatic Disc Loading System LABEL SIDE UP WARD NOTES Remove all discs b...

Page 21: ...disc tray closes automatically and playback begins If the disc tray is closed with the OPEN CLOSE button press the PLAY button For many interactive DVDs and video CDs with playback control a menu scre...

Page 22: ...disc Press the RETURN button during playback of a video CD to return to the menu screen SELECT SELECT Remote control unit If the OPEN CLOSE 5 button is pressed while a disc is playing playback contin...

Page 23: ...is set to the standby mode and then turned back ON STOP Main unit The resume play memory function only works for discs for which the elapsed time is shown on the display during playback Remote control...

Page 24: ...buttons is pressed during menu playback on a video CD 4 Selecting DISC SKIP Press the DISC SKIP button The carousel in the dreamer turns and the disc on the next tray is played For example if disc num...

Page 25: ...ain the slow play speed increases in five steps Press the PLAY button to resume normal playback NOTE Reverse slow play is not possible on video CDs 2 STOP 7 Skipping to the Beginning of Chapters or Tr...

Page 26: ...The GUI Graphical User Interface screen appears The picture on the TV screen switches each time the button is pressed The items displayed differ from disc to disc DISPLAY Remote control unit 1 1 56 37...

Page 27: ...OFF ON 16b Linear PCM k stands for kHz and b stands for bit Dolby Digital AC 3 DVD karaoke Solo DVD karaoke Duet 20b 24b OFF V1 V2 V1 V2 Subtitle language No Subtitle language Subtitle on off Change...

Page 28: ...No by using the cursor buttons or the numeric buttons and press SELECT Audio mode Video CD only Change the mode by using the cursor buttons Left channel sound is output from the speaker L and right c...

Page 29: ...t the preferred mode during play by using the cursor buttons V S S off OFF V S S natural effect 1 V S S emphasized effect 2 Digital Cinema Mode DVD Video CD only Select the preferred mode by using the...

Page 30: ...button 1 DVD Video CD only Rapid reverse Press the cursor button 0 Rapid advance Press the cursor button 1 Play Press the cursor button NOTES Each time the cursor button 0 1 is pressed the speed of ra...

Page 31: ...les may not be displayed at marked spots The marking function cannot be used for DVDs and video CDs for which the elapsed time is not shown on the display during playback The marks are retained until...

Page 32: ...isplay s VIDEO CD or CD indicator is lit Normal playback Chapter repeated During playback only Title repeated During playback only All disc repeated DVD only disc repeated Repeat playback canceled To...

Page 33: ...l playback Press the A B REPEAT button until the display s REPEAT indicator turns off NOTES A B repeat play does not work with an interactive DVD Some subtitles recorded around point A or B may fail t...

Page 34: ...ECT button Now press the PLAY button to start normal playback from the beginning of the disc The program is stored in the memory To clear tracks from the program Press the STOP button twice Press the...

Page 35: ...gram See item 2 on page 34 press the Random button then the Play button The microcomputer will then select tracks from the program at random and play them PLAY Remote control unit Remote control unit...

Page 36: ...ds after turning on the power of the 100 CD changer DCM 5000 5001 before performing this operation Buttons not indicated on the above table do not operate Press the buttons on the DVM 3700 or the remo...

Page 37: ...the disc is displayed Use the and cursor buttons to select the desired language The display turns off when the AUDIO or SELECT button is pressed Remote control unit Remote control unit NOTES If the de...

Page 38: ...lected DVD Karaoke Solo 0 1 OFF ON 0 1 DVD Karaoke Duet 0 1 OFF 1 2 ON 1 V1 ON V2 ON 1 1 Video CD LR L 1 R 1 Press AUDIO or SELECT to clear the display Remote control unit AUDIO Remote control unit SE...

Page 39: ...e desired language is not set after pressing the and cursor buttons several times the disc does not include that language The subtitle language set with the default settings see page 45 is set when th...

Page 40: ...ELECT button is pressed 1 3 NOTES The multiple angle function only works with discs on which multiple angles are recorded At scenes where multiple angles are recorded the angle can be switched Even at...

Page 41: ...ound is cancelled Virtual surround sound 1 Natural effect Virtual surround sound 2 Emphasized effect NOTES The virtual surround sound effect does not work with DVD Karaoke discs The virtual surround s...

Page 42: ...u was called out and playback resumes from that point Use the cursor or number buttons to select the desired title If you select the title number using the number buttons skip step 3 below Press the S...

Page 43: ...enu appears If the MENU button is pressed again the disc returns to the point at which the DVD menu was called out and playback resumes from that point Use the or cursor buttons or the number buttons...

Page 44: ...ss of the display 6 TV Aspect Set this according to the size of the connected TV s screen 4 3 or 16 9 7 Digital Audio Output Use this to set the audio signals output from the digital audio output conn...

Page 45: ...ber buttons to input the 4 digit language number shown on page 60 w When 2 Subtitle is selected 1 Automatic Factory default The subtitle language is automatically set to the same language as the audio...

Page 46: ...ing screen in step 1 on page 44 When 2 Ratings is Selected 1 When playback is not restricted Level 8 1 2 See page 44 3 Use the and cursor buttons to select 2 Ratings then press the SELECT button Level...

Page 47: ...RETURN button The RETURN button will not function after the SELECT button is pressed in step 5 To exit the default settings Press the SET UP button or number button 0 at the default setting screen in...

Page 48: ...ayer Press number button 4 Press the SELECT button The screen in step 1 on page 44 reappears The temporary unlock setting will be in effect until the power is switched OFF or set to STANDBY as well as...

Page 49: ...t this to set the language used for the default setting screen and the PLAY and other messages displayed on the TV screen to Spanish The settings are completed and the screen in step 1 on page 44 reap...

Page 50: ...nd position above slightly below of Play Still and other displays as well as On Screen Menu Icons Press the cursor buttons to select the preferred setting and press SELECT q When 1 On Screen Messages...

Page 51: ...ge English 4 On Screen Messages 5 FL Display Bright 6 TV Aspect 4 3 7 Digital Audio Output 9 Other Settings 0 Exit 5 The settings are completed and the screen in step 1 on page 44 reappears NOTE When...

Page 52: ...temporarily bright during the slow play and search operations The settings are completed and the screen in step 1 on page 44 reappears To return to the previous menu screen Press the RETURN button To...

Page 53: ...entional size TV is connected Factory preset The video material formatted in the Pan Scan style is played back in that style the left and right edges are cut off The video material not formatted in th...

Page 54: ...l 8 3 Menu Language English 4 On Screen Messages 5 FL Display Bright 6 TV Aspect 4 3 7 Digital Audio Output 9 Other Settings 0 Exit To return to the previous menu screen Press the RETURN button To exi...

Page 55: ...nd bottom Screen horizontally enlarged with black bands at top and bottom Full screen Screen in which the picture at the far left and far right ends only is extended horizontally with black bands at t...

Page 56: ...SELECT button q When 1 LPCM 96k 48k is selected 1 No Factory default Digital audio of 48 kHz 16 bit is output during playback of the DVD recorded in Linear PCM of 48 kHz No digital audio is output du...

Page 57: ...ector see page 12 When a Dolby Digital AC 3 DTS decoder is connected to the digital audio output connector 1 No factory default 2 Yes NOTE 1 2 Yes NOTE 1 2 Yes NOTE 1 1 Bitstream factory default 2 PCM...

Page 58: ...ally set this The frame still or field still mode is selected automatically 2 Field Select this if the picture flutters when Automatic is set 3 Frame Frame still is always selected Select this setting...

Page 59: ...reappears To return to the previous menu screen Press the RETURN button To exit the default settings Press the SET UP button or number button 0 at the default setting screen in step 1 on page 44 Othe...

Page 60: ...Javanese Georgian Kazakh Greenlandic Cambodian Kannada Korean Kashmiri Kurdish Kirghiz Latin Assamese Aymara Azerbaijani Bashkir Byelorussian Bulgarian Bihari Bengali Bangla Tibetan Breton Catalan Cor...

Page 61: ...he connections Properly set the input of the TV stereo etc Menu playback is not possible with anything but video CDs with playback control Some disturbance is normal Some operations are disabled for s...

Page 62: ...w CDs 2 Hz to 20 kHz 2 S N ratio q DVDs 115 dB w CDs 115 dB 3 Total harmonic distortion q DVDs 0 0025 w CDs 0 0030 4 Dynamic range q DVDs 108 dB w CDs 100 dB Digital audio output Optical digital outp...

Reviews: