9
DN-780R
ADJUSTMENT
ADJUSTING AND CHECKING THE
MECHANISM SECTION
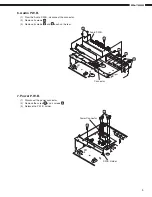
1. Replacing Pinch Roller
Before replacing the pinch roller, clean the tape contact
surface of the pinch roller and the capstan shaft.
Most causes of poor tape transport can be traced to dirty
pinch roller and capstan shaft.
Removing the pinch roller
Remove the clips that press the pinch roller and pull the
pinch roller forward remove it.
After replacing, run a padles C-90 tape to check for tape
curls at the tape guide section of the head.
2. Checking the pressure Force of the Pinch
Roller
In the playback mode, hook a spring weight onto the
bracket at the center of the pinch roller. After separating
the pinch roller from the capstan shaft allow the pinch roller
to contact the capstan shaft again. Check to make sure
the spring weight reads between 250 ~ 350g when the
pinch roller starts to rotate.
Replace the pinch roller when it does not conform to the
standard specification values.
3. Replacing the Head Ass'y
(1) Removing the head Ass'y
1. Remove the head base mounting screws.
2. Remove the head base from the lead holder and
the wire connectors.
(2) Head Ass'y Installation
1. Assembly is the reverse of disassembly.
4. Adjusting the R/P HEAD
Azimuth adjustments
Set test tape A-BEX TCC-153 so that the A surface faces
forward, and adjust accordingly.
(1) Playback FWD. Turn the azimuth adjustment nut so
that the Lissajous waveform (A) is at maximum scale
and the Lissajous waveform (B) is at minimum scale.
(2) Playback REV. Turn the azimuth adjustment nut in
the same manner as (1), above.
(3) Make further adjustments to (1) and (2), above.
(4) Apply torsion locks to the adjusted nuts.
Note:
Only the azimuth adjustment is necessary; no height
and tilt angle adjustments are required.
Capstan shaft
Pinch roller
250 ~ 350g
L
R
PB Amp
A-BEX TCC-153
LINE OUT
V
H
A
B
FWD
REV
R/P Head


