14
10
RECORDING
• When recording on an already recorded disc, recording automatically starts from the end of the section last recorded.
When doing so, pay attention to the remaining time.
• To clear the entire content of the disc and record from the beginning, first erase the entire disc. (For instructions on
erasing the entire disc, refer to “
Editing — (1) Erasing all tracks” on Page 23.)
• To record on a disc, make sure the accidental erasure prevention tab is closed and the hole is covered.
• Use of the CD synchronized recording function (Page 31) and the Synchronized recording function (Page 31) will be
convenient when there is a system connection with the D-F101 Series.
• When recording without a system connection, the insertion of a blank (i.e., unrecorded) disc or a no-track disc (i.e., a
disc with only the disc name recorded) will result in the unit automatically entering the record pause mode which will
make analog recording Step 7 and digital recording Step 6 unnecessary. (The Auto Rec Pause function.)
The Auto Rec Pause function will also be activated when the power is switched on while one of these discs is in the
unit.
• When recording of the TOC is not performed after editing, “
Write UTOC
” is displayed and the unit will not enter
the recording mode.
14
1. Starting recording (Manual Recording)
(1) Analog recording
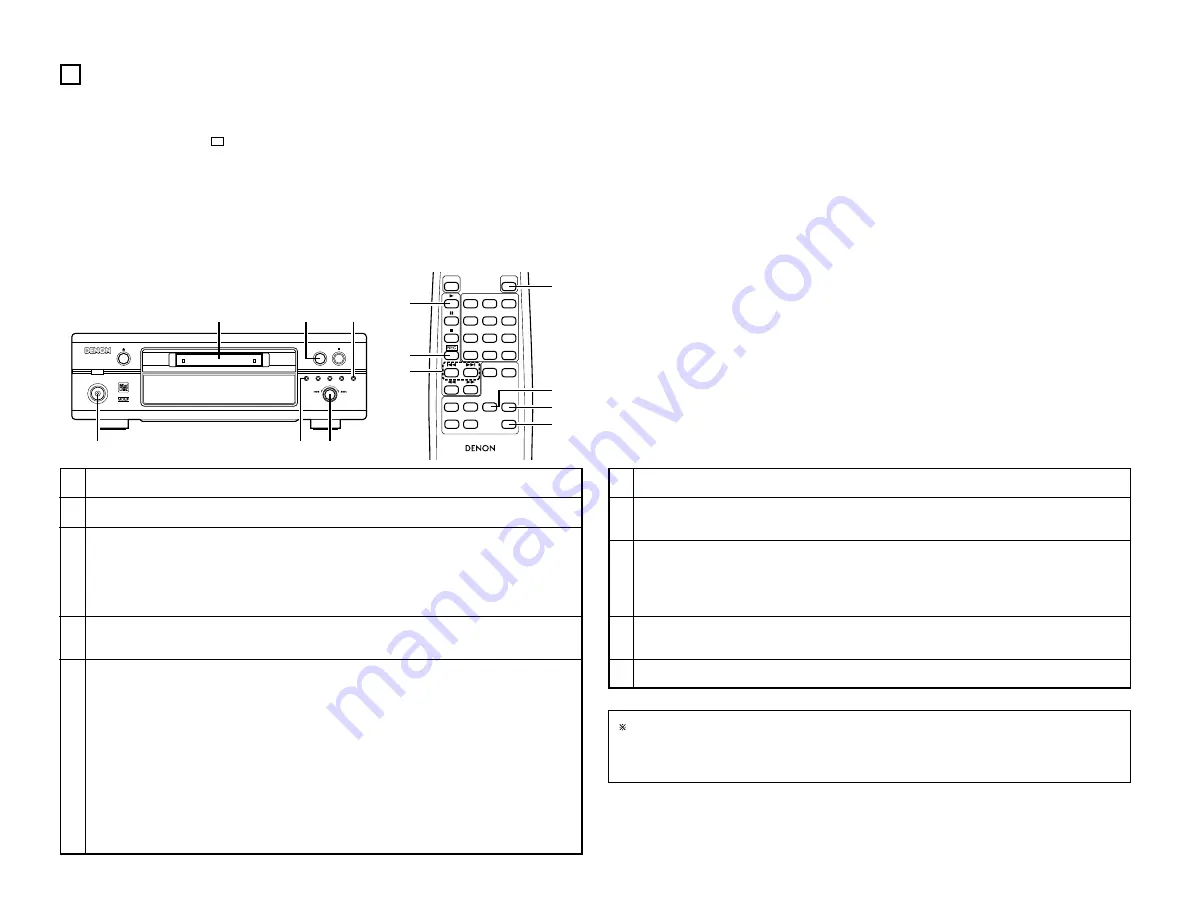
1
2
3
4
5
Turn on the power.
Load the recordable MiniDisc that is to be recorded.
When using a blank disc or a no-track disc, the Auto Rec Pause function automatically sets this unit to the
recording pause mode (There is no need to perform step 7.)
• Adjust the recording level in step 8.
When using an already recorded MiniDisc, press the TIME button to check the recordable time.
• The time display switches between the total recorded time and the recordable time each time the TIME
button is pressed.
Press the INPUT button and set “
Analog
”.
• The indicator for the selected input source (“ANA”) lights.
Select On/Off of the Auto Track Marking function.
• ATM Function On
The “ATM” indicator will light. When a blank portion (of about 3 seconds or greater) of the recording input
signal is detected, the track number is automatically associated and recorded.
• ATM Function Off
This is recorded as the following track.
Press the EDIT button, turn the jog dial of the main unit or press the automatic search buttons (
8
and
9
)
of the remote control unit, and select the Analog A.T.M. mode.
• “
Analog A.T.M?
” is displayed.
Press the ENTER button, turn the jog dial of the main unit or press the automatic search buttons (
8
and
9
) of the remote control unit, and select On/Off of the A.T.M. function.
• “
A.T.M On(Off)
” is displayed.
Press the ENTER button.
6
7
8
9
10
Start playing the selection you want to record on the CD player, Cassette deck, etc.
Press the MULTI REC button.
• The recording standby mode is set.
Adjust the recording level with the jog dial.
• Adjust the input level adjustment control so that the “OVER” indicator does not light even when the volume
is loudest. After adjusting, set the source to be recorded to the standby mode.
• The set recording level will be stored in memory, but this data might be lost if the unit is not connected to a
power source for 2 to 3 days.
Press the
1 3
(play/pause) button.
• Recording starts.
Start playing the selection you want to record on the CD player, Cassette deck, etc.
1
18T r 0 2 m 4 6 s
-60 40 -30 -20 -12 -6 -2 0
L
dB
R
POWER LOADING MECHANISM
ON / STANDBY
MINIDISC RECORDER DMD-F101
INPUT
-
+
MULTI REC
CD SRS
EDIT
1 3
REC LEVEL
/ ENTER
MEMO REC /
CHARACTER
2
9
7
1
5,8
4
EJECT
POWER
1
2
3
4
5
6
7
8
9
10
+10
CALL
REMOTE CONTROL UNIT RC-282
CLEAR
GROUP
PROG/
DIRECT
REPEAT RANDOM
EDIT
ENTER
TIME
TITLE CHARACTER
1
3
5
5
9
7
5
When recording is performed with a system connection to the D-F101 Series, the synchronized recording
function will operate with the CD player (DCD-F101) and the Cassette deck (DRR-F101) and pressing the
play/pause button (
1
/
3
) of one of the units will start the recording automatically. See “Synchronized Recording”
on Page 31 for details.
Summary of Contents for DMD-F101
Page 34: ...34 MEMO ...
Page 35: ...35 MEMO ...


