background image

4

ENGLISH

DEUTSCH

FRANÇAIS

ITALIANO

ESPAÑOL

NEDERLANDS

SVENSKA

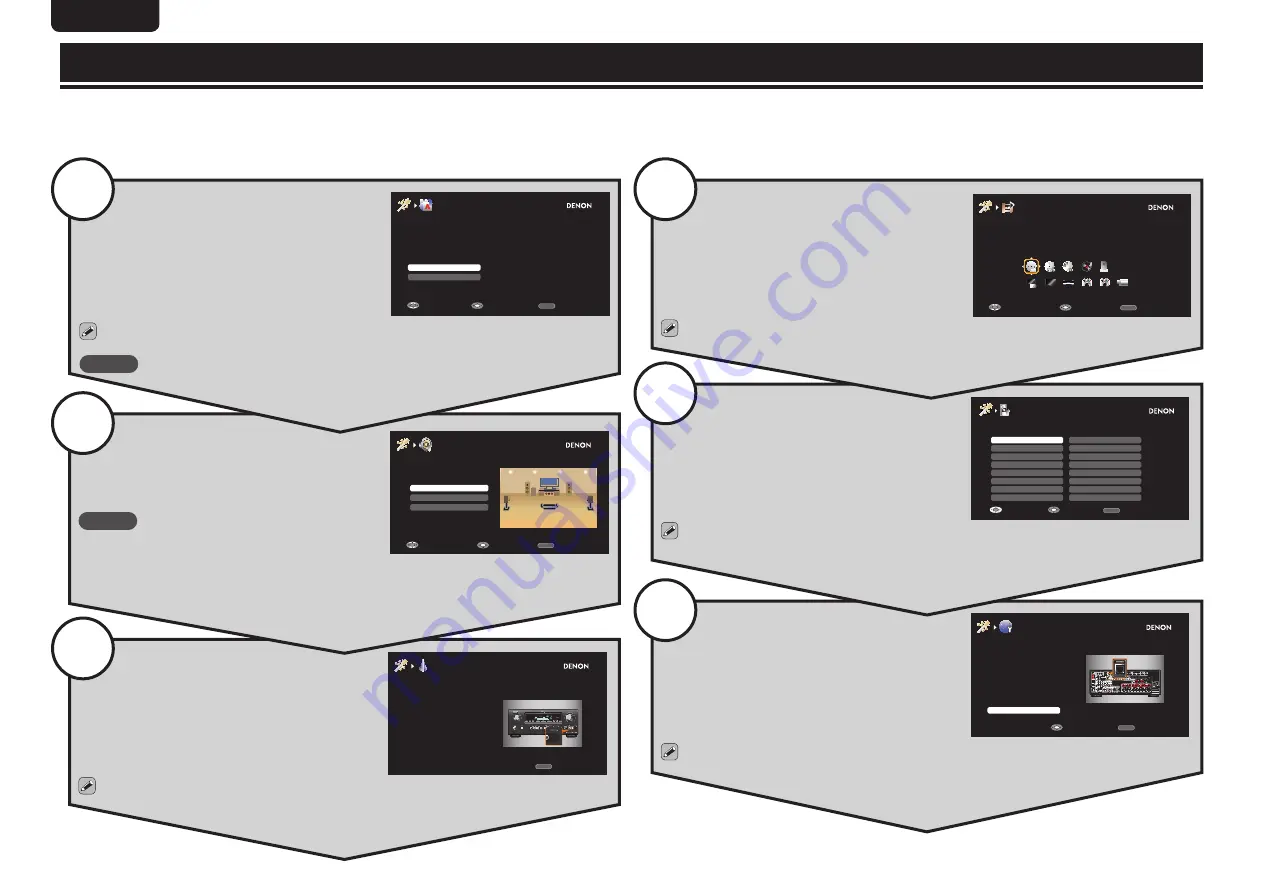
When preparations are complete, start the Setup Wizard. 

Use the Setup Wizard to perform connections and settings as shown in the following steps. Perform the operations as described in the 

instructions on the screen. You can skip or cancel at each section if necessary.

SETUP WIZARD

This completes the Setup Wizard. 

Network Setup

NETWORK SETUP

Please connect LAN cable to

ETHERNET port on rear panel 

of receiver, and other side of 

cable to network router.

When connection is complete, 

press “Next” to continue.

Next

RETURN

Back to TOP

Enter

Configure to playback audio files saved 
onto a computer or Internet radio. 

 These settings can be changed in the following menu even after setting the Setup Wizard 

(

vm

 page 111 “Network Setup”).

6

Remote Setup

CABLE

Blu-ray

PVR

CABLE/PVR

SAT

CD

SAT/PVR

CD Recorder

TV

DVD

TV/DVD

DVD Recorder

TV/VCR

HD DVD

VCR

REMOTE SETUP

IPTV STB

Please select the device you want to control.

Enter

RETURN

Return

Select

Configure the settings so that devices 
connected to this unit can be operated 
using the provided remote control. 

 These settings can be changed in the following menu even after setting the Setup Wizard 

(

vm

 page 117 “Remote Setup Guide”).

5

Source Setup

SOURCE SETUP

Please select device.

Source        BD
Device        Blu-ray Disc player

Player

Video

RETURN

Back to TOP

Enter

Select

Set the connecting terminals for each 
device to be set, and connect to the 
terminals. 

 These settings can be changed in the following menu even after setting the Setup Wizard 

(

vm

 page 91 “Input Assign”).

4

Speaker Calibration

SPEAKER CALIBRATION

For preparation, the setup
microphone which included
in the box is required.
Please connect the
microphone connector to the 
SETUP MIC jack on front
panel.

RETURN

Back to TOP

1

2

3

4

Configure the settings for your speakers, 
and for the optimum surround sound for 
your room. 

 These settings can be changed in the following menu even after setting the Setup Wizard

(

vm

 page 21 “Set up speakers (Audyssey® Auto Setup)”).

3

Speaker Connection

SPEAKER CONNECTION

Please select the speaker
configuration to be used.

5.1ch is the most popular 
surround system.

7.1ch

Others

5.1ch

RETURN

Back to TOP

Enter

Select

Connect the speakers for surround sound.

NOTE

Connections for speakers other than 5.1 channel or 7.1 

channel speakers cannot be set using the Setup Wizard. 

Select “Others”, and then select “Skip” in “2. Speaker Connection” to proceed to “3. Speaker 

Calibration”. (For details on the setting method, see 

page 61 “Speaker installation/connection 

(Advanced connection)”.)

2

Language Select

LANGUAGE SELECT

Please select the language for the on screen menu.

Español

English

RETURN

Back to TOP

Enter

Select

Set the language for the instructions on 
the television screen. 

 These settings can be changed in the following menu even after setting the Setup Wizard

(

vm

 page 119 “Language”).

NOTE

If your language is not available, select “English”. 

1

Summary of Contents for AVR-3312CI

Page 1: ...ue tout le fonctionnement de votre récepteur Ouvrez le CD ROM inclus sur votre ordinateur pour pouvoir consulter la notice d utilisation détaillée Explica todas las operaciones del receptor Abra el CD ROM en el ordenador para ver instrucciones detalladas de funcionamiento z z D M Holdings is striving to be a paperless company in order to help preserve the environment Your cooperation and understan...

Page 2: ......

Page 3: ... user to the presence of important operating and maintenance servicing instructions in the literature accompanying the appliance WARNING TO REDUCE THE RISK OF FIRE OR ELECTRIC SHOCK DO NOT EXPOSE THIS APPLIANCE TO RAIN OR MOISTURE CAUTION HOT SURFACE DO NOT TOUCH The top surface over the internal heat sink may become hot when operating this product continuously Do not touch hot areas especially ar...

Page 4: ...u cordon Protéger l appareil contre l humidité l eau et la poussière Débrancher le cordon d alimentation lorsque l appareil n est pas utilisé pendant de longues périodes Ne pas obstruer les trous d aération Ne pas laisser des objets étrangers dans l appareil Ne pas mettre en contact des insecticides du benzène et un diluant avec l appareil Ne jamais démonter ou modifier l appareil d une manière ou...

Page 5: ...ower turned off and wait until there is little difference in temperature before using the unit Cautions on using mobile phones Using a mobile phone near this unit may result in noise If that occurs move the mobile phone away from this unit when it is in use Moving the unit Turn off the power and unplug the power cord from the power outlet Next disconnect the connection cables to other system units...

Page 6: ...using the Setup Wizard n n When 5 1 channel installed FL FR SW C SL SR z1 z2 Listening position z1 22 30 z2 120 n n When 7 1 channel Surround back speaker installed FL FR SBL SBR SL SR SW C z1 z2 z3 Listening position z1 22 30 z2 90 110 z3 135 150 FL Front speaker L Install the surround speakers in a position 2 to 3 ft 60 to 90 cm higher than ear level Surround back speaker When 7 1 channel instal...

Page 7: ...n the television power on and switch the video input to this unit HDMI input For details on how to operate the television see the television instruction manual q Power on w Switch the input to this unit HDMI input 3 Insert the provided batteries into the remote control unit q Slide the rear lid in the direction of the arrow and remove it w Load the two batteries properly as indicated by the marks ...

Page 8: ...r Select Set the connecting terminals for each device to be set and connect to the terminals These settings can be changed in the following menu even after setting the Setup Wizard vm page 91 Input Assign 4 Speaker Calibration SPEAKER CALIBRATION For preparation the setup microphone which included in the box is required Please connect the microphone connector to the SETUP MIC jack on front panel R...

Page 9: ...r plug into the wall socket To household power outlet AC 120 V 60 Hz Power cord supplied Press ZONE SELECT to switch the zone mode to J MAIN ZONE Switch the zone mode J Lights This remote control can be operated in three separate zones MAIN ZONE ZONE2 and ZONE3 Set the remote control to MAIN ZONE to operate the Setup Wizard 1 2 Press AMP to set the remote control unit to AMP operation mode Switch ...

Page 10: ...he core wires touch the rear panel or if the and sides touch each other vm page 144 Protection Circuit Never touch the speaker terminals while the power supply is connected Doing so could result in electric shock When the Setup Wizard is running follow the instructions in the Setup Wizard screen for making connections Use speakers with the speaker impedances shown below Speaker terminals Speaker i...

Page 11: ...is automatically played vm page 34 iPod play function n nUsing the SOURCE SELECT menu Switch the remote control unit to the J MAIN ZONE mode when performing this operation vm page 121 Operating AV device If the remote control unit is in K ZONE2 or L ZONE3 mode the SOURCE SELECT menu will not be displayed when SOURCE SELECT is pressed BD Recent Player Video Network Tuner SOURCE SELECT Source The cu...

Page 12: ...flashes green MUTE indicator on the display lights appears on a TV screen The sound is reduced to the level set at Mute Level vm page 116 To cancel press N again Muting can also be canceled by adjusting the master volume Other operations See the following items on the included CD ROM Owner s manual n nPlaying a Blu ray Disc player DVD player n nPlaying a CD player n nPlaying an iPod n nTuning in r...

Page 13: ......

Page 14: ......

Page 15: ......

Page 16: ...D M Holdings Inc Printed in China 5421 10064 009D www denon com V00 ...

Reviews: