background image

12

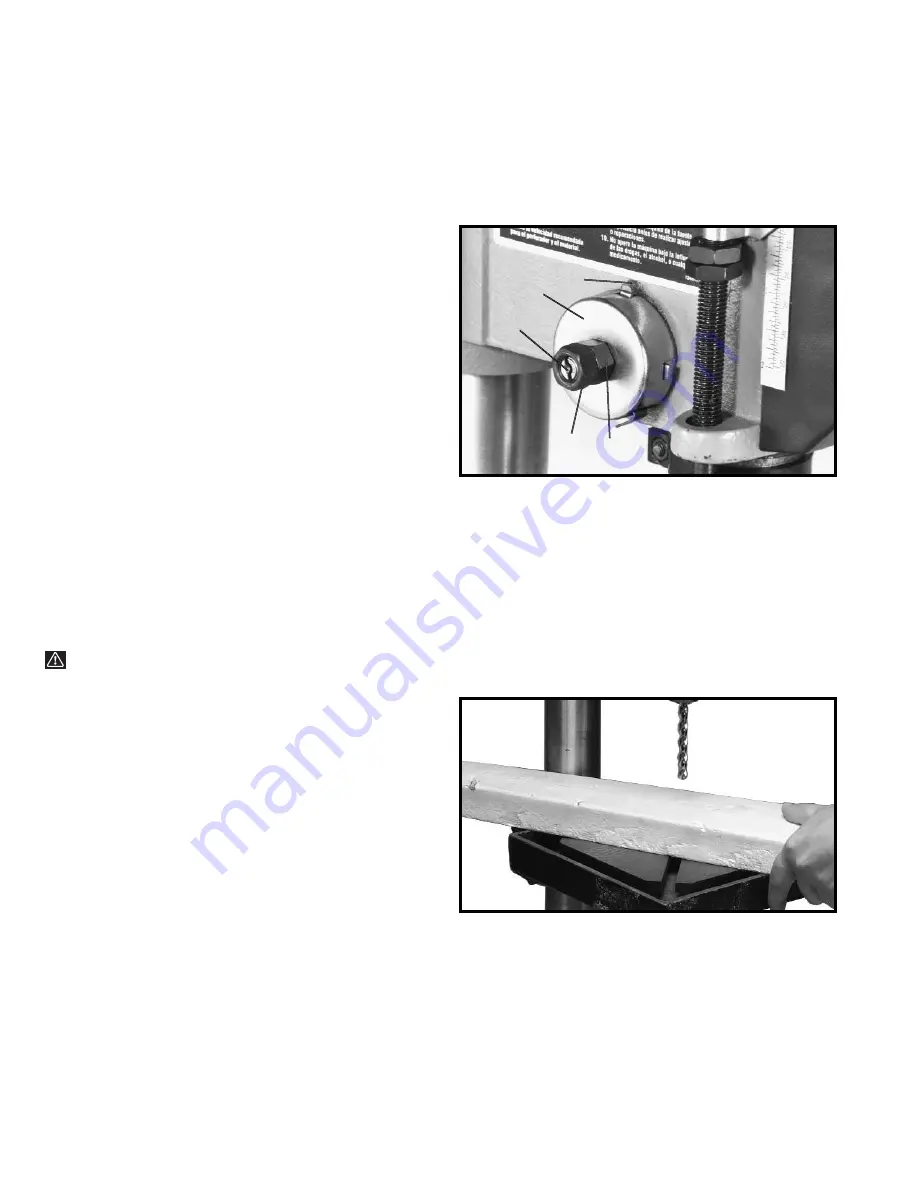
ADJUSTING SPINDLE
RETURN SPRING

The spindle is automatically returned to its upper most
position when the handle is released. It is recommended
that the handle be allowed to slowly return to the top
position after each hole has been drilled in the material.
This spring has been properly adjusted at the factory
and should not be disturbed unless absolutely
necessary. To adjust the return spring, proceed as
follows:

1.

DISCONNECT MACHINE FROM POWER SOURCE.

2.

Loosen nuts (B) and (E) Fig. 24. Make sure spring

housing (A) stays engaged with head casting.

3.

While 

FIRMLY HOLDING

spring housing (A) Fig. 24

pull out housing and rotate it until boss (D) is engaged
with the next notch on the housing. Turn the housing
counterclockwise to increase or clockwise to decrease
spring tension. Turn nut (E) until it contacts spring
housing (A), then back nut (E) out a 1/4 turn. Tighten nut
(B) against nut (E), to hold the housing in place.

IMPORTANT: Inside nut (E) should not contact spring
housing (A) when tightened.

Fig. 24

D

A

C

E

B

OPERATION

Your drill press is to be used with drill bits with a shank of 1/2" or less in diameter. The following will give the inexperienced
operator a start on common drill press operations. Use scrap material for practice to get a feel of the machine before
attempting regular work.

WARNING: The use of accessories and attachments not recommended by Delta may result in risk of injury.

IMPORTANT:

When the workpiece is long enough it

should always be positioned on the table with one end
against the left side of the column, as shown in Fig. 25.
This prevents the workpiece from rotating with the drill
bit or cutting tool, causing damage to the workpiece or
personal injury to the operator. If it is not possible to
support the workpiece against the column, the
workpiece should always be fastened to the table using
clamps or a vise.

Fig. 25

Summary of Contents for ShopMaster DP115

Page 1: ...NO 906580 07 01 02 Copyright 2002 Delta Machinery ESPAÑOL PÁGINA 17 To learn more about DELTA MACHINERY visit our website at www deltamachinery com For Parts Service Warranty or other Assistance please call 1 800 223 7278 In Canada call 1 800 463 3582 ...

Page 2: ...ry to get caught in moving parts Nonslip footwear is recommended Wear protective hair covering to contain long hair 12 SECURE WORK Use clamps or a vise to hold work when practical It s safer than using your hand and frees both hands to operate tool 13 DON T OVERREACH Keep proper footing and balance at all times 14 MAINTAIN TOOLS IN TOP CONDITION Keep tools sharp and clean for best and safest perfo...

Page 3: ...kpiece that does not have a flat surface against the table Prevent the workpiece from rotating by clamping it to the table or by securing it against the drill press column 14 TURN THE MACHINE OFF AND WAIT FOR THE DRILL BIT CUTTING TOOL OR SANDER TO STOP TURNING prior to cleaning the work area removing debris removing or securing workpiece or changing the angle of the table A moving drill bit cutti...

Page 4: ...dinances Do not modify the plug provided if it will not fit the outlet have the proper outlet installed by a qualified electrician Improper connection of the equipment grounding conductor can result in risk of electric shock The conductor with insulation having an outer surface that is green with or without yellow stripes is the equipment grounding conductor If repair or replacement of the electri...

Page 5: ...r s Remove the protective coating from all unpainted surfaces This coating may be removed with a soft cloth moistened with kerosene do not use acetone gasoline or lacquer thinner for this purpose After cleaning cover the unpainted surfaces with a good quality household floor paste wax NOTICE THE MANUAL COVER PHOTO ILLUSTRATES THE CURRENT PRODUCTION MODEL ALL OTHER ILLUSTRATIONS ARE REPRESENTATIVE ...

Page 6: ...SS PARTS Fig 2 Fig 3 1 Drill Press Head and Motor 2 Column and Base Flange 3 Base 4 Table 5 Chuck 6 Chuck key 7 Clamp handle 8 Wrench 9 M8x1 25x20mm Hex head screws 3 10 Pinion Shaft Handles 3 1 2 3 4 5 6 7 8 9 10 ...

Page 7: ...n A as shown Fig 5 1 Assemble the column A Fig 4 to drill press base B as shown using the three M8x1 25x20mm hex head cap screws C Fig 4 A B C D 3 Thread stud on clamp handle E Fig 6 into hole in rear of table bracket as shown Fig 6 E Fig 7 F A G 4 Place the drill press head F Fig 7 onto the column A as far as it will go Align head A Fig 7A to table B and base C Tighten the two head locking screws...

Page 8: ...s NOTE Household oven cleaner can effectively remove any sub stance from the spindle and chuck however carefully follow the manufacturer s safety rules concerning its use 7 IMPORTANT Open the chuck jaws as wide as possible by turning the chuck sleeve M Fig 10 8 Holding chuck on taper of spindle tap with a soft tip hammer N or a block of wood and hammer to set chuck as shown in Fig 10 IMPORTANT To ...

Page 9: ...on the front of the drill press head To turn the drill press ON move the switch up to the ON position To turn the drill press OFF move the switch down to the OFF position Fig 15 A Fig 16 LOCKING SWITCH IN THE OFF POSITION IMPORTANT When the machine is not in use the switch should be locked in the OFF position to prevent unauthorized use This can be done by grasping the switch toggle B and pulling ...

Page 10: ...to remove turn nut C clockwise to pull pin out of casting Fig 18 C B Fig 19 3 Fig 19 illustrates the table alignment pin B removed Loosen table locking bolt D tilt table to the desired angle and tighten bolt D When returning table to the level position replace table alignment pin B This will position the table surface at 90 degrees to the spindle D B Fig 20 4 A tilt scale E Fig 20 is provided on t...

Page 11: ...should be just tight enough to prevent slipping Excessive tension will reduce the life of the belt pulleys and bearings Correct tension is obtained when the belt C can be flexed about 1 out of line midway between the pulleys using light finger pressure Fig 22 E A C B D DRILLING HOLES TO DEPTH Where a number of holes are to be drilled to exactly the same depth the stop nuts on the threaded stop rod...

Page 12: ...A then back nut E out a 1 4 turn Tighten nut B against nut E to hold the housing in place IMPORTANT Inside nut E should not contact spring housing A when tightened Fig 24 D A C E B OPERATION Your drill press is to be used with drill bits with a shank of 1 2 or less in diameter The following will give the inexperienced operator a start on common drill press operations Use scrap material for practic...

Page 13: ...ned for removal of wood chips Do not use hand bits which have a screw tip at drill press speeds they turn into the wood so rapidly as to lift the work off the table and whirl it For through boring line up the table so that the bit will enter the center hole to avoid damage to the table Scribe a vertical line on the front of the column and a matching mark on the table bracket and the drill press he...

Page 14: ...elta s sole warranty and sets forth the customer s exclusive remedy with respect to defective products all other warranties express or implied whether of merchantability fitness for purpose or otherwise are expressly disclaimed by Delta Printed in U S A PARTS SERVICE OR WARRANTY ASSISTANCE All Delta Machines and accessories are manufactured to high quality standards and are serviced by a network o...

Page 15: ...15 NOTES ...

Page 16: ...16 NOTES ...

Reviews: