background image

1

Amplon RX Series

Chapter 1 : Important Safety Warnings

Please comply with all warnings and operating instructions in this manual strictly. 
Save this manual properly and read carefully the following instructions before install-
ing the unit. Do not operate the unit before reading through all safety information 
and operating instructions carefully.

z

z

 Do not try to repair the unit yourself, contact your local supplier or your warranty 
will be void.

z

z

 To eliminate any overheating of the battery box, keep all ventilation openings 
free from obstruction and do not place any foreign objects on top of the battery 
bank. Keep the battery box 20 cm away from the wall. 

z

z

 Make sure the battery box is installed within the proper environment as specified 

(0-40°C and 30-90% non-condensing humidity).

z

z

 Do not install the battery box under direct sunlight. Your warranty will be void if 
the batteries fail due to overheating.

z

z

This battery box is not designed for use in dusty, corrosive and salty environ-
ment.

z

z

The warranty for this battery bank will be void if water or other liquid is spilt or 
poured directly onto the battery box. Similarly we do not warrant any damage to 
the battery box if foreign objects are deliberately or accidentally inserted into the 
battery box enclosure.

z

z

The battery will discharge naturally if the system is unused for a period of time.

z

z

It should be recharged every 2-3 months if unused. If this is not done, then the 
warranty will be null and void.  During normal operation, the batteries will be au-
tomatically remained in charged condition.

z

z

Servicing of batteries should be performed or supervised by trained personnel 
with knowledge of batteries and the required precautions. 

z

z

When replacing batteries, it is necessary to replace ALL batteries with the same 
quantity, type & capacity.

z

z

CAUTION – Do not dispose of battery or batteries in a fire. The battery may ex

-

plode.

Summary of Contents for Amplon M series

Page 1: ...www deltapowersolutions com The power behind competitiveness Delta UPS Amplon Family User Manual External Battery Box for RX 3 kVA B TTERY PACK B TTERY PACK...

Page 2: ...product Any disposition duplication dissemination reproduction modification translation extraction or usage of this Manual in whole or in part is prohibited without the prior written permission of De...

Page 3: ...ety Warnings 1 Chapter 2 Product Overview and Setup 3 2 1 Rear Panel View 3 2 2 Installation and Connection 3 Chapter 3 Type of Battery Required 6 Chapter 4 Battery Installation 7 Chapter 5 Wiring Dia...

Page 4: ...warranty will be void if the batteries fail due to overheating z z This battery box is not designed for use in dusty corrosive and salty environ ment z z The warranty for this battery bank will be voi...

Page 5: ...nds z z CAUTION A battery can present a risk of electrical shock and high short circuit current The following precaution should be observed when working on batteries 1 Remove watches rings or other me...

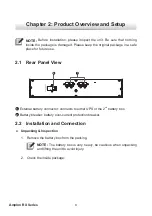
Page 6: ...EXTERNAL BATT CONNECTOR 72Vdc 50A max EXTERNAL BATT CONNECTOR 72Vdc 50A max 2 1 1 External battery connector connects to either UPS or the 2nd battery box 2 Battery breaker battery over current prote...

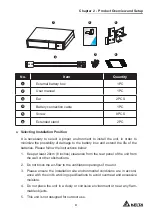
Page 7: ...ronment to install the unit in order to minimize the possibility of damage to the battery box and extend the life of the batteries Please follow the instructions below 1 Keep at least 20cm 8 inches cl...

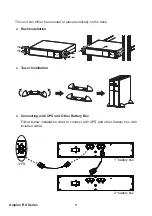
Page 8: ...z Rack Installation B TTERY PACK B TTERY PACK z z Tower Installation ON MUTE SELECT OFF ENTER B TTERY PACK z z Connecting with UPS and Other Battery Box Follow below installation chart to connect wit...

Page 9: ...equired Chapter 3 Type of Battery Required This battery box has been designed to operate with the following types of batteries 1 72V 9Ah Version 6 pieces of 12V 9Ah batteries 2 72V 18Ah Version 12 pie...

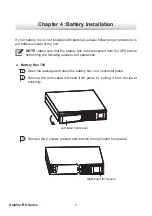
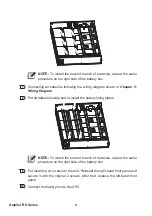
Page 10: ...at the battery box is disconnected from the UPS before performing the following sequence of operations z z Battery Box 72V 1 Open the package and place the battery box on a horizontal plane 2 Remove t...

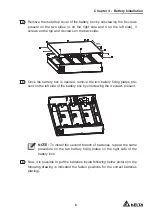
Page 11: ...ry box is opened remove the two battery fixing plates pre sent on the left side of the battery box by unscrewing the 4 screws present NOTE To install the second branch of batteries repeat the same pro...

Page 12: ...ter 5 Wiring Diagram 8 Put all batteries inside and re install the battery fixing plates NOTE To install the second branch of batteries repeat the same procedure on the right side of the battery box 9...

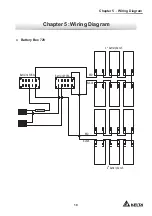
Page 13: ...Chapter 5 Wiring Diagram 10 Chapter 5 Wiring Diagram z z Battery Box 72V Batt Link PCBA Batt Link PCBA Breaker 1 battery bench 2 battery bench RED RED BLACK BLACK st nd...

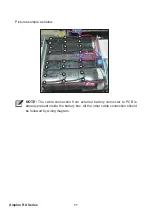
Page 14: ...re example as below M M M 240mm 280mm 380mm 380mm NOTE The cable connection from external battery connector to PCB is already present inside the battery box All the other cable connection should be fo...

Page 15: ...ur dealer Be sure to deliver the spent battery to a recycling facility or ship it to your dealer in the replacement battery packing material z z Storage Before storing charge the unit 4 hours Store th...

Page 16: ...ce or irresistible force i e war fire natural disaster etc and this warranty also expressly excludes all incidental and consequential damages Maintenance service for a fee is provided for any damage o...

Page 17: ......

Page 18: ......

Page 19: ......

Page 20: ......

Reviews: