background image

TROUBLE SHOOTING 


SM3300 

26 / 30 

DELTA ELEKTRONIKA B.V. 

rev. Jan. 2022 


8


TROUBLE SHOOTING 

8.1


GENERAL 


If you have a question about the unit, please contact our 
engineers using the address [email protected]


In case the unit is defect, please first fill out the RMA-form 
before sending the unit to us. Adding a detailed fault 
description will help us to repair the unit as soon as 
possible. Do not try to repair the unit yourself. 


On our website  the RMA-form can be found under 
'Support'.  

8.2


NO DC OUTPUT 


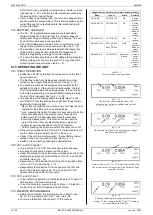
Check the output is switched ON: the text 'ON/off' must be 
visible on the right side of the display. 


If the text is 'on/OFF', press the button next to this text to 
switch it ON if needed. 


Check the unit is not in LOCK mode: the text 'Lock' must be 
visible on the right side of the display.  
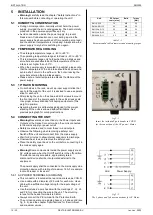
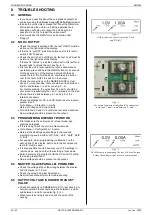
If the text is 'Unlock', press the button next to this text for a 
few seconds to unlock the unit, see fig. 8 - 1. 


First set the unit in local operation (or so-called manual 
operation): press and hold the ON/off button for 4 seconds. 
On the second line of the display, before both the set 
values the text 'front' will be seen, now press the button 
next to the text on/OFF to switch on the output.  


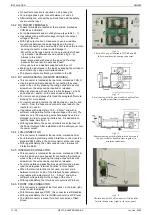
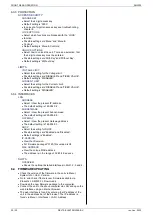
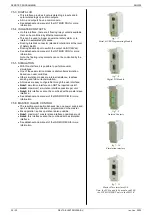
Check the connections on the SENSE BLOCK (at rear 
panel). For local sensing, there should be a link b 
and S+ and between 

– and S– (see fig. 8 - 2). 

For remote sensing, the wires from S+ and S- should be 
connected to respectively the + and - terminals on the load. 


Check there is a link between pin 1 and pin 3 of the 
Interlock connector. 


Check the settings for CV- and CC-limit are set to a value 
greater than 0. 
Go to Menu -> Protection -> Limits. 
Here set Voltage and Current limits. 


Turn both the CV and CC encoders a few turns clockwise. 
Now a voltage should be present on the output. 

8.3


PROGRAMMING DOES NOT WORK OK 


First make sure the unit works ok in local mode, see 
previous paragraph. 


If this is okay, check the unit is in Remote mode. 


Go to Menu -> Configuration -> Source. 


Here set the Vsettings and Isettings to the required 
programming source, either 'eth', 'web', 'slot1', 'slot2', 'slot3' 
or 'slot4'.  


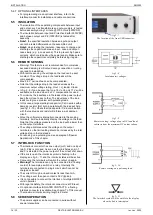
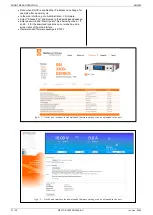
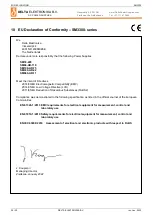
For example, when programming via Ethernet, on the 
second line of the display, before both the set values the 
text 'eth' must be seen.  


It is also possible to only have only one of the settings in 
remote mode, and have the other setting in local mode. 


Enter a command to program both the CV and CC setting 
to a value greater than 0. 


Now a voltage should be present on the output. 

8.4


MASTER / SLAVE PARALLEL PROBLEMS 


Check the voltage drop of the wiring between the master 
and the slaves is < 10 mV. 


Check the wiring has a low inductance. 


See interface manual for more trouble shooting. 

8.5


OUTPUT VOLTAGE IS HIGHER THAN SET 
VALUE 


Check connections on SENSE BLOCK (on rear panel), For 
normal operation there should be a link b and S+ 
and between 

– and S– (see also fig. 8 - 2 ).  


When remote sensing is used, check the wires of the 
sensing. 


fig 8 - 2 

For normal operation links should be connected 

between S+ and +, and between S– and –. 


fig 8 - 1 

At the right side, the texts must be 'Lock'  

and 'ON/off'. 


fig 8 - 3 

For Ethernet programming, the text 'eth' must be seen 

before the setting(s) that is/are in 'remote mode'. 

Summary of Contents for SM100-AR-75

Page 1: ...herheitshinweise 3 Quick Start 4 General 5 Installation 6 Front Menu Operation 7 Remote Programming 8 Trouble Shooting 9 Maintenance Calibration 10 EU Declaration of Conformity 11 UK Declaration of Conformity Firmware Update It is strongly recommended first to perform a firmware update before further operation Download the SM3300 Quick Start Manual for instructions Driver Example Software For seve...

Page 2: ...ounded the voltage on the DC power terminals and sense connections can be considered safe Caution 1 If a low voltage unit has both DC power terminals floating or if the terminals are in series with an external high AC or DC voltage the minus DC power terminal can exceed the safe value in respect to ground as specified in the above warning Caution 2 Although a high voltage unit is set to a safe vol...

Page 3: ...hausts can get hot Avoid touching these while operating the unit at high power Warning Do not block fan openings or air exhausts Do not try to enter fan openings by any object to obstruct fan Long hair can get stuck in fan wear a hairnet if you have long hair Warning Do not dis connect cables to the DC power terminals while the unit is on Sudden making or breaking of high DC currents can cause lar...

Page 4: ...us DC Anschlussklemme des Geräts im Verhältnis zur Erdung 1000 VDC 707 Vpk nicht überschreitet Vorsicht 1 Falls beide DC Anschlussklemmen eines Niederspannungsgerätes potentialfrei sind oder falls die DC Klemmen in Reihe mit einer externen AC oder DC Hochspannung geschaltet sind kann die minus DC DC Anschlussklemme den sicheren Wert in Bezug auf die Erdung wie in der Warnung oben spezifiziert über...

Page 5: ... Schließen Sie keine Kabel an die DC Anschlussklemmen an während das Gerät eingeschaltet ist Plötzliches Machen oder Brechen von hohen Gleichstrom kann große Funken verursachen auch bei niedriger Spannung Gefahr von thermischen Verbrennung und Feuer 2 14 Elektromedizinische Geräte Warnung Hohe Ströme können durch die DC Anschlussklemmen laufen Diese Ströme verursachen starke Magnet felder Kommen S...

Page 6: ... The LAN connector is at Protective Earth level 3 1 4 LOAD SENSING INTERLOCK USB INTERFACES SERIES PARALLEL MASTER SLAVE Refer to user manual for connecting and using these features and options 3 2 Operating the unit 3 2 1 FIRMWARE UPDATE Switch the unit on by rotating the mains switch on the front panel clockwise In the unit menu check the firmware revision via Menu System info Unit Version Use t...

Page 7: ...eration see fig 3 4 In remote operation different programming options are available such as eth web seq slot1 etc Via the front menu the source can be set to the required programming input via Menu Configuration Source When connected to LAN enter the unit s IP address in a web browser to open the web interface With this interface all above described parameters plus additional parameters can be set...

Page 8: ...ly 3700W Thus at 18V the maximum output current is 205A When using it on 17V the maximum current is 220A On 230VAC single phase the power is derated to approximately 3000W thus delivering maximum 18V 166A or 13 5V 220A For the SM18 220 the full range of 18V and 220A 4000W cannot be used simultaneously because the input power is limited to 3750W See datasheet for more details 4 4 OVERLOAD PROTECTIO...

Page 9: ...up the voltage setting a programming error or a defect in the power supply The Voltage Limit circuit uses a separate voltage divider connected directly to the output terminals The Current Limit protects your circuit from unwanted high currents The Voltage and Current Limits maintain the output to a safe preset value They do not trip so no resetting is needed after a fault 4 15 HOLD UP TIME The hol...

Page 10: ...to read the CV CC monitors and the status signals 4 21 SEQUENCER PROGRAMMING Possibility to use the unit in stand alone automation or use as an arbitrary waveform generator and create loops ramps etc The sequencer can be controlled via the web interface and via Ethernet programming 4 22 OPTIONAL INTERFACES Up to a number of 4 different interfaces can be plugged in the sockets at the rear side of t...

Page 11: ...flow path see fig 4 8 Because the air enters at the left and exits at the right side it is possible to stack the power supplies no distance between the units is required 4 27 OPERATING TEMP At full power the operating temperature range is 20 to 50 C From 50 to 60 C the output current has to be derated linearly to 75 at 60 C see fig 4 9 These temperatures hold for normal use i e the ventilation ope...

Page 12: ...ons See previous paragraph for cooling instructions 5 4 CONNECTING THE UNIT Warning Never make connections to the Power Inputs and Outputs or the Sense Connector when the unit is connected to the mains supply or power outlet Safety covers are used to cover these in and outputs Observe the following when removing a safety cover Switch off the unit and disconnect from the mains supply Wait for 5 min...

Page 13: ...nt voltage rating for the output voltage of the unit The leads are only thin measuring wires but always have to be shielded In order to prevent interference it is advisable to twist the leads See fig 5 5 With regards Safety the sense terminals are at the level of the Power Outputs After installation add the safety cover over the power output 5 4 4 LAN CONNECTOR This connector is located at the rea...

Page 14: ...g 5 10 Check that the capacitor Cd in combination with the load leads and resistor Rd forms a well damped circuit Since the voltmeter is internally connected to the sensing terminals it will automatically display the voltage on the load Note that the voltage measured on the load will be lower than on the output terminals The voltage limit measures the voltage on the output terminals so the limit s...

Page 15: ...oad has been reached the Power Sink and the output shut down completely until the internal heat sink has cooled down again In this OverTemp situation the OT status will be high 5 11 4SERIES OPERATION For series operation in combination with Power Sink option all units must have a Power Sink built inside otherwise no power can be absorbed When using Master Slave mixed parallel series operation auto...

Page 16: ...5 seconds will unlock the encoders and or the display menu This function can be useful to protect the output from accidental shutdown See next chapter for exact possibilities of the Lock function On Off pressing this button will switch the output on or off If the unit is equipped with a Power Sink via the web server it can be chosen to also switch this off or leave it on Check if the unit is in lo...

Page 17: ...e ETH connection or via an optional interface USB Not available in firmware package P0157 POWERSINK OVER LOAD This indicator is active if absorbed power of the optional Power Sink is too high SMIN SPLUS BREAK Not available in firmware package P0157 CV OR CC MODE This indicator will indicate if a unit is operating in CV or CC mode CONTROLS LOCKED This indicator is active if the rotary encoders on t...

Page 18: ...S LIGHT ON Select the setting of the display back light level during operation of the rotary encoders or the push buttons A range of 20 100 is available The default setting is 50 LIGHT DIM Select the setting of the normal display back light level A range of 0 100 is available The default setting is 20 DIM DELAY Select the time after which the display switches back from a high level during encoder ...

Page 19: ...gs are NONE FRONT ETH WEB SEQ and SLOT1 4 Default setting is FRONT I SETTINGS Select programming source for the CC setting Possible settings are NONE FRONT ETH WEB SEQ and SLOT1 4 Default setting is FRONT POWERSINK STATUS Displays current state Displays the temperature of the power sink SETTINGS Shows the settings for the optional power sink Settings can be done via the web interface as well Possi...

Page 20: ...elect View the present IP address The default setting is 169 254 0 2 SUBNETMASK Select View the present Subnet mask The default setting is 255 255 0 0 GATEWAY Select View the present Gateway address The default setting is 169 254 0 1 DHCP Select the setting for DHCP Possible settings are Enabled and Disabled Default settings is Enabled IP VERSION View the IP version For firmware package P0120 this...

Page 21: ...t Choose File and browse to the downloaded package Enter password and Start Update See below figures 6 2 and 6 3 for the download locations on our website and a screen shot of the web interface Recommended firmware package is P0157 fig 6 3 Via the web interface the downloaded firmware package can be uploaded to the unit fig 6 2 Via the web interface the downloaded firmware package can be uploaded ...

Page 22: ... DC fail type of unit and serial number on time of the unit system temperature and fan speed input voltage See fig 7 1 for the console lay out SEQUENCER Possible to select sequences from the unit memory Running Pausing and Stopping of sequences Trigger sequence Running in Single Step mode See fig 7 2 for the console lay out MASTER SLAVE Only available on the Master unit Overview of the entire syst...

Page 23: ...us of the relay contact 1 4 On Off Level of the Interlock input High Low Level of the Enable input High Low MASTER SLAVE Enable or disable master slave mode Select Master or Slave Number of units in parallel or series SEQUENCES Upload sequences into the unit s volatile memory Synchronize memory to copy sequences from the volatile to the non volatile memory After switching off the unit the sequence...

Page 24: ...re uploaded in the volatile memory and are lost after switching off the mains 7 5 OPTIONAL INTERFACES Set the programming source for voltage and or current to slot1 4 via the front menu the web interface or Eth commands The following interfaces can be plugged in the slots at the rear panel of the unit There is room to insert a total of 4 interfaces see fig 7 6 11 7 5 1 ISOLATED ANALOG PROGRAMMING ...

Page 25: ... simulations One of these simulation modes is photovoltaic simulation based upon user variables Other simulation modes are internal resistance leadless sensing and fold current simulation All modes are easy configurable through the web interface Note1 simulation interface can NOT be inserted in slot1 Note2 maximum 1 simulation interface possible per unit Note3 this interface cannot be combined wit...

Page 26: ...1 and pin 3 of the Interlock connector Check the settings for CV and CC limit are set to a value greater than 0 Go to Menu Protection Limits Here set Voltage and Current limits Turn both the CV and CC encoders a few turns clockwise Now a voltage should be present on the output 8 3 PROGRAMMING DOES NOT WORK OK First make sure the unit works ok in local mode see previous paragraph If this is okay ch...

Page 27: ...e unit or when an interface is not correctly configured Verify the System information page of the web interface Or contact support 8 11 Forgotten password access key or network settings To reset the front panel access key the password and the network settings to their default values press the reset button at the rear panel of the unit A bent paperclip can be used to press the internal micro push b...

Page 28: ...For using the power supplies in the galvanic industry it is strongly recommended to take precautions against an aggressive environment An aggressive environment with acid salt etc can harm the electronic components Sometimes even the copper tracks on the printed circuit boards dissolve To avoid problems the power supplies should be mounted in a relatively clean room in a cabinet receiving clean ai...

Page 29: ...tion of Hazardous Substances RoHS2 Compliance was demonstrated to the following specification as listed in the official Journal of the European Communities EN 61326 1 2013 EMC requirements for electrical equipment for measurement control and laboratory use EN 61010 1 2010 Safety requirements for electrical equipment for measurement control and laboratory use EN IEC 63000 2018 Assessment of electri...

Page 30: ...t UK Statutory Instruments and their amendments 2016 No 1091 Electromagnetic Compatibility Regulations 2016 2016 No 1101 Electrical Equipment Safety Regulations 2016 2012 No 3032 Restriction of the Use of Certain hazardous Substances in Electrical and Electronic Equipment Regulations 2012 Standard Title BS EN 61326 1 2013 EMC requirements for electrical equipment for measurement control and labora...

Reviews: