background image

7

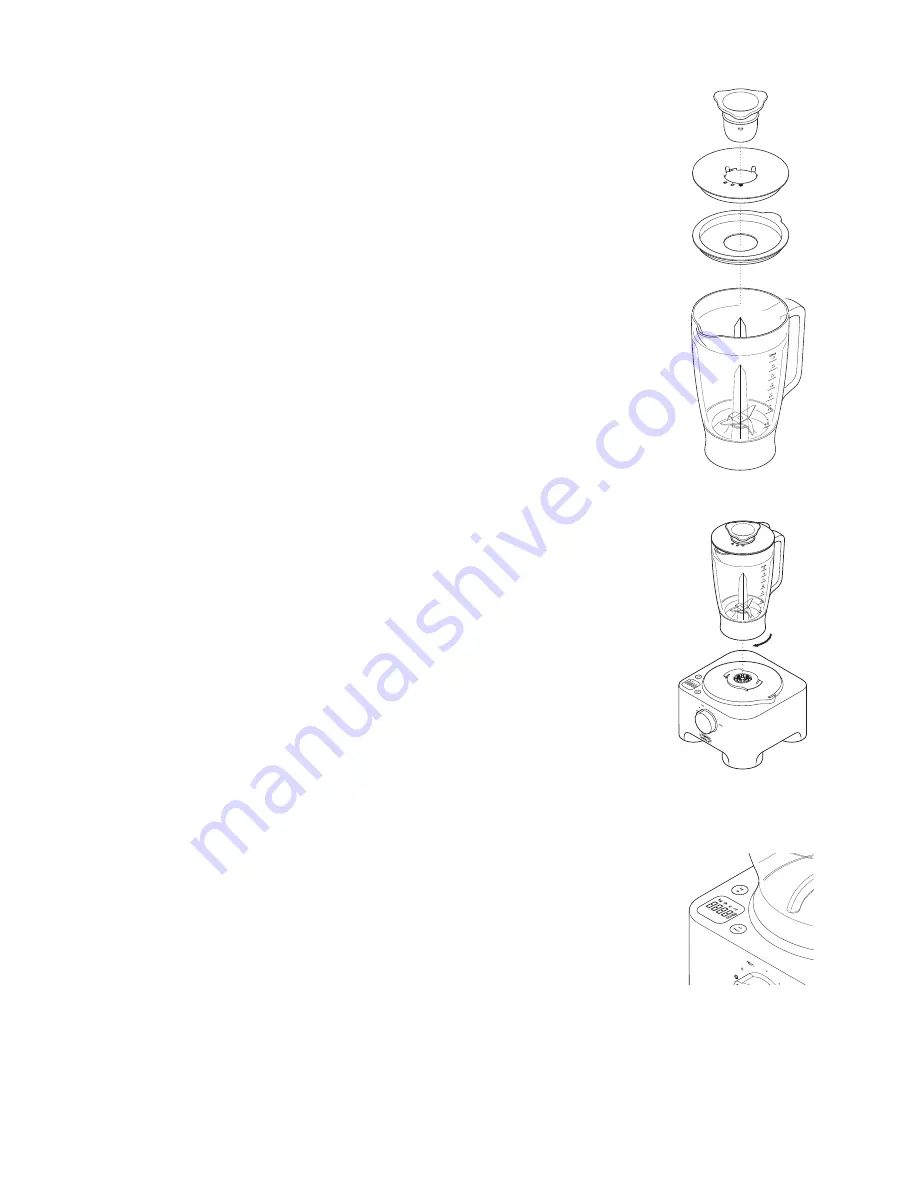
TO USE YOUR BLENDER

1

Put your ingredients into the carafe.

2

Ensure the lid seal is correctly fitted to the underside of the lid so there are no gaps between the lid
and the lid seal.

3

Fit and lock the filler cap in the lid, by turning one position 

.                                                         

4

Fit the lid to the carafe.

5

Place the blender onto the power unit and turn clockwise to lock (4).

6

Select a speed or use the pulse control.

Important

- Allow all liquids to cool to room temperature before placing them in the blender.
- To ensure the long life of your blender, never run it for longer than 60 seconds. Switch off as soon as

you’ve got the right consistency.

- Don’t process spices - they may damage the plastic.
- The machine won’t work if the blender is fitted incorrectly.
- Don’t put dry ingredients into the blender before switching on. If necessary, cut them into pieces;

remove the filler cap; then with the machine running, drop them through one by one.

- Don’t use the blender as a storage container. Keep it empty before and after use.
- Never blend more than 1 1/2 litres (50 oz) - less for frothy liquids like milkshakes.

Hints

- When making mayonnaise, put all the ingredients, except the oil into the blender. Then with the machine

running,  remove filler cap and pour oil slowly through the filler cap hole.

- Thick mixtures, e.g. pates and dips, may need scraping down. If it’s difficult to process, add more liq-

uid.

- When crushing ice use the pulse in short bursts.

WEIGHING FUNCTION

- Your food processor is fitted with a built in weighing function to allow ingredients to be weighed

straight into the bowl or blender carafe.

- The Maximum weighing capacity is 3Kg./6.6 lbs. This is the total weight of all the ingredients plus the

weight of the bowl or blender carafe.

TO USE THE WEIGHING FUNCTION

1 Always fit the drive shaft, bowl and attachment or blender carafe onto the power unit before adding ingredients.
2 Plug in – the display screen will remain blank.
3 Press the ON/ZERO button once and the display screen will light up.
4 Press the (kg/lb) button to select either grams or ounces. The display will default to kg/g when first switched

on.
- The unit weighs in 2g increments and teaspoon/tablespoon measures are recommended for weighing
small quantities.

5 Check the display shows ‘0’, if not, zero by pressing the ON/ZERO button. Then weigh the required

ingredients straight into the bowl or carafe. After the weight is displayed, press the ON/ZERO button
and the display will return to ‘0’. Add the next ingredients and that weight will be displayed. Repeat until all ingredients are
weighed.
- If the display is not zeroed and either the ingredients or the bowl/attachment/lid are removed the display will show [ - - - -] to
represent a minus reading. To zero press the ON/ZERO button once.

6 Add the lid and select a speed to operate the processor.

4

Summary of Contents for DFP950 Series

Page 1: ...on com Visit www delonghi com for a list of service centers near you Enregistrez ce produit en ligne et recevez un num ro gratuit de Cook s Illustrated Visitez www delonghiregistration com Visitez www...

Page 2: ...2 F E D C B A K L J I G H 1 2 3...

Page 3: ...3 N O P Q M 4 27 20 21 22 28 29 23 24 25 26 30 31...

Page 4: ...11 Keephandsandutensilsawayfrommovingbladesordiscswhileprocessingfoodandawayfrom cuttingblade whilechop pingfood andoutofcontainerwhileblending toreducetheriskofsevereinjurytopersonsordamagetotheappli...

Page 5: ...mpt to modify the plug in any way Before plugging in Makesureyourelectricitysupplyisthesameastheoneshownontheundersideofyourmachine Before using for the first time 1 Remove all packaging including the...

Page 6: ...d processor is not suitable for crushing or grinding coffee beans or processing granulated sugar to caster sugar When adding extracts or flavorings to mixtures avoid contact with the plastic as this m...

Page 7: ...y need scraping down If it s difficult to process add more liq uid Whencrushingiceusethepulseinshortbursts WEIGHING FUNCTION Your food processor is fitted with a built in weighing function to allow in...

Page 8: ...sive force as this may damage the weighing sensor Always place the food processor on a dry flat surface prior to weighing Do not move the power unit during operation of the weighing function USING THE...

Page 9: ...atoes and foods of a similar texture Use the slicing side for cheese carrots potatoes cabbage cucumber zucchini beet and onions Julienne fine chipper disc 25 optional Use to cut potatoes for Julienne...

Page 10: ...andle is locked into position directly over the bowl handle H 3 Place the cone over the drive shaft turning until it drops all the way down I 4 Cut the fruit in half Then turn the speed dial and press...

Page 11: ...mini processor bowl TO USE THE MINI PROCESSOR BOWL 1 Fit the drive shaft and bowl onto the power unit 2 Fit the mini processor bowl ensuring the ribs on the inside of the mini bowl chimney align with...

Page 12: ...ender mill 1 Empty the carafe jar before unscrewing it from the blade unit 2 Wash the carafe jar by hand 3 Remove and wash the seals 4 Don t touch the sharp blades brush them clean using hot soapy wat...

Page 13: ...fuse circuit breaker in your home Processor overloaded maximum capacities Check maximum capacities stated under to use your exceeded food processor Lid unlocked Check lid is locked correctly Refer to...

Page 14: ...resulting from the use of this product or arising out of any breach of contract or breach of this warranty are not recoverable under this warranty Some states do not allow the exclusion or limitation...

Page 15: ...erlesalimentshorsdurobot pour viterlerisquedeblessureauxpersonnes oud endommagerl appareil Utiliserune raclettelorsquec estn cessaireetquel appareilnefonctionnepas 12 Leslamessontcoupantes Manipulerav...

Page 16: ...de la CE du 27 10 2004 sur les mat riaux destin s au contact alimentaire Avantlapremi reutilisation 1 Oteztouslesemballagesycomprislecachelameenplastiqueducouteau Manipulezavecpr cautionsleslamescarel...

Page 17: ...Votrerobotn estpascon upourconcasseroumoudredesgrainsdecaf outransformerdusucrecristallis ensucreenpoudre Sivousajoutezdel essenced amandesouunparfumauxpr parations vitezlecontactavecleplastiquecaril...

Page 18: ...uide Pour piler de la glace utilisez le bouton de m lange intermittent Pulse P FONCTION DE BALANCE Votre robot est quip d une fonction de balance int gr e qui permet de peser les ingr dients directe m...

Page 19: ...ction de balance UTILISATION DES ACCESSOIRES LAME COUTEAU P TRINL Cette lame est l accessoire le plus polyvalent La texture que vous obtenez est d termin e par la dur e de mixage Pour les textures plu...

Page 20: ...ents de texture similaire Utilisez l minceur pour les fromages carottes pommes de terre choux concombres courgettes betteraves et ognions disque frites fines style Julienne 25 optional Utilisez ce dis...

Page 21: ...s agrumes par exemple les oranges les citrons les citrons verts et les pamplemousses a c ne b passoire UTILISATION DU PRESSE AGRUME 1 Fixez le manche et le bol sur l unit moteur 2 Fixez la passoire da...

Page 22: ...es et s ches MINI BOL Utilisez le mini bol pour broyer les aromates et pour mixer les petites quantit s d ingr dients par ex viande oignon noix mayon naise l gumes pur es sauces et aliments pour b b...

Page 23: ...oration Unit moteur Essuyez avec un chiffon humide puis s chez Assurez vous que la zone de verrouillage est exempte de r sidus alimentaires Entourez le cordon d alimentation autour de l enrouleur qui...

Page 24: ...ctionner si le bol et le couver cle ne sont pas fix s correctement Si aucune des solu tions susmentionn es ne r gle le probl me v rifiez votre disjoncteur ou les fusibles de votre installation lectriq...

Page 25: ...rantie ne sont pas recouvrables dans le cadre de cette garantie Certains tats ou provinces n autorisent pas l exclusion ou la limitation des dommages int r ts directs ou indirects Par cons quent la li...

Page 26: ...etidoaunafuerzaexcesiva lam quinapodr aresultarda adaycausarlesiones 11 Mantenga las manos y utensilios lejos de las cuchillas o los discos mientras se elaboran los alimentos fuera de la cuchilla de c...

Page 27: ...electricidad es la misma que la mostrada en la parte inferior de la m quina Antes del primer uso 1 Retire todos los envases incluida las protecciones de pl stico de las cuchillas Tenga cuidado ya que...

Page 28: ...anosdecaf niparahaceraz carglasapartirdeaz cargranulado Cuandoagregueextractosdesaboresuotrosaromatizantes evitarelcontactoconelpl sticoyaquepuededejarmanchaspermanentes Selecci n de la velocidad adec...

Page 29: ...sde11 2litros 50oz dealimentosporvez menosa nenelcasodel quidosqueformen espuma comolosbatidosdeleche Consejos Parahacermayonesa introduzcaenlalicuadoratodoslosingredientesmenoselaceite Pongaelaparato...

Page 30: ...nsec utivos La pantalla se puede apagar manualmente apretando y manteniendo presionada la tecla ON ZERO durante unos segundos Importante No supere la capacidad m xima de la b scula que es de 3 kg 6 6...

Page 31: ...grasas DISCOS PARA REBANAR Y RALLAR discos reversibles para rebanar y rallar grueso 23 y fino 24 Lado de rallar para queso zanahorias patatas y alimentos de consistencia similar Lado de rebanar para q...

Page 32: ...bloqueada justo sobre el asa del recipiente H 3 Aplique el cono en el eje de rotaci n y g relo hasta que se encaje I 4 Corte los frutos por la mitad Encienda la m quina y presione las mitades sobre el...

Page 33: ...mezclador peque o PARA USAR EL RECIPIENTE MEZCLADOR PEQUE O 1 Monte el eje de rotaci n y el recipiente mezclador grande en la toma el ctrica 2 Coloque dentro el recipiente mezclador peque o de manera...

Page 34: ...d zcalo en el alojamiento situado en la parte posterior del aparato S Licuadora y molinillo 1 Desmonte el accesorio de la m quina y desenrosque el vaso del conjunto cuchilla 2 Lave el vaso a mano 3 De...

Page 35: ...capacidad m xima La tapa no est bloqueada Vea las instrucciones en el correspondiente apartado Uso de La cantidad pesada es demasiado peque a La toma el ctrica se ha desplazado durante el funcionamie...

Page 36: ...ncumplimiento de los t rminos y condiciones que hacen v lida la garant a En algunos estados no se permiten exclusiones ni limitaciones de los perjuicios reconocidos por una garant a por lo cual las li...

Page 37: ...19772 05 11_00 Printed in China www delonghi com...

Reviews: