background image

Setting Up Your Tablet


|

  15

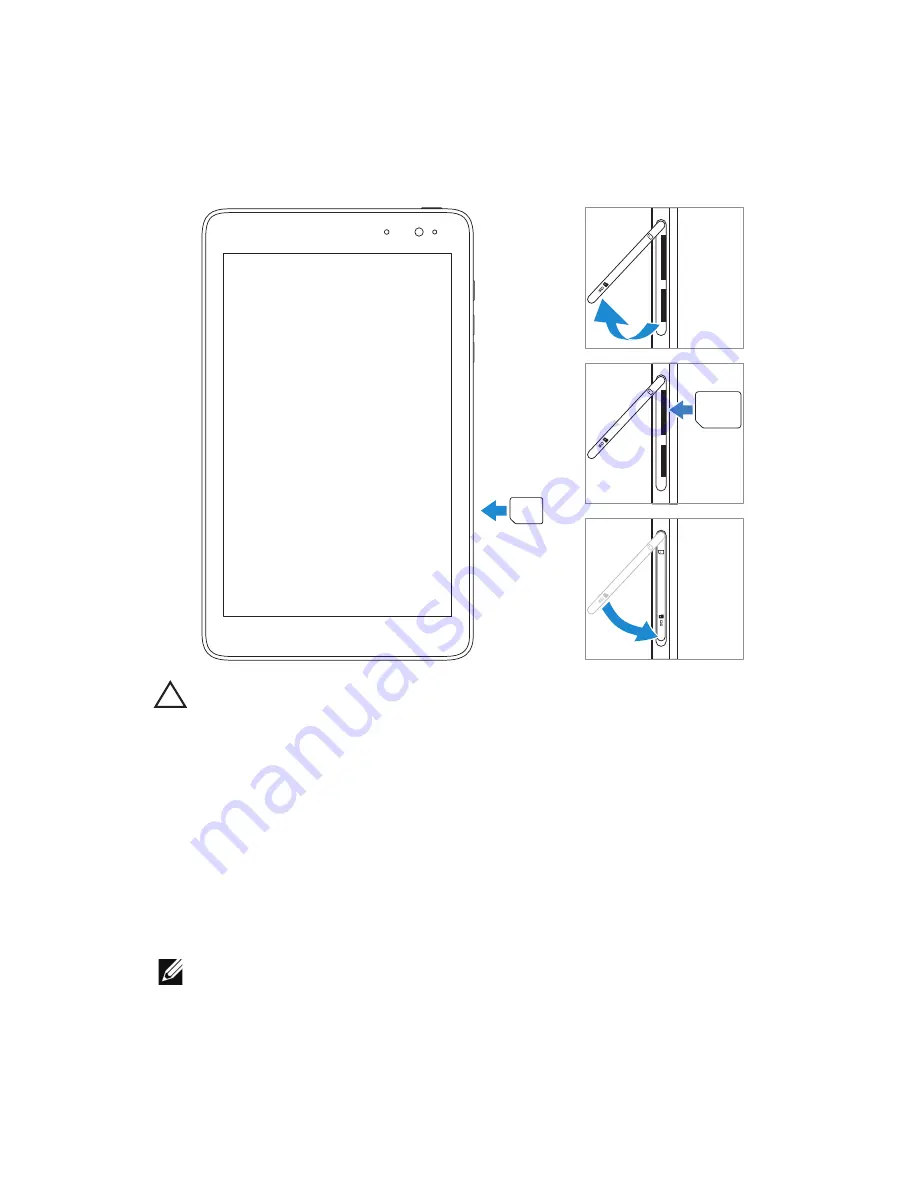
Inserting a Micro-SIM Card

SIM

SIM

CAUTION: 

Inserting an incompatible SIM card, such as a nano‑SIM card, 

into the micro‑SIM card slot may damage the card or the tablet, and 
may corrupt data stored on the card. 

Open the slot cover. 

Align the micro‑SIM card so that the pins are pointed toward the 
card slot and are facing toward the rear of the tablet.

Push the micro‑SIM card into the card slot. 

Close the slot cover. 

NOTE:

 Make sure the micro‑SIM card is inserted all the way into the card 

slot.

Summary of Contents for Venue 8 Pro

Page 1: ...Venue 8 Pro User s Manual ...

Page 2: ... Reproduction of these materials in any manner whatsoever without the written permission of Dell Inc is strictly forbidden Trademarks used in this text Dell the DELL logo and Venue are trademarks of Dell Inc Bluetooth is a registered trademark owned by Bluetooth SIG Inc and is used by Dell under license Apple is a trademark of Apple Inc registered in the U S and other countries Other trademarks an...

Page 3: ... Removing the microSD Card 14 Inserting a Micro SIM Card 15 Removing the Micro SIM Card 16 Using Headphones 17 Using Your Tablet 18 Wi Fi Setting 18 Mobile broadband Setting 18 Bluetooth Setting 20 Gestures 21 Screen Orientation 24 Windows 8 Start Screen 24 Synchronizing Your Tablet 27 Refreshing Your Tablet 28 Resetting Your Tablet 29 Cleaning Your Tablet 30 Troubleshooting 31 Contacting Dell 35 ...

Page 4: ...4 Contents Locating Your Service Tag and Express Service Code 36 Specifications 37 Glossary 39 Index 43 ...

Page 5: ... 1 Audio port 3 5 mm Connect a headset headphones microphone or other audio equipment to listen to stereo sound record audio or make calls 2 Windows button Press to open the Windows Start screen Press for quick access to the most recently used app or most recently viewed screen ...

Page 6: ... Express Service code needed for contacting Dell for customer service or technical support 7 Speaker Provides audio output 8 Micro USB port Connect the supplied power adapter to provide power to the tablet and charge the battery Connect USB devices using an optional USB On The Go OTG dongle for transferring data music photos videos and so on 9 Battery status light Indicates the battery charge stat...

Page 7: ...ty 15 Rear camera Captures pictures or videos NOTE The front camera does not support zoom face tracking or the touch to focus feature NOTE The rear camera supports continuous auto focus and touch to focus but does not support zoom or the face tracking feature NOTE The micro USB port does not support connecting to a computer or power sharing to connected USB devices Regulatory model Venu 8 Pro ...

Page 8: ... and micro USB cable Provides power to your tablet and charges the battery Stylus optional Allows you to draw shapes select items and text turn pages write or sign documents as well as use touch gestures on the touchscreen NOTE The stylus is sold separately and is not shipped with the tablet ...

Page 9: ...ry_compliance Charging the Tablet CAUTION Charge the battery in an ambient temperature of 0 C to 35 C CAUTION Use only the supplied power adapter to charge your tablet Using unauthorized power adapters or micro USB cables may severely damage your tablet NOTE The battery is not fully charged when you unpack your tablet 1 Connect the power cable into the power adapter 2 Connect the micro USB cable t...

Page 10: ...f Battery is not charging or battery is fully charged Flashing amber Battery is critically low and does not have enough charge to power up If you press the power button during this state the battery charge light turns on for 2 seconds and then turn off Battery icon displayed on the screen Battery icon Description Tablet is connected to power supply and the battery is fully charged Tablet is connec...

Page 11: ...art Guide 1 Press and hold the power button for 2 seconds to turn on your tablet The lock screen appears 2 Swipe up your finger from the bottom of the display to switch to the login screen and then enter password to log in to Windows NOTE If the login screen is not enabled the Start screen appears after the lock screen The tablet is ready for use when the Windows Start screen is displayed ...

Page 12: ...the right edge of the display to access Charms 2 Touch Settings Power Shut down to turn off the tablet Turning Off the Screen Using the power button Press the power button to turn off the screen Using Charms 1 Swipe in from the right edge of the display to access Charms 2 Touch Settings Power Sleep to turn off the screen NOTE If your tablet is in a standby state tablet is on but screen is off pres...

Page 13: ...serting a microSD Card 1 Open the slot cover 2 Align the microSD card so that the pins are pointed toward the card slot and are facing toward the rear of the tablet 3 Push the microSD card into the card slot 4 Close the slot cover ...

Page 14: ...fication area at the bottom right corner of the screen NOTE If you do not see Safely Remove Hardware touch Show Hidden Icons to display all icons in the notification area 3 Touch Eject SD Memory Card A message appears confirming that the microSD card can be safely removed If a warning message appears stating the microSD card cannot be removed make sure all data transfers involving the microSD card...

Page 15: ...y damage the card or the tablet and may corrupt data stored on the card 1 Open the slot cover 2 Align the micro SIM card so that the pins are pointed toward the card slot and are facing toward the rear of the tablet 3 Push the micro SIM card into the card slot 4 Close the slot cover NOTE Make sure the micro SIM card is inserted all the way into the card slot ...

Page 16: ... data loss or damage the card Make sure your tablet is turned off or the network connections are disabled 1 Turn off your tablet For more information on turning off your tablet see Turning Off Your Tablet 2 Open the slot cover 3 Press on the micro SIM card to release it 4 Slide the card out after it pops out from the micro SIM card slot ...

Page 17: ...g loss 1 Connect headphones to the audio port 3 5 mm on the tablet 2 Insert the earphones in your ears and adjust the volume level to a comfortable level NOTE When you connect an audio device to the 3 5 mm audio jack the integrated speakers on your tablet are muted automatically CAUTION To prevent damage to the headphones when disconnecting it from the tablet pull the connector and not the cable ...

Page 18: ... available network from the list and touch Connect Mobile broadband Setting Turning On Off mobile broadband 1 Swipe from the right edge of the display to access Charms 2 Touch Settings Network icon 3 Swipe Mobile broadband icon right or left to turn mobile broadband on or off Connecting to a mobile broadband network 1 Make sure an active micro SIM card is inserted into the tablet For more informat...

Page 19: ...the network If you enter the incorrect PIN code your mobile broadband connection will be blocked NOTE Select Connect automatically if you want the tablet to connect to mobile broadband automatically each time the tablet starts up NOTE When both Wi Fi and mobile broadband connections are available the tablet gives priority to Wi Fi networks If you wish to force the tablet to connect to mobile broad...

Page 20: ...rted 1 Swipe in from the right edge of the display to access Charms 2 Touch Settings Change PC settings PC and devices Bluetooth 3 Select the Bluetooth device you want to pair with in the list of available devices and touch Pair 4 If needed verify that the Bluetooth passcode that appears on both the tablet and the Bluetooth enabled device are the same 5 Confirm the pairing process on both the tabl...

Page 21: ...ap gently on the display with your fingertip Select items on the screen including options entries images and icons Start apps Touch buttons on the screen Input text using the on screen keyboard Touch and Hold Touch and hold your finger on the display Display detailed information about an item Open the context menu of an item to perform further actions ...

Page 22: ...splay to drop the item in the desired location Move items such as images and icons on the screen Swipe or Slide Move your finger in a vertical or horizontal direction on the display Scroll through the Start screen web pages lists entries photos contacts and so on Close an app Swipe the app to the bottom of the display Zoom in Touch the display with two fingers and then move the fingers apart Enlar...

Page 23: ...out Touch the display with two fingers and then move the fingers closer Reduce the view of an image or web page Rotate Touch the display with two or more fingers and then move the fingers in a clockwise or counter clockwise arc Rotate an object by 90 degrees ...

Page 24: ...touch toggle to unlock the screen orientation Windows 8 Start Screen The Windows 8 Start screen displays a list of default and custom Live Tiles which act as shortcuts to the installed apps Live Tiles on your Start screen change and update in real time to show news and sports updates weather updates social networking feeds and so on The tile based user interface gives you direct access to your mos...

Page 25: ...at the Start screen pressing the Start icon takes you to the most recently used app or most recently viewed screen NOTE The functionality of the Start icon is same as Windows button Swipe left Swipe in from the right edge of the display to show the charms Charms provide access to the system commands such as Start Search Share Devices and Settings options From the Start screen swiping left until yo...

Page 26: ...pe in and out on the left edge of the display to show a list of the most recently used apps Swipe up down From Start screen swipe in from the bottom or top edge of the display to show the Customize icon Touch Customize to organize the tiles on your Start screen Swipe in from the top to the bottom of an app to dock or close the app For more information on using Windows 8 Start screen see dell com w...

Page 27: ...s SkyDrive Sync settings to see the options for synchronizing your data and settings Copy music photos and videos 1 Connect your tablet to a USB storage device with a micro USB to standard USB conversion cable then transfer files to or from the USB storage device 2 After transferring files use the Safely Remove Hardware wizard to remove the USB storage device NOTE The micro USB to standard USB con...

Page 28: ...cally reinstalled after the refresh is complete Apps installed from sources other than the Windows Store are removed and have to be manually installed A list of apps removed during this process is created on the desktop after the process is complete NOTE After refreshing your tablet apps installed from the Window Store are automatically reinstalled using a mobile broadband or Wi Fi internet connec...

Page 29: ...ake sure that you back up all the required data before you proceed Resetting your tablet returns Windows to original factory settings To reset your tablet 1 Swipe in from the right edge of the display to access Charms 2 Touch Settings Change PC settings Update and recovery Recovery 3 Touch Get started under Remove everything and reinstall Windows 4 Read the warning and touch Next ...

Page 30: ...ucts specifically designed for cleaning displays and follow the instructions included with the product CAUTION Do not clean the keyboard sold separately with a moist cloth 1 Turn off your tablet For more information on turning off your tablet see Turning Off Your Tablet 2 Disconnect any attached devices headphones and speakers from the tablet and from their electrical outlets 3 Moisten a soft lint...

Page 31: ...he battery in an ambient temperature between 0 C to 35 C 32 F to 95 F The battery or power adapter is damaged Contact a Dell authorized reseller to replace the battery or power adapter Battery drains quickly even when the tablet is in Standby mode If the tablet is not in the range of a network it can connect to the tablet continues to send out signals to locate a base station and drains the batter...

Page 32: ...ton for 10 seconds to perform a hard shut down Tablet is not responding or behaving unexpectedly 1 Reboot the tablet See Turning Off Your Tablet and Turning On Your Tablet 2 Refresh the tablet See Reset your tablet 3 Contact Dell s support service See dell com support Tablet cannot boot into Windows Contact Dell s support service See dell com support Software or feature is not working as expected ...

Page 33: ...ion 1 Check if the mobile broadband is on See Mobile broadband Setting 2 Move your tablet to a different location for better signal reception The mobile broadband has been capped Stop using mobile broadband until the next billing cycle or contact your carrier to change your broadband plan Limited mobile broadband connection The mobile broadband network is temporarily unavailable Move your tablet t...

Page 34: ...ee Bluetooth Setting 2 Contact Dell s support service See dell com support Touchscreen problem Problems Possible causes Possible solutions Touchscreen responds slowly or improperly The screen is dirty A protective cover may prevent the tablet from recognizing your inputs Moisten a soft lint free cloth with either water or a display cleaner and wipe the surface of the tablet until it is clean Do no...

Page 35: ...quirement or choose the method of contacting Dell that is convenient for you Dell provides several online and telephone based support and service options Availability varies by country and product and some services may not be available in your area NOTE If you do not have an active internet connection you can find contact information on your purchase invoice packing slip bill or Dell product catal...

Page 36: ...ntacting Dell for customer service or technical support NOTE The telephone systems prompts you to enter the Express Service Code that helps in routing your call efficiently The Service Tag and Express Service Code for your tablet is located on a label at the bottom of the tablet Speaker IMEI 123456 ST 76WKLV1 EX 15664982673 789123456 IMEI 123456 ST 76WKLV1 EX 15664982673 789123456 ...

Page 37: ...Operating 0 C to 35 C 32 F to 95 F Non operating 40 C to 65 C 40 F to 149 F Relative humidity maximum Operating 10 to 90 noncondensing Non operating 5 to 95 noncondensing Altitude maximum unpressurized Operating 15 20 m to 3048 m 50 ft to 10 000 ft Storage 15 20 m to 10 668 m 50 ft to 35 000 ft Ports and Connectors Audio One headset audio out port microSD card One microSD card slot USB One micro U...

Page 38: ...degrees Contrast ratio 700 1 Color depth 24 bit pixel Power Adapter Input voltage 100 240 VAC Input current maximum 0 50 A Input frequency 50 60 Hz Output power 10 W Output current 2 A Rated output voltage 5 VDC Temperature range Operating 0 C to 40 C 32 F to 104 F Storage 40 C to 70 C 40 F to 158 F Camera Resolution Front facing camera 1 2 MP 16 9 Rear facing camera 5 MP 16 9 ...

Page 39: ...sonal area network over a short distance between devices The connection may be restricted according to the Bluetooth profiles of each device To be marketed as a Bluetooth device it must be qualified to standards defined by the Bluetooth SIG C Charms a Microsoft Windows 8 Windows RT term for the icons that appear when you swipe in from the right edge of the display It provides quick access to the c...

Page 40: ...al value used in mechanical engineering for structural design and analysis purposes H Hz Hertz A unit of frequency measurement that equals 1 cycle per second Computers and electronic devices are often measured in kilohertz KHz megahertz MHz gigahertz GHz or terahertz THz M microSD micro Secure Digital a smaller size of SD which is a removable flash memory card used for storing information in porta...

Page 41: ...on that provides quick access to frequently used programs files folders and drives When you place a shortcut on your Windows Start screen the home screen of Windows 8 is made up of Live Tiles and touch the tile you can open its corresponding folder or file without having to find it first Shortcut tiles do not change the location of files sleep mode A power management mode that shuts down all unnec...

Page 42: ...background pattern or picture on the Windows desktop Wi Fi A technology as a synonym for WLAN wireless local area network connects to the Internet when within range of a wireless network WXGA wide aspect extended graphics array A video standard for video cards and controllers that supports resolutions up to 1280 x 800 ...

Page 43: ...er 6 Volume up down 6 C Charging Tablet 9 Charms 25 Connection Bluetooth 20 Mobile broadband 18 Wi Fi 18 G Gestures Drag 22 Rotate 23 Swipe or Slide 22 Touch 21 Touch and Hold 21 Zoom in 22 Zoom out 23 L Lock screen 11 Login screen 11 M microSD card Insert 13 Remove 14 Micro SIM card Insert 15 Remove 16 Mobile broadband setting 18 Index ...

Page 44: ...ng 36 Start icon Function 25 Synchronize with computer 27 T Tablet Charge 9 Clean 30 Overview 5 Refresh 28 Reset 29 Setting 9 Turn off 12 Turn on 11 Touchscreen Display Orientation 24 Turn off on 12 Troubleshooting Battery 31 Network 33 System 32 Touchscreen 33 W Wi Fi setting 18 Windows button Location 5 Windows Start screen 24 ...

Reviews: