background image

18


About Your Monitor

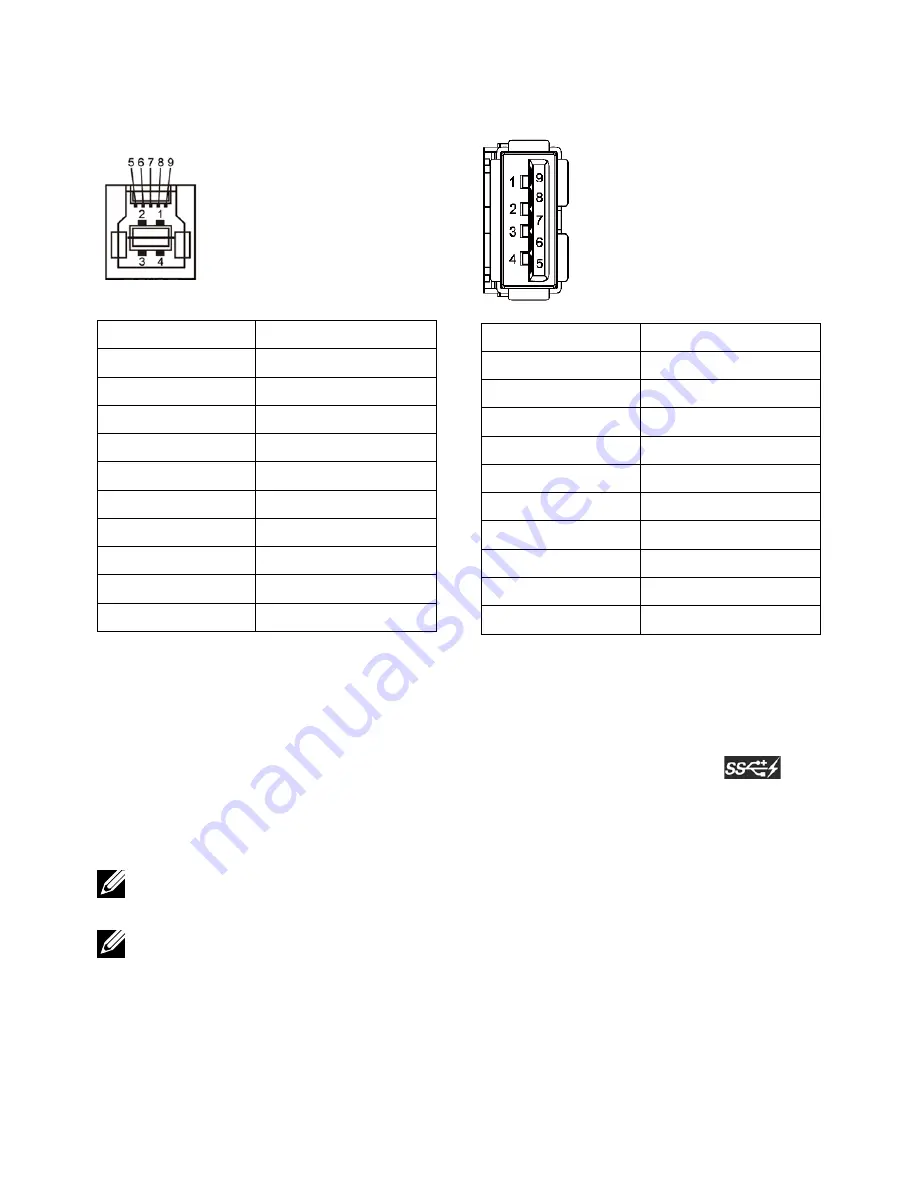
USB Upstream Connector

Pin Number

Signal Name

1

VBUS

2

D-

3

D+

4

GND

5

StdB_SSTX-

6

St

7

GND_DRAIN

8

StdB_SSRX-

9

St

Shell

Shield

USB Downstream Connector

Pin Number

Signal Name

1

VBUS

2

D-

3

D+

4

GND

5

StdA_SSRX-

6

St

7

GND_DRAIN

8

StdA_SSTX-

9

St

Shell

Shield

USB ports

• 

1 upstream - bottom

• 

4 downstream - 1 at back, 3 at bottom
Power Charging Port - the one on the rear cover (Port with 


lightning icon); supports fast current charging capability if the device 
is BC 1.2 compatible.


NOTE:

 USB 3.0 functionality requires a USB 3.0 compatible computer and 

devices.


NOTE:

 For computers running Windows® 7 must have Service Pack 1 

(SP1) installed. The monitor’s USB interface works only when the monitor 
is On or in Power Save Mode. If you turn Off the monitor and then turn it 
On, the attached peripherals may take a few seconds to resume normal 
functionality.

Summary of Contents for UltraSharpUP3216Q

Page 1: ...Dell UltraSharp 32 Monitor User s Guide Model No UP3216Q Regulatory model UP3216Qt ...

Page 2: ...or other jurisdictions All other marks and names mentioned herein may be trademarks of their respective companies 2015 09 Rev A00 NOTE A NOTE indicates important information that helps you make better use of your computer CAUTION A CAUTION indicates potential damage to hardware or loss of data if instructions are not followed WARNING A WARNING indicates a potential for property damage personal inj...

Page 3: ...ines 21 2 Setting Up the Monitor 22 Attaching the Stand 22 Organizing the Cables 24 Attaching the Cable Cover 25 Wall Mounting Optional 26 3 Operating the Monitor 27 Using the Front Panel Controls 27 Using the On Screen Display OSD Menu 30 Using the Tilt Swivel and Vertical Extension 45 4 Troubleshooting 46 Self Test 46 Built in Diagnostics 47 Common Problems 49 Product Specific Problems 52 Troubl...

Page 4: ...4 Contents 5 Appendix 56 WARNING Safety Instructions 56 FCC Notices U S Only and Other Regulatory Information 56 Contact Dell 56 Setting Up Your Monitor 57 ...

Page 5: ...ceived all the components and Contact Dell if something is missing NOTE Some items may be optional and may not ship with your monitor Some features or media may not be available in certain countries NOTE To set up with any other stand please refer to the respective stand setup guide for setup instructions Monitor Stand Cable Cover ...

Page 6: ...P to DP USB 3 0 upstream cable enables the USB ports on the monitor UP3216Q UltraSharp Monitor De ll P N WJ3 4G Rev A00 P N 790 A0 M39 00 01 Sep tem ber 201 5 Mad e in Chin a 5 Drivers and Documentation media Quick Setup Guide Safety and Regulatory information Guide Factory Calibration Report ...

Page 7: ...exible mounting solutions Plug and play capability if supported by your system On Screen Display OSD adjustments for ease of set up and screen optimization Software and documentation media includes an information file INF Image color Matching File ICM Dell Display Manager software application and product documentation Dell Display Manager included comes in the CD attached with the monitor Security...

Page 8: ... Controls Front View 1 2 Front view Front panel controls Label Description 1 Function buttons For more information see Operating the Monitor 2 Power On Off button with LED indicator Back View 1 2 3 4 5 6 7 Back view Back view with monitor stand ...

Page 9: ...security cable lock 4 Barcode serial number label Refer to this label if you need to contact Dell for technical support 5 Stand release button Release stand from monitor 6 USB downstream port with battery charging Connect your USB device You can only use this connector after you have connected the USB cable to the computer and USB upstream connector on the monitor 7 Cable management slot Use to or...

Page 10: ...P audio channels Only supports 2 channel audio NOTE The audio line out port does not support headphones 6 USB upstream port Connect the USB cable that comes with your monitor to the computer Once this cable is connected you can use the USB downstream connectors on the monitor 7 USB downstream ports Connect your USB device You can only use this connector after you have connected the USB cable to th...

Page 11: ...yp Luminance output 300 cd m typ Contrast ratio 1000 1 typ Dynamic contrast ratio 2 000 000 1 Faceplate coating Antiglare with hard coating 3H Backlight LED edge light system Response Time 8 ms typical 6 ms fast mode Color depth 1 0737 B 10 Bits Color gamut Typical 100 sRGB 99 5 Adobe RGB Resolution Specifications Horizontal scan range 30 kHz to 140 kHz automatic Vertical scan range 24 Hz to 75 Hz...

Page 12: ... 1280 x 800 49 3 60 0 71 0 1280 x 1024 64 0 60 0 108 0 1280 x 1024 80 0 75 0 135 0 1600 x 1200 75 0 60 0 162 0 1920 x 1080 67 5 60 0 193 5 2048 x 1152 71 6 60 0 197 0 2560 x 1440 88 8 60 0 241 5 3840 x 2160 65 68 30 0 262 75 3840 x 2160 133 313 60 0 533 25 Electrical Specifications Video input signals Digital video signal for each differential line predifferential line at 100 ohm impedance HDMI1 4...

Page 13: ...sed 482 6 mm 19 0 inches Width 749 9 mm 29 5 inches Depth 214 0 mm 8 4 inches Dimensions without stand Height 444 6 mm 17 5 inches Width 749 9 mm 29 5 inches Depth 51 5 mm 2 0 inches Stand dimensions Height extended 418 1 mm 16 5 inches Height compressed 381 8 mm 15 0 inches Width 250 0 mm 9 8 inches Depth 214 0 mm 8 4 inches Weight Weight with packaging 15 2 kg 33 44 lb Weight with stand assembly...

Page 14: ...mpliance display card or software installed in your PC the monitor can automatically reduce its power consumption when not in use This is referred to as Power Save Mode If the computer detects input from keyboard mouse or other input devices the monitor automatically resumes functioning The following table shows the power consumption and signaling of this automatic power saving feature VESA Modes ...

Page 15: ...onnecting the power adapter from the monitor Maximum power consumption with maximum luminance Energy consumption On Mode is tested at 230 Volts 50 Hz This document is informational only and reflects laboratory performance Your product may perform differently depending on the software components and peripherals you ordered and shall have no obligation to update such information Accordingly the cust...

Page 16: ... TMDS DATA 1 SHIELD 15 DDC CLOCK SCL 6 TMDS DATA 1 16 DDC DATA SDA 7 TMDS DATA 0 17 GROUND 8 TMDS DATA 0 SHIELD 18 5 V POWER 9 TMDS DATA 0 19 HOT PLUG DETECT 10 TMDS CLOCK DisplayPort Connector DP in and DP out Pin Number 20 pin Side of the monitor connector Pin Number 20 pin Side of the monitor connector 1 ML3 n 11 GND 2 GND 12 ML0 p 3 ML3 p 13 GND 4 ML2 n 14 GND 5 GND 15 AUX p 6 ML2 p 16 GND 7 M...

Page 17: ... 3 V DP_PWR Universal Serial Bus USB Interface This section gives you information about the USB ports that are available on the back and bottom of your monitor NOTE The USB ports on this monitor are USB 3 0 compliant Transfer speed Data rate Power consumption Super Speed 5 Gbps 4 5 W Max each port Hi Speed 480 Mbps 2 5 W Max each port Full Speed 12 Mbps 2 5 W Max each port NOTE Up to 2 A on USB do...

Page 18: ...tream 1 at back 3 at bottom Power Charging Port the one on the rear cover Port with lightning icon supports fast current charging capability if the device is BC 1 2 compatible NOTE USB 3 0 functionality requires a USB 3 0 compatible computer and devices NOTE For computers running Windows 7 must have Service Pack 1 SP1 installed The monitor s USB interface works only when the monitor is On or in Po...

Page 19: ...tion Media CD that comes with the monitor to ensure memory cards are detected properly when inserted into the card slot Features The Flash Memory Card Reader has the following features Supports Microsoft Windows 7 Service Pack SP1 and Windows 8 Windows 8 1 Windows 10 operating systems Mass Storage Class device No drivers are required under Microsoft Windows 7 Service Pack SP1 and Windows 8 Windows...

Page 20: ...l the monitor in any Plug and Play compatible system The monitor automatically provides the computer system with its Extended Display Identification Data EDID using Display Data Channel DDC protocols so that the system can configure itself and optimize the monitor settings Most monitor installations are automatic you can select different settings if desired For more information about changing the ...

Page 21: ...e a special screen cleaning tissue or solution suitable for the antistatic coating Do not use benzene thinner ammonia abrasive cleaners or compressed air Use a lightly dampened warm cloth to clean the monitor Avoid using detergent of any kind as some detergents leave a milky film on the monitor If you notice white powder when you unpack your monitor wipe it off with a cloth Handle your monitor wit...

Page 22: ...on the upper part of the stand to the groove on the back of the monitor 3 Press the stand till it snaps into its place Connecting Your Monitor WARNING Before you begin any of the procedures in this section follow the Safety Instructions To connect your monitor to the computer 1 Turn Off your computer and disconnect the power cable 2 Connect the black HDMI cable or the DP DisplayPort cable to the c...

Page 23: ...or setup 1 Connect the upstream USB 3 0 port cable supplied to an appropriate USB 3 0 port on your computer See Bottom View for details 2 Connect the USB 3 0 peripherals to the downstream USB 3 0 ports on the monitor 3 Plug the power cables for your computer and monitor into a nearby outlet 4 Turn On the monitor and the computer If your monitor displays an image installation is complete If it does...

Page 24: ...purpose of illustration only Appearance of the computer may vary Organizing the Cables After attaching all necessary cables to your monitor and computer See Connecting Your Monitor for cable attachment use the cable management slot to organize all cables as shown above ...

Page 25: ...re that the monitor is placed on a clean surface NOTE This is applicable for a monitor with a stand When any other stand is bought please refer to the respective stand setup guide for set up instructions To remove the stand 1 Place the monitor on a flat surface 2 Press and hold the stand release button 3 Lift the stand up and away from the monitor ...

Page 26: ...on stable flat table 2 Remove the stand 3 Use a screwdriver to remove the four screws securing the plastic cover 4 Attach the mounting bracket from the wall mounting kit to the monitor 5 Mount the monitor on the wall by following the instructions that came with the wall mounting kit NOTE For use only with UL or CSA or GS listed wall mount bracket with minimum weight load bearing capacity of 8 6 kg...

Page 27: ... the controls an OSD shows the numeric values of the characteristics as they change Preset Modes Brightness Contrast Input Source Menu Exit 1 1 2 3 4 5 6 The following table describes the front panel buttons Front panel button Description 1 Shortcut key Preset Modes Use this button to choose from a list of preset color modes 2 Shortcut key Brightness Contrast Use this button to directly access the...

Page 28: ...ween the setting options and press to select the input source you want 4 Menu Use the Menu button to launch the on screen display OSD and select the OSD Menu See Accessing the Menu System 5 Exit Use the Exit button to go back to the main menu or exit the OSD main menu 6 Power with power light indicator Use the Power button to turn the monitor On and Off The white LED indicates the monitor is On an...

Page 29: ...e image settings Front Panel Button Description 1 Up Use the Up button to adjust increase ranges items in the OSD menu 2 Down Use the Down button to adjust decrease ranges items in the OSD menu 3 OK Use the OK button to confirm your selection 4 Back Use the Back button to go back to the previous menu ...

Page 30: ...onalize Energy Input Source Color Display PIP PBP Dell UltraSharp UP3216Q Energy Use 2 Press the and buttons to move between the setting options As you move from one icon to another the option name is highlighted See the following table for a complete list of all the options available for the monitor 3 Press the or button once to activate the highlighted option 4 Press the and buttons to select th...

Page 31: ...inance of the backlight Press the button to increase brightness and press the button to decrease brightness min 0 max 100 NOTE Manual adjustment of Brightness is disabled when Dynamic Contrast is switched On and when Preset Modes is set to CAL1 or CAL2 Contrast Adjust Brightness first and then adjust Contrast only if further adjustment is necessary Press the button to increase contrast and press t...

Page 32: ...rt DP connector Press the button to select the DisplayPort input source mDP Select Mini DisplayPort input when you are using the Mini DisplayPort DP connector Press the button to select the Mini DisplayPort input source HDMI MHL Select HDMI MHL input when you are using the HDMI MHL connector Press the button to select the HDMI MHL input source Color Use the Color Settings menu to adjust the monito...

Page 33: ...ption if your DVD player supports only YPbPr output Gamma Allows you to set the Gamma to PC or MAC Preset Modes Allows you to choose from a list of preset color modes Brightness Contrast Others Menu Personalize Energy Input Source Color Display PIP PBP Preset Modes Movie Standard Multimedia Game Paper Color Temp Color Space Custom Color Resolution 1920x1080 60Hz Maximum 3840x2160 60Hz Dell UltraSh...

Page 34: ... without affecting color images Applies to RGB input format only Color Temp The screen appears warmer with a red yellow tint with slider set at 5 000K or cooler with blue tint with slider set at 10 000K Color Space Allows users to select the color space Adobe RGB sRGB DCI P3 REC709 CAL1 CAL2 Brightness Contrast Others Menu Personalize Energy Input Source Color Display PIP PBP Preset Modes DCI P3 A...

Page 35: ...mpensation to Off NOTE Factory Reset will remove all calibrated data in CAL1 and CAL2 Custom Color Allows you to manually adjust the color settings Press the and buttons to adjust the Red Green and Blue values and create your own preset color mode Use the and buttons to select the Gain Offset Hue Saturation Custom Color Offset Hue Saturation Gain Gain Select it to adjust input RGB signal gain leve...

Page 36: ...ell Ultrasharp Color Calibration Software works with the X rite colorimeter i1Display Pro The i1Display Pro can be purchased from the Dell Electronics Software and Accessories website NOTE When Zonal Color Space is turned on the left side of the screen will adopt the brightness setting of the right side Furthermore the factory Uniformity Compensation and Dynamic Contrast will be disabled NOTE To e...

Page 37: ...Contrast Dynamic Contrast adjusts the contrast ratio to 2 000 000 1 Press the button to select the Dynamic Contrast On or Off Dynamic Contrast provides higher contrast if you choose Game mode and Movie mode Response Time Allows you to set the Response Time to Normal or Fast Uniformity Compensation Select screen brightness and color uniformity compensation settings Calibrated is factory calibrated ...

Page 38: ...rgy Input Source Color Display PIP PBP Resolution 1920x1080 60Hz Maximum 3840x2160 60Hz Dell UltraSharp UP3216Q Energy Use Right Window select from input Source Left window select from PIP PBP source Mini DP DP HDMI MHL Mini DP x x DP x x HDMI MHL x PIP PBP Mode Adjusts the PBP Picture by Picture model to PIP Small PIP Large PBP Aspect Ratio or PBP Fill You can disable this feature by selecting Of...

Page 39: ... mode is only available when the USB upstream cable is unplugged This option will be greyed out when the USB upstream cable plugs in Monitor Sleep Allow you to set Monitor sleep On or Off Reset Energy Select this option to restore default Energy Settings Menu Brightness Contrast Others Menu Personalize Energy Input Source Color Display PIP PBP English 20 20 s Unlock Language Rotation Transparency ...

Page 40: ...ither soft lock through OSD menu or hard lock Press and hold the button above power button for 10 sec Unlock function Only hard unlock Press and hold the button above power button for 10 sec Reset Menu Select this option to restore default Menu settings Personalize User can select from Preset Modes Brightness Contrast Input Source Aspect Ratio PIP PBP Mode Rotation and set as shortcut key Brightne...

Page 41: ...e monitor beeps every time a new option is selected in the menu This button enables or disables the sound DDC CI DDC CI Display Data Channel Command Interface allows your monitor parameters brightness color balance etc to be adjustable via software on your computer You can disable this feature by selecting Disable Enable this feature for best user experience and optimum performance of your monitor...

Page 42: ...e this feature by selecting Enable Brightness Contrast Others Menu Personalize Energy Input Source Color Display LCD Conditioning PIP PBP Resolution 1920x1080 60Hz Maximum 3840x2160 60Hz Enable Disable Dell UltraSharp UP3216Q Energy Use Reset Other Select this option to restore default other settings such as DDC CI Factory Reset Reset all OSD settings to the factory preset values ...

Page 43: ...160 60Hz or any other monitor Dell UltraSharp UP3216Q listed timing as per the monitor specifications Please change your This means that the monitor cannot synchronize with the signal that it is receiving from the computer See Monitor Specifications for the Horizontal and Vertical frequency ranges addressable by this monitor Recommended mode is 3840 x 2160 You will see the following message before...

Page 44: ... select the correct input source on the On Screen Display menu If either HDMI DP or mini DP input is selected and the corresponding cable is not connected a floating dialog box as shown below appears No HDMI Cable The display will go into Power Save Mode in 5 minutes www dell com support monitors Dell UltraSharp UP3216Q or No DP Cable The display will go into Power Save Mode in 5 minutes www dell ...

Page 45: ...This is applicable for a monitor with a stand When any other stand is bought please refer to the respective stand setup guide for set up instructions 4 typical maximum 5 5 21 typical maximum 22 30 30 90 mm NOTE The stand is detached when the monitor is shipped from the factory ...

Page 46: ...tor 2 Unplug the video cable from the back of the computer 3 Turn On the monitor The floating dialog box should appear on screen against a black background if the monitor cannot sense a video signal and is working correctly While in self test mode the power LED remains white Also depending upon the selected input one of the dialog boxes shown below will continuously scroll through the screen No HD...

Page 47: ...puter and the monitor If your monitor screen remains blank after you use the previous procedure check your video controller and computer because your monitor is functioning properly Built in Diagnostics Your monitor has a built in diagnostic tool that helps you determine if the screen abnormality you are experiencing is an inherent problem with your monitor or with your computer and video card NOT...

Page 48: ...2 seconds A gray screen appears 4 Carefully inspect the screen for abnormalities 5 Press the Button 4 on the front panel again The color of the screen changes to red 6 Inspect the display for any abnormalities 7 Repeat steps 5 and 6 to inspect the display in green blue black white screens The test is complete when the white screen appears To exit press the Button 4 again If you do not detect any s...

Page 49: ...he power outlet is functioning properly using any other electrical equipment Ensure that the power button is depressed fully Ensure that the correct input source is selected via the Input Source menu Check the Power Button LED option under Energy Settings in OSD Menu No Video Power LED On No picture or no brightness Increase brightness contrast controls via OSD Perform monitor self test feature ch...

Page 50: ...n Dell Monitor Quality and Pixel Policy see Dell Support site at http www dell com support monitors Brightness Problems Picture too dim or too bright Reset the monitor to Factory Settings Adjust brightness contrast controls via OSD Safety Related Issues Visible signs of smoke or sparks Do not perform any troubleshooting steps Contact Dell immediately Intermittent Problems Monitor malfunctions on o...

Page 51: ... Try different color Preset Modes in Color Settings OSD Change the Input Color Format to RGB or YPbPr in the Color Settings OSD Run the built in diagnostics Image retention from a static image left on the monitor for a long period of time Faint shadow from the static image displayed appears on the screen Use the Power Management feature to turn Off the monitor at all times when not in use for more...

Page 52: ...r is not in the power saving mode by moving the mouse or pressing any key on the keyboard Check to make sure Video Source to DisplayPort or Mini DisplayPort or HDMI is powered and playing video media Check whether the signal cable is plugged in properly Re plug the signal cable if necessary Reset the computer or video player The picture does not fill the entire screen The picture cannot fill the h...

Page 53: ...rd DP 1 1a or DP 1 2 is your Graphics Card certified to Download and install the latest graphics card driver Some DP1 1a graphics card cannot support DP 1 2 monitors Go to OSD menu under Input Source selection press and hold DP select key for 8 sec to change the monitor setting from DP1 2 to DP1 1a ...

Page 54: ... appears select Disk Management In the list of drives that appear in the right panel right click the removable drive and then click Change Drive Letter and Paths Select Change and in the drop down box that appears specify a drive letter for the removable drive NOTE While choosing the drive letter choose one that is not assigned to the mapped network drives Click OK then click OK once again in the ...

Page 55: ...rance of the pop up window the media has been ejected while the LED was blinking Although the pop up window disappears during writing if you eject your media while the LED is still blinking then you cannot complete your action on the media Format the media for writing or erasing the same folder or file name Cannot format or write on the media Write protect switch is enabled Verify that the write p...

Page 56: ...ed States call 800 WWW DELL 800 999 3355 NOTE If you do not have an active Internet connection you can find contact information on your purchase invoice packing slip bill or Dell product catalog Dell provides several online and telephone based support and service options Availability varies by country and product and some services may not be available in your area To contact Dell for sales technic...

Page 57: ...installing the drivers for your graphics adapter attempt to set the resolution to 3840 x 2160 again NOTE If you are unable to set the resolution to 3840 x 2160 please contact Dell to inquire about a graphics adapter that supports these resolutions Non Dell computer In Windows 7 Windows 8 Windows 8 1 and Windows 10 1 For Windows 8 and Windows 8 1 only select the desktop tile to switch to classic de...

Reviews: