background image

About 

your 

monitor  |  

9

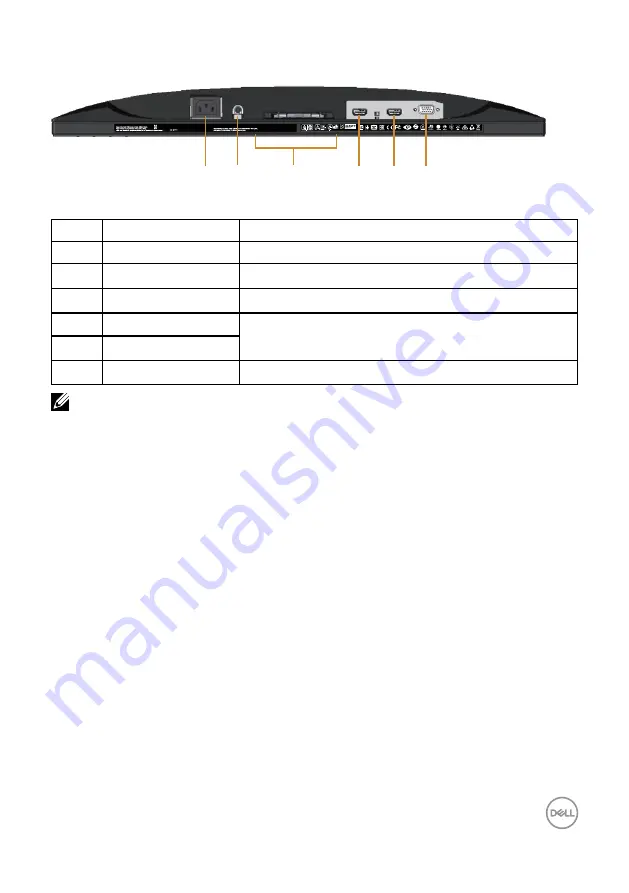
Bottom View

CAN ICES-3 (B)/NMB-3(B)

Удельная мощность рабочего режима -  X.XXX Вт/см²

Потребляемая мощность изделием в режиме ожидания - X.XX Вт

Потребляемая мощность изделием в выключенном режиме - X.XX Вт

The equipment must be connected to an earthed mains socket-outlet.

L'appareil doit être branché sur une prise de courant munie d'une mise à la terre. 

XXXXXXX-XXXXX

MSIP-REM-TPV-SE2416Hc

㐔㷡㢬ڕ

TOP VICTORY ELECTRONICS (FUJIAN) CO., LTD.

㥐㦤㣄ڕ

TPV Electronics (Fujian) Co., Ltd.  

080-200-3800

Consumo de energía: XX.X Wh

Consumo de energía en modo de espera: X.XX Wh

X X X X X X - X X

XXXXXX

5

6

4

2

3

1

Bottom view without monitor stand

Label

Description

Use

1

Power port

Connect the power cable.

2

Line-out port*

Connect external speakers (sold separately).

3

Regulatory label

Lists the regulatory approvals.

4

HDMI1 port

Connect your computer with HDMI cable.

5

HDMI2 port

6

VGA port

Connect your computer with VGA cable.


NOTE: 

Headphone usage is not supported for the audio line out port.

Summary of Contents for SE2417HGX

Page 1: ...Monitor Model SE2417HGX Regulatory Model SE2417HGXc Dell SE2417HGX User s Guide ...

Page 2: ...r loss of data if instructions are not followed WARNING A WARNING indicates a potential for property damage personal injury or death Copyright 2019 Dell Inc or its subsidiaries All rights reserved Dell EMC and other trademarks are trademarks of Dell Inc or its subsidiaries Other trademarks may be trademarks of their respective owners 2019 09 Rev A00 ...

Page 3: ...13 Disconnecting the monitor stand 14 Operating your monitor 15 Power on the monitor 15 Using the front panel controls 15 Using the On screen Display OSD menu 17 Accessing the OSD menu 17 OSD warning messages 28 Setting up your monitor 31 Using tilt 32 Troubleshooting 33 Self test 33 Built in diagnostics 34 Common problems 36 Product specific problems 38 Monitor specifications 39 Flat panel specif...

Page 4: ...des 40 Electrical specifications 41 Physical characteristics 41 Environmental characteristics 42 Power management modes 42 Pin assignments 44 Appendix 46 FCC notices U S Only and other regulatory information 46 Contacting Dell 46 ...

Page 5: ...at you have received all the components and Contacting Dell if something is missing NOTE Some components may be optional and may not ship with your monitor Some features or media may not be available in certain countries Component image Component description Monitor Stand riser Stand base Power cable varies by country ...

Page 6: ...Role Playing Game On Screen Display OSD adjustments for ease of set up and screen optimization Security lock slot Capability to switch from wide aspect to standard aspect ratio while maintaining image quality BFR PVC Reduced Its circuit boards are made from BFR PVC free laminates High dynamic contrast ratio 8 000 000 1 0 3 W power consumption when in sleep mode Energy Gauge shows the energy level ...

Page 7: ...scription 1 Function buttons For more information see Operating your monitor 2 Power on off button with LED indicator NOTE For displays with glossy bezels the user should consider the placement of the display as the bezel may cause disturbing reflections from surrounding light and bright surfaces ...

Page 8: ...ases stand from monitor 2 Security lock slot Secures monitor with security lock security lock not included 3 Barcode serial number label Refer to this label if you need to contact Dell for technical support 4 Cable management slot Uses to organize cables by placing them through the slot Back View without monitor stand ...

Page 9: ...V SE2416Hc 㐔㷡㢬 ڕ TOP VICTORY ELECTRONICS FUJIAN CO LTD 㥐㦤㣄 ڕ TPV Electronics Fujian Co Ltd 080 200 3800 Consumo de energía XX X Wh Consumo de energía en modo de espera X XX Wh X X X X X X X X 䝕 XXXXXX 5 6 4 2 3 1 Bottom view without monitor stand Label Description Use 1 Power port Connect the power cable 2 Line out port Connect external speakers sold separately 3 Regulatory label Lists the regulat...

Page 10: ...ce guidelines Cleaning your monitor WARNING Before cleaning the monitor unplug the monitor power cable from the electrical outlet CAUTION Read and follow the Safety instructions before cleaning the monitor For best practices follow the instructions in the list below while unpacking cleaning or handling your monitor To clean your anti static screen lightly dampen a soft clean cloth with water If po...

Page 11: ... are applicable for connecting the stand that shipped with your monitor For setting up any other stand see the documentation that shipped with it To attach the monitor stand 1 Place the monitor on a soft cloth or cushion 2 Insert the tabs on the upper part of the stand in to the grooves on the back of the monitor 3 Press the stand down until it snaps into place 2 3 ...

Page 12: ...ables to the computer at the same time It is recommend to route the cables through the cable management slot before you connect them to the monitor To connect your monitor to the computer 1 Turn off your computer and disconnect the power cable 2 Connect the VGA HDMI cable from your monitor to the computer Connecting the VGA cable sold separately Connecting the HDMI cable ...

Page 13: ...Setting up the monitor 13 Organizing cables Use the cable management slot to organize the cables connected to your monitor ...

Page 14: ... screen while removing the stand ensure that the monitor is placed on a soft and clean surface To remove the stand 1 Place the monitor on a soft cloth or cushion 2 Use a long and thin screwdriver to push the release latch 3 After the latch is released remove the stand away from the monitor 2 3 2 ...

Page 15: ...ollowing table describes the front panel buttons Front Panel Button Description 1 Shortcut key Preset Modes Use this button to choose from a list of preset modes Shortcut key Brightness Contrast Use this button to directly access the brightness contrast menu Menu Use the menu button to launch the on screen display OSD and select the OSD menu See Accessing the OSD menu Exit Use this button to go ba...

Page 16: ...cates it is in power save mode OSD controls Use the buttons on the front of the monitor to adjust the image settings 1 2 3 4 Front Panel Button Description 1 Up Use the up button to increase values or move up in a menu 2 Down Use the down button to decrease values or move down in a menu 3 OK Use the OK button to confirm your selection in a menu 4 Back Use the back button to go back to the previous...

Page 17: ...menu Dell 24 Monitor Brightness Contrast Auto Adjust Input Source Color Display Menu Personalize Others 75 75 2 Press the and buttons to move between the setting options As you move from one icon to another the option is highlighted 3 Press the button once to activate the highlighted option 4 Press and button to select the desired parameter 5 Press and then use the and buttons according to the ind...

Page 18: ...ress the button to increase the brightness and press the button to decrease the brightness min 0 max 100 NOTE Manual adjustment of brightness is disabled when dynamic contrast is switched on Contrast Adjust the brightness first and then adjust the contrast only if further adjustment is necessary Press the button to increase the contrast and press the button to decrease the contrast min 0 max 100 T...

Page 19: ...monitor self adjusts to the current input Auto Adjustment in Progress Auto adjustment allows the monitor to self adjust to the incoming video signal After using auto adjustment you can further tune your monitor by using the pixel clock coarse and phase fine controls under display settings NOTE Auto adjust does not occur if you press the button while there are no active video input signals or attac...

Page 20: ... input source HDMI 1 Select HDMI 1 input when you are using the HDMI 1 connector Push to select the HDMI 1 input source HDMI 2 Select HDMI 2 input when you are using the HDMI 2 connector Push to select the HDMI 1 input source Auto Select Select auto select to scan for available input signals Reset Input Source Select this option to restore default Input Source Color Use color to adjust the color s...

Page 21: ...oter games RTS Game Loads color settings ideal for Real Time Strategy games RPG Game Loads color settings ideal for Role Playing Games Warm Increases the color temperature The screen appears warmer with a red yellow tint Cool Decreases the color temperature The screen appears cooler with a blue tint Custom Color Allows you to manually adjust the color settings Press the and buttons to adjust the t...

Page 22: ...l Input Color Format Allows you to set the video input mode to RGB Select this option if your monitor is connected to a computer or DVD player using the HDMI cable YPbPr Select this option if your DVD player supports only YPbPr output Dell 24 Monitor Brightness Contrast Auto Adjust Input Source Color Display Menu Personalize Others Preset Modes Input Color Format Reset Color YPbPr RGB ...

Page 23: ...t Color Display Use the display to adjust image Dell 24 Monitor Brightness Contrast Auto Adjust Input Source Color Display Menu Personalize Others Horizontal Position Vertioal Position Sharpness 50 Pixel Clock Phase Dynamic Contrast Aspect Ratio Wide 16 9 Dell 24 Monitor Brightness Contrast Auto Adjust Input Source Color Display Menu Personalize Others Reset Display Response time Extreme Aspect Ra...

Page 24: ...mum is 100 Dynamic Contrast Allows you to increase the level of contrast to provide sharper and more detailed image quality Press the button to select the dynamic contrast on or off NOTE Dynamic contrast provides higher contrast if you select game or movie preset mode Response Time User can select between Normal Fast or Extreme Reset Display Select this option to restore default display settings M...

Page 25: ... a shortcut key Dell 24 Monitor Brightness Contrast Auto Adjust Input Source Color Display Menu Personalize Others Shortcut Key 1 Preset Modes Shortcut Key 2 Brightness Contrast Power Button LED On During Active Reset Personalization Shortcut Key 1 User can select one of the followings preset modes brightness contrast auto adjust input source aspect ratio to set the shortcut key 1 Shortcut Key 2 U...

Page 26: ...lay Info DDC CI On LCD Conditioning Off Service Tag ABCDEFG Reset Others Factory Reset Display Info Dell 24 Monitor Brightness Contrast Auto Adjust Input Source Color Display Menu Personalize Others Display Info Model Dell SE2417HGX DDC CI Input Source HDMI1 LCD Conditioning Current 1920x1080 60Hz Service Tag Reset Others Factory Reset ...

Page 27: ...ers Factory Reset On LCD Conditioning Helps reduce minor cases of image retention Depending on the degree of image retention the program may take some time to run To start LCD conditioning select On Dell 24 Monitor Brightness Contrast Auto Adjust Input Source Color Display Menu Personalize Others Display Info DDC CI LCD Conditioning Service Tag Reset Others Factory Reset On Off Service Tag Display...

Page 28: ...rted by the monitor display Please change your input timing to 1920x1080 60Hz or any other monitor listed timing as per the monitor specifications SE2417HGX Dell 24 Monitor This means that the monitor cannot synchronize with the signal that it is receiving from the computer See Monitor specifications for the Horizontal and Vertical frequency ranges addressable by this monitor Recommended mode is 1...

Page 29: ...ce If there is no display press the monitor button again to select the correct Dell 24 Monitor SE2417HGX If VGA or HDMI cable is not connected a floating dialog box as shown below appears The monitor will enter Power Save Mode after 5 minutes if left at this state No VGA Cable The display will go into Power Save Mode in 4 minutes www dell com SE2417HGX Dell 24 Monitor SE2417HGX No HDMI 1 Cable The...

Page 30: ...30 OSD warning messages No HDMI 2 Cable The display will go into Power Save Mode in 4 minutes www dell com SE2417HGX Dell 24 Monitor SE2417HGX See Troubleshooting for more information ...

Page 31: ...0 4 Click OK If you do not see 1920 x 1080 as an option you may need to update your graphics driver Depending on your computer complete one of the following procedures If you have a Dell desktop or portable computer Go to www dell com support enter your computer s Service Tag and download the latest driver for your graphics card If you are using a non Dell computer portable or desktop Go to the su...

Page 32: ...32 OSD warning messages Using tilt The stand shipped with your monitor supports tilt up to 5 degrees forward and 21 degrees backward 5 21 ...

Page 33: ...following steps 1 Turn off both your computer and the monitor 2 Disconnect all video cables from the monitor This way the computer doesn t have to be involved 3 Turn on the monitor If the monitor is working correctly it detects that there is no signal and one of the following message appears While in self test mode the power LED remains white No VGA Cable The display will go into Power Save Mode i...

Page 34: ... tool that helps you determine if any screen abnormality you experience is an inherent problem with your monitor or with your computer and video card NOTE You can run the built in diagnostics only when the video cable is unplugged and the monitor is in self test mode 1 5 2 3 4 To run the built in diagnostics 1 Ensure that the screen is clean no dust particles on the surface of the screen 2 Unplug ...

Page 35: ...pect the display in green blue black white and text screens The test is complete when the text screen appears To exit press Button 1 again If you do not detect any screen abnormalities upon using the built in diagnostic tool the monitor is functioning properly Check the video card and computer ...

Page 36: ...atio Shaky jittery video Reset the monitor to Factory Settings Factory Reset Check environmental factors Relocate the monitor and test in another room Missing pixels Cycle power on off Pixel that is permanently off is a natural defect that can occur in LCD technology For more information on Dell Monitor Quality and Pixel Policy see Dell Support site at www dell com support monitors Stuck on pixels...

Page 37: ...st feature check Ensure that the video cable connecting the monitor to the computer is connected properly and is secure Check for bent or broken pins in the video cable connector Wrong color Change the Color Setting Mode in the Color Settings OSD to Graphics or Video depending on the application Try different Preset Modes in Color settings OSD Adjust R G B value in Custom Color in Color settings O...

Page 38: ...OSD menu is locked If yes press and hold the button above the power button for 10 seconds to unlock No input signal when user controls are pressed Check the signal source Ensure the computer is not in standby or sleep mode by moving the mouse or pressing any key on the keyboard Check if the video cable is plugged in properly Disconnect and reconnect the video cable if necessary Reset the computer ...

Page 39: ...pical 170 degrees horizontal typical Luminance output 300 cd m typical Contrast ratio 1000 to 1 typical 8 000 000 to 1 Dynamic Contrast Faceplate coating Anti glare with 3H hardness Backlight LED light bar system Response time Gray to Gray Normal mode 5 ms Fast mode 2 ms Extreme mode 1 ms Color depth 16 7 million colors Color gamut CIE 1976 84 CIE 1931 72 FreeSync support frame frequency HDMI only...

Page 40: ...nology see www amd com Preset display modes Display Mode Horizontal Frequency kHz Vertical Frequency Hz Pixel Clock MHz Sync Polarity Horizontal Vertical VESA 720 x 400 31 5 70 1 28 3 VESA 640 x 480 31 5 60 0 25 2 VESA 640 x 480 37 5 75 0 31 5 VESA 800 x 600 37 9 60 3 40 0 VESA 800 x 600 46 9 75 0 49 5 VESA 1024 x 768 48 4 60 0 65 0 VESA 1024 x 768 60 0 75 0 78 8 VESA 1152 x 864 67 5 75 0 108 0 VE...

Page 41: ...Max at 0 C cold start Physical characteristics Model SE2417HGX Signal cable type Digital detachable HDMI 19 pins Analog detachable D Sub 15 pins Dimensions with stand Height 422 50 mm 16 63 in Width 555 20 mm 21 86 in Depth 179 90 mm 7 08 in Dimensions without stand Height 330 10 mm 13 00 in Width 555 20 mm 21 86 in Depth 55 mm 2 17 in Stand dimensions Height 178 00 mm 7 01 in Width 250 00 mm 9 84...

Page 42: ... or software installed in your PC the monitor can automatically reduce its power consumption when not in use This is referred to as Power Save Mode If the computer detects input from the keyboard mouse or other input devices the monitor automatically resumes functioning The following table shows the power consumption and signaling of this automatic power saving feature NOTE Zero power consumption ...

Page 43: ...this information in making decisions about electrical tolerances or otherwise No warranty as to accuracy or completeness is expressed or implied The OSD functions only in the normal operation mode When any button is pressed in the Active off mode the following message will be displayed No VGA signal from your device Press any key on the keyboard or move the mouse to wake it up input source If ther...

Page 44: ...ts VGA connector Pin Number 15 pin Side of the Connected Signal Cable 1 Video Red 2 Video Green 3 Video Blue 4 GND 5 Self test 6 GND R 7 GND G 8 GND B 9 Computer 5V 3 3V 10 GND sync 11 GND 12 DDC data 13 H sync 14 V sync 15 DDC clock ...

Page 45: ...T M D S Data 2 Shield 3 T M D S Data 2 4 T M D S Data 1 5 T M D S Data 1 Shield 6 T M D S Data 1 7 T M D S Data 0 8 T M D S Data 0 Shield 9 T M D S Data 0 10 T M D S Clock 11 T M D S Clock Shield 12 T M D S Clock 13 CEC 14 Reserved N C on device 15 SCL 16 SDA 17 DDC CEC Ground 18 5V Power 19 Hot Plug Detect ...

Page 46: ...acting Dell To contact Dell for sales technical assistance or customer service issues 1 Go to www dell com contactdell 2 Verify your country or region in the Choose a Country Region drop down list at the bottom of the page 3 Select the appropriate service or support link based on your requirement or choose the method of contacting Dell that is convenient for you Dell provides several online and te...

Reviews: