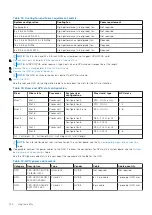
Table 20. GPU power cable matrix (continued)
Category
Description
Type
Vendor
Cable
Cable quantity
GPU
CRD,GRPHC,32GB,2
50W,V100S,PCIE
FH and FL
NVIDIA
8 pin cable
1 piece per GPU riser
GPU
CRD,GRPHC,NVIDIA,
24GB,RTX6000
FH and FL
NVIDIA
8 pin cable
1 piece per GPU riser
GPU
CRD,GRPHC,NVIDIA,
48GB,RTX8000
FH and FL
NVIDIA
8 pin cable
1 piece per GPU riser
FPGA
Xilinx Snow White
Card
FH and FL
Xilinx
6 + 2 pin cable
1 piece per GPU riser
HH - Half Height, HL - Half Length, FH - Full Height, FL - Full Length
NOTE:
Maximum of three full length GPUs with power cables or a maximum of six half lengths GPUs are supported in a
system.
7. To connect the XGMI cable,
a. Connect the MB_SL1 and MB_SL2 connectors on the XGMI cable to the J_SL1 and J_SL2 connectors on the system
board.
b. Twist the cable to 180 degrees to connect the MB_SL3 and MB_SL4 to the J_SL3 and J_SL4 connectors on the system
board.
c. Install the cable tie and tighten to fix the cables.
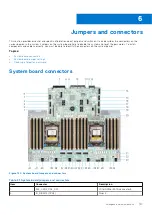
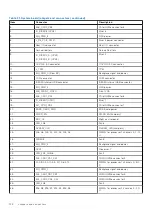
d. To know the XGMI cable connectors on the system board, see the
System board jumpers and connectors
8.
Install the full length expansion card riser
or
half height expansion card risers
. See GPU kit components table for supported
GPU risers.
9.
Install the GPU air shroud top cover
10. Install the foam on the system cover. To install the foam,
a. Place the system cover with the System Information Lable (SIL) side facing up.
b. For easier handling, peel off a small section of the adhesive cover and align the foam with the system cover.
c. Remove rest of the adhesive cover, and install foam on the system cover.
d. Press along the length of the foam to ensure that it is firmly affixed to the system cover.
Upgrade Kits
125

