background image

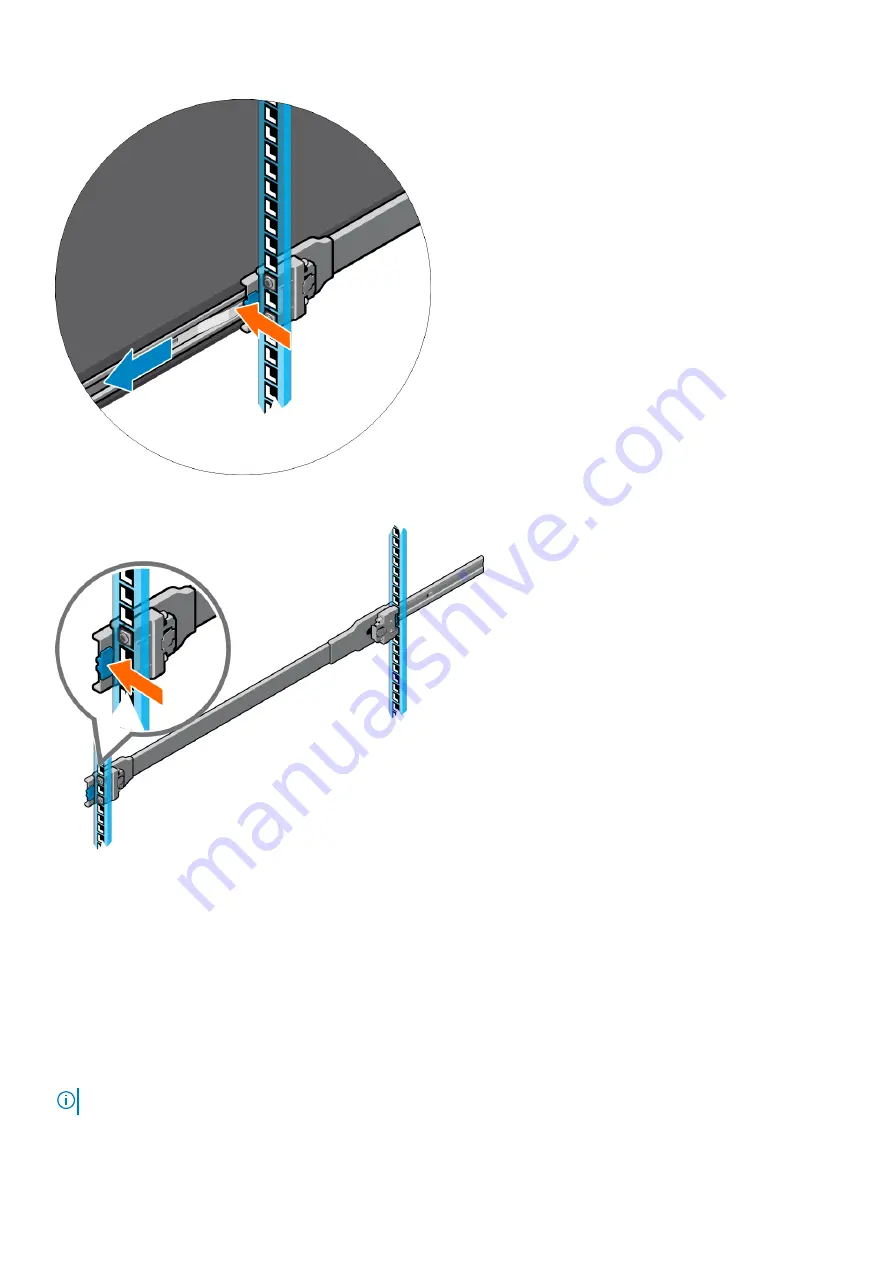
To remove the outer rails from the rack, press the blue plastic button on each outer rail.

Four-post L-bracket rail installation

Use these installation instructions for racks with threaded holes, 9.5 mm (.354 in) square holes, or 7.1 mm (.279) round holes.

Complete the switch installation in the following order:

1. Attach the L-brackets to the front of the switch.
2. Attach the inner rails to the switch.
3. Attach the outer rails to the rear of the four-post rack.
4. Slide the switch into the rack.
5. Secure the L-brackets to the front of the four-post rack.

NOTE:

 You need a user-supplied Phillips screwdriver to complete this installation.

22

Z9432F-ON switch installation

Summary of Contents for EMC PowerSwitch Z9432F-ON

Page 1: ...Dell EMC PowerSwitch Z9432F ON Installation Guide February 2021 February 2021 Rev A00 ...

Page 2: ...ential damage to hardware or loss of data and tells you how to avoid the problem WARNING A WARNING indicates a potential for property damage personal injury or death 2021 Dell Inc or its subsidiaries All rights reserved Dell EMC and other trademarks are trademarks of Dell Inc or its subsidiaries Other trademarks may be trademarks of their respective owners ...

Page 3: ...h power 14 Storing components 14 Chapter 4 Z9432F ON switch installation 15 Attach a ground cable 15 Rack or cabinet hardware installation procedure 16 Switch installation 16 Four post ReadyRail installation 16 Four post L bracket rail installation 22 Optics installation 26 Optics removal 27 Switch startup 27 After switch placement 27 Switch replacement 27 Chapter 5 Power supplies 29 Components 29...

Page 4: ...heck your switch 46 ONIE service discovery 46 Chapter 10 Specifications 47 Chassis physical design 47 IEEE standards 48 Agency compliance 49 USA Federal Communications Commission statement 49 European Union EMC directive conformance statement 49 Japan VCCI compliance for class A equipment 50 Safety standards and compliance agency certifications 50 Electromagnetic compatibility 51 Product recycling...

Page 5: ...NOTE When no cable is connected visible and invisible laser radiation may emit from the aperture of the optical transceiver ports Avoid exposure to laser radiation Do not stare into open apertures Regulatory information Marketing model Z9432F ON is represented by the regulatory model E46W and the regulatory type E46W001 BMC ONIE and DIAG OS default login After you have installed and powered up you...

Page 6: ...ort Information symbols This book uses the following information symbols NOTE The Note icon signals important operational information CAUTION The Caution icon signals information about situations that could result in equipment damage or loss of data CAUTION The ESD Warning icon requires that you take electrostatic precautions when handling the device WARNING The Warning icon signals information ab...

Page 7: ...er cables or optics 400 GbE transceivers and active cables may exceed the supported threshold For more information see the Dell EMC PowerSwitch with High Power Optics guide CAUTION Review the optics specification sheet and the switch data sheet to understand which models support airflow from the I O to the PSU normal and which support airflow from the PSU to I O reverse The Z9432F ON switch has se...

Page 8: ... Type A port for more file storage Eight core Intel Denverton NS central processing unit CPU system with 2 2 GHz C3758 One 10 100 1000BaseT Ethernet management port Temperature monitoring Software readable thermal monitor Real time clock RTC support Two hot pluggable redundant AC or DC PSUs Seven hot pluggable replaceable fan modules Power management monitoring Two hole ground lug Physical dimensi...

Page 9: ... LED Off No power Solid green Normal operation Flashing green Booting Solid yellow Critical system error Flashing yellow Noncritical system error fan failure or power supply failure Power LED Off No power Solid Green Normal operation Solid yellow POST is in process Flashing yellow Power supply fault FAN LED Off No power Solid green Normal operation fan powered and running at the expected RPM Flash...

Page 10: ...ed 10G Flashing green Port activity at maximum speed Solid yellow Link operating at a lower speed 1G Activity LED Off No link Flashing green port activity Prerequisites The following is a list of components that are required for successful switch installation NOTE For detailed installation instructions see Site preparations and Z9432F ON switch installation Z9432F ON switch or multiple switches if...

Page 11: ...flow CAUTION Switches with fan airflow from the PSU to the I O reverse airflow are subject to tighter restrictions for power consumption on cables and optics that are used for 400 GbE ports Reverse airflow switches do not support high power cables or optics 400 GbE transceivers and active cables may exceed the supported threshold For more information see the Dell EMC PowerSwitch with High Power Op...

Page 12: ...ure range is from 0 to 45 C 32 to 113 F Relative humidity is from 5 to 90 percent noncondensing In a dry clean well ventilated and temperature controlled room away from heat sources such as hot air vents or direct sunlight Away from sources of severe electromagnetic noise Inside the restricted access area that is positioned in a rack or cabinet or on a desktop with adequate space in the front back...

Page 13: ... to the PSU normal the red indicator is the normal airflow direction DC PSU with fan airflow from the I O to the PSU normal the red indicator is the normal airflow direction With the addition of the fan reversal kit the Z9432F ON switch has SKUs that also support the following configurations AC PSU with fan airflow from the PSU to the I O reverse the blue indicator is the reverse airflow direction...

Page 14: ...located or installed near the equipment and is easily accessible NOTE Redundant AC power requires high line 200 VAC to 240 VAC Using low line 120 VAC does not provide redundancy for the switch NOTE You do not see module LEDs when the switch powers up in ONIE as the software controls the modules Storing components If you do not install your Z9432F ON switch and components immediately properly store...

Page 15: ...interference offers ESD protection and prevents possible equipment damage CAUTION For a DC powered switch the only way to safely ground your switch is to attach a dedicated ground wire The ground lug ships inside the DC PSU shipping box The two ground lug screws ship attached to the switch Before you install the DC switch in a rack attach the ground lug to the switch using the included screws Next...

Page 16: ...ent temperature Use care not to exceed the 45 C 113 F maximum ambient temperature of the switch Reduced air flow Do not compromise the amount of airflow that is required for safe operation of the equipment Install the equipment in the rack so that the equipment constantly has the correct amount of airflow surrounding it Reliable grounding Maintain reliable grounding of rack mounted equipment Pay p...

Page 17: ...the inner rail back until it clicks into place 4 Confirm the rack mounting hole type and choose the correct components EIA 9 5 mm 354 in square hole EIA 7 1 mm 279 in round hole or threaded hole For EIA 9 5 mm 354 in square hole racks default setting for the outer rail Z9432F ON switch installation 17 ...

Page 18: ...itting plates shipped with the rails Change the die cast parts on both the front and rear side of the outer rail 5 Attach the outer rail to the back of the four post rack Align the outer rail pegs to the back of the four post rack and push towards the back to lock the outer rail to the rear post The rail clicks into place Threaded mounting rack 18 Z9432F ON switch installation ...

Page 19: ...OR 9 5 mm square hole rack OR EIA 7 1 mm 279 in round hole rack Z9432F ON switch installation 19 ...

Page 20: ...ce 7 Repeat these steps for the second rail 8 Slide the inner rails that are attached to the switch into the outer rails that are attached to the rails NOTE Press the spring clip on each inner slide rail to allow the switch to slide into the outer rail 20 Z9432F ON switch installation ...

Page 21: ...Tighten the thumbscrews to secure the switch to the rack To remove the switch press the rail spring clip and pull the inner rail and switch out of the outer rail and rack Z9432F ON switch installation 21 ...

Page 22: ...mm 279 round holes Complete the switch installation in the following order 1 Attach the L brackets to the front of the switch 2 Attach the inner rails to the switch 3 Attach the outer rails to the rear of the four post rack 4 Slide the switch into the rack 5 Secure the L brackets to the front of the four post rack NOTE You need a user supplied Phillips screwdriver to complete this installation 22 ...

Page 23: ...e the rails L brackets and screws from the shipping container 2 Attach an L bracket to each side of the switch front using four M4 screws 3 Separate the inner rail and the outer rail 4 Attach the inner rail to the switch Line up the slot on the inner rail with the T stud on the switch Push back to lock the rail into place Secure the inner rail to the switch using two M4 screws Z9432F ON switch ins...

Page 24: ... of the four post rack Align the outer rail peg to the back of the four post rack Secure the outer rail to the back of the rack using two M4 screws for each rail Repeat this step to attach the second outer rail to the other side of the rack 6 Slide the inner rails into the outer rails 24 Z9432F ON switch installation ...

Page 25: ...s to the front of the four post rack Align the L bracket holes to the holes at the front of the four post rack Secure the L brackets to the front of the rack using two M4 screws for each side Z9432F ON switch installation 25 ...

Page 26: ...an airflow from the PSU to the I O reverse airflow are subject to tighter restrictions for power consumption on cables and optics that are used for 400 GbE ports Reverse airflow switches do not support high power cables or optics 400 GbE transceivers and active cables may exceed the supported threshold CAUTION To avoid damage to the switch when you cable the ports be sure not to interfere with the...

Page 27: ... is included for powering up an AC or DC power supply You must order all other power cables separately Start up sequence When the switch powers up the fans immediately come on at high speed The fan speed slows as the switch continues to boot After switch placement After you have securely installed and turned on the Z9432F ON switch For switch documentation and resources see the Dell EMC Networking...

Page 28: ...ing the fan trays or PSUs from the removed switch reinsert them in the replacement switch 7 Connect all the cables 8 Power on the switch For more information see Switch start up 9 Establish a connection to the switch CLI 10 Confirm that the software version of the replacement switch is the same as the previously installed switch show version If the software versions do not match upgrade the replac...

Page 29: ...put power specifications NOTE If you use a single PSU install a blank plate in the other PSU slot to ensure proper airflow for cooling Use power supply 2 PSU2 as the blank plate slot To install the blank plate use a 1 Philips screw driver NOTE ESD damage can occur if components are mishandled Always wear an ESD preventive wrist or heel ground strap when handling the Z9432F ON switch and components...

Page 30: ...de of the PSU NOTE If you use a single PSU install a blank plate in the other PSU slot to ensure proper airflow for cooling If you are only using one power supply install the power supply in the first slot PSU1 Install a blank plate in the second slot PSU2 1 Remove the PSU slot cover from the Z9432F ON switch using a small 1 Phillips screwdriver 2 Remove the PSU from the electro static bag 3 Inser...

Page 31: ...ower supply bay 4 Attach the power cables to the replacement PSU NOTE The switch powers up when the cables are connected between the power supply and the power source DC power connections Each DC PSU comes with one DC cable The cable ships in a separate plastic bag CAUTION This product must be supplied by a DC power source rated 48 Vdc to 60 Vdc 40 A minimum and Tma 45 degree C minimum The altitud...

Page 32: ... from the PSU socket Keep all the removed parts 5 Attach the blue wire and black wire to the PSU socket Secure the wires with the two M4 screws NOTE Attach the blue wire to the V terminal Attach the black wire to the V terminal 6 Return the plastic cover back to the PSU socket 7 Attach the yellow and green wire to the PSU GND Secure the wire with the M5 screw 32 Power supplies ...

Page 33: ...To uninstall the cable from the DC PSU remove the plastic cover and unscrew the M4 and M5 screws Pull the DC cable out from the DC PSU socket Power supplies 33 ...

Page 34: ...y exceed the supported threshold Airflow is from the I O panel to the PSU the red indicator is the normal airflow direction Airflow is from the PSU to the I O panel the blue indicator is the reverse airflow direction NOTE Fan and PSU airflow directions must match Do not mix normal and reverse airflows in a single switch Environmental factors can decrease the amount of time that is required between...

Page 35: ...e module into the bay 1 Fan module When facing the fan modules fan slot 1 is on the left side of the switch Fan slot seven is on the right side of the switch Fan module replacement To request a hardware replacement see www dell com support CAUTION Complete the following steps within one minute or the switch temperature could rise above safe thresholds and the switch could shut down 1 Take the repl...

Page 36: ...oot NOTE Ensure that any equipment that is attached to the serial port can support the required 115200 baud rate NOTE If the serial port on your computer cannot accept a female DB 9 connector use a DB 9 to USB adapter 1 Install the provided RJ45 connector side of the provided cable into the switch console port 2 Install the DB 9 female side of the provided copper cable into the serial port on your...

Page 37: ...rt on the computer 3 Connect the micro USB Type B end of cable into the micro USB Type B console port on the switch 4 Power on the switch 5 Install the necessary Silicon Labs drivers 6 Open your terminal software emulation program to access the switch 7 Confirm that the terminal settings on your terminal software emulation program are as follows 115200 baud rate No parity Eight data bits One stop ...

Page 38: ...tar archive file has both the bin file and the sig file to verify the secure boot bin file You do not have to untar the tar file to access the bin file NOTE If you specify the bin file the sig file MUST be in the same location as the bin file Topics Enable BIOS secure boot Disable BIOS secure boot Enable BIOS secure boot The Secure Boot configuration page in the BIOS Setup menu is password protect...

Page 39: ...2 Select the Security tab using the right arrow key 3 Select the Secure Boot option at the bottom of the Security tab using the down arrow key Secure boot 39 ...

Page 40: ... Secure Boot using the down arrow key 5 Enable Secure Boot Use the down arrow key to select Enabled 6 Go to the Save Exit tab 7 Select Save Changes and Reset to reset the switch using the down arrow key 40 Secure boot ...

Page 41: ...le BIOS secure boot The Secure Boot configuration page in the BIOS Setup menu is password protected On some switches Secure Boot mode is enabled by default in the BIOS but you can disable it from the BIOS menu 1 Enter the BIOS password The default password is the switch service tag plus an exclamation mark for example xxxxxx After you enter the password you enter the Main tab of the BIOS user inte...

Page 42: ...2 Select the Security tab using the right arrow key 3 Select the Secure Boot option at the bottom of the Security tab using the down arrow key 42 Secure boot ...

Page 43: ...4 Select Enable Secure Boot using the down arrow key 5 Select Disable 6 Go to the Save Exit tab 7 Select Save Changes and Reset to reset the switch using the down arrow key Secure boot 43 ...

Page 44: ...8 Select Yes at the Save Configuration and Reset option After the switch reloads Secure Boot mode is disabled 44 Secure boot ...

Page 45: ...e RJ45 or Micro USB console port ONIE example ONIE Install OS For downloading and installing an OS from a URL Starts ONIE with ONIE Discovery Service factory default boot ONIE Rescue Starts ONIE without ONIE Discovery Service Useful for running Diagnostics manually ONIE Uninstall OS Restore to factory defaults erases any installed OS ONIE Update ONIE For downloading and updating ONIE from a URL ON...

Page 46: ... URL command NOTE If you have a recovery USB plugged into your switch you must uninstall it before using the onie nos install command The ONIE Install environment uses DHCP to assign an IP address to the management interface eth0 If that fails it uses the default IP address 192 168 3 10 255 255 255 0 To display the IP address use the ifconfig eth0 command as shown ONIE ifconfig eth0 eth0 Link enca...

Page 47: ...assis physical design Parameter Specifications Height 43 mm 1 693 inches Width 438 5 mm 17 26 inches Depth 550 mm 21 65 inches PSU handle 29 3 mm 1 15 in PSU latch 34 6 mm 1 37 in Fan tray handle 25 0 mm 0 99 in Chassis weight with factory installed components 11 78 kg 2 PSUs and 7 fans 25 97 lbs 2 PSUs and 7 fans Rack clearance required Front 12 7 cm 5 inches Back 12 7 cm 5 inches Table 6 Environ...

Page 48: ...duty cycle 7 8 bels 66 dBA 35C operating 70 duty cycle 8 5 bels 45C operating 100 duty cycle 9 3 bels 80 dBA NOTE There is prominent tone at 270 Hz 234 Hz under 25C idle operating condition respectively 4 PSU to I O back to front fan direction 25C idle 30 duty cycle 6 9 bels 60 dBA 25C operating 70 duty cycle 8 4 bels 73 dBA 35C operating 80 duty cycle 8 7 bels 45C operating 100 duty cycle 9 1 bel...

Page 49: ...onnectors or by unauthorized changes or modifications in the equipment Unauthorized changes or modification could void the user s authority to operate the equipment This device complies with Part 15 of the FCC Rules Operation is subject to the following two conditions 1 this device may not cause harmful interference and 2 this device must accept any interference received including interference tha...

Page 50: ...power cords with Dell EMC equipment only Do not use Dell EMC AC power cords with any unauthorized hardware Figure 4 Japan warning label Safety standards and compliance agency certifications CUS UL 60950 1 2nd Edition Meets or exceeds Hi Pot and Ground Continuity testing per UL 60950 1 CSA 60950 1 03 2nd Edition EN 60950 1 2nd Edition EN 60825 1 1st Edition EN 60825 1 Safety of Laser Products Part ...

Page 51: ...is switch according to applicable local and national regulations Dell EMC encourages owners of information technology IT equipment to responsibly recycle their equipment when it is no longer needed Dell EMC offers a variety of product return programs and services in several countries to assist equipment owners in recycling their IT products Waste electrical and electronic equipment WEEE directive ...

Page 52: ... customers for the return recycling and recovery of WEEE Customer participation is important to minimize any potential effects of EEE on the environment and human health due to the potential presence of hazardous substances in EEE Dell EMC products which fall within the scope of the WEEE are labeled with the crossed out wheelie bin symbol as shown above as required by WEEE For information on Dell ...

Page 53: ...age scroll down to the bottom of the web page and select your country from the drop down menu To obtain product specific information enter the 7 character Service Tag or 11 digit express service code of your switch which is found on the pull out tag also known as a luggage tag and click Submit To receive more technical support click Contact Us On the Contact Information web page click Technical Su...

Reviews: