background image

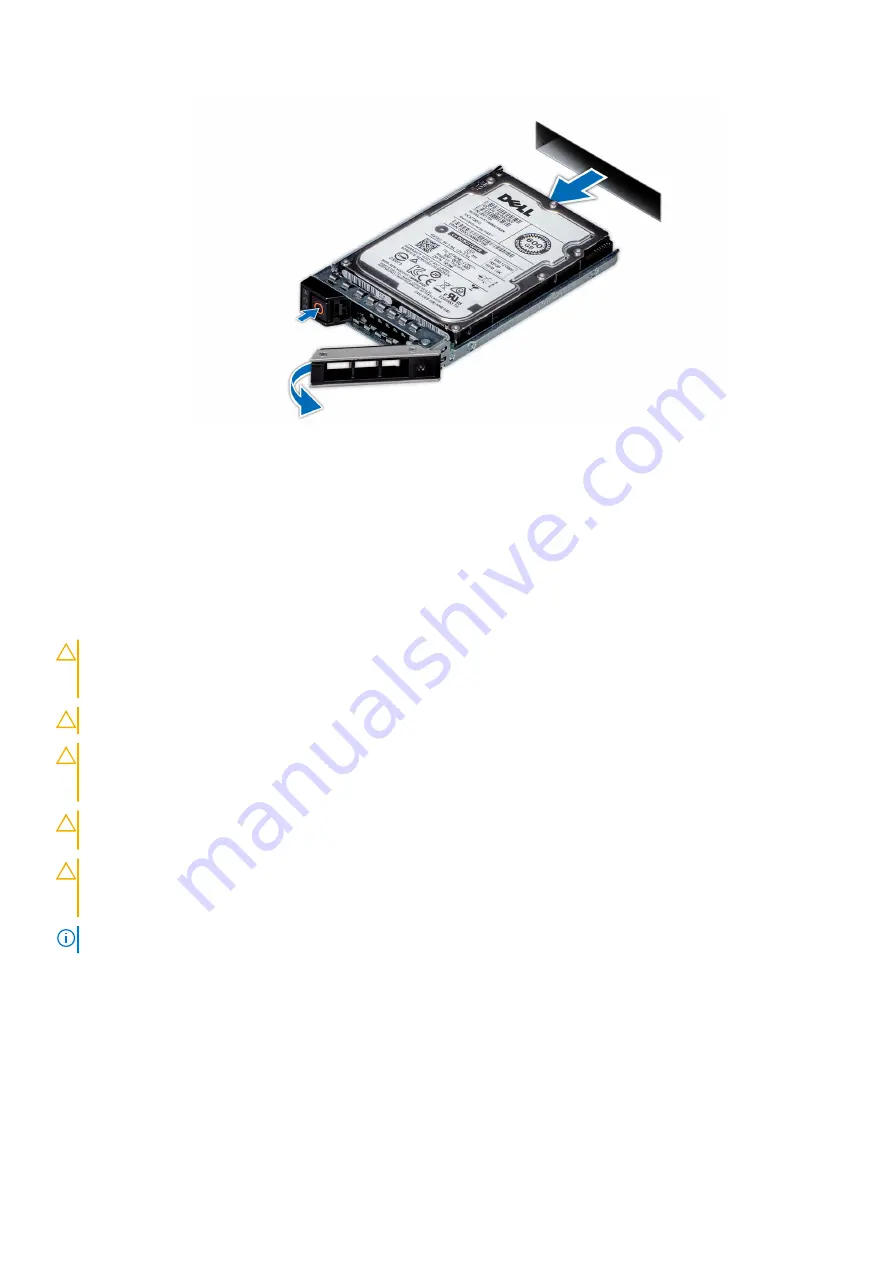
Figure 25. Removing the drive carrier

Next steps

1.

Install a drive carrier or a drive blank

.

Installing the drive carrier

Prerequisites

CAUTION:

 Before removing or installing a drive while the system is running, see the documentation for the

storage controller card to ensure that the host adapter is configured correctly to support drive removal and
insertion.

CAUTION:

 Combining SAS and SATA drives in the same RAID volume is not supported.

CAUTION:

 When installing a drive, ensure that the adjacent drives are fully installed. Inserting a drive carrier

and attempting to lock its handle next to a partially installed carrier can damage the partially installed carrier's
shield spring and make it unusable.

CAUTION:

 To prevent data loss, ensure that your operating system supports hot-swap drive installation. See the

documentation supplied with your operating system.

CAUTION:

 When a replacement hot swappable drive is installed and the system is powered on, the drive

automatically begins to rebuild. Ensure that the replacement drive is blank or contains data that you wish to
overwrite. Any data on the replacement drive is immediately lost after the drive is installed.

NOTE:

 Ensure that the drive carrier's release handle is in the open position before inserting the carrier into the slot.

1. Follow the safety guidelines listed in 

Safety instructions

.

2. If installed, 

remove the front bezel

.

3.

Remove the drive carrier or drive blank

.

Steps

1. Slide the drive carrier into the drive slot.
2. Close the drive carrier release handle to lock the drive in place.

Installing and removing system components

29

Summary of Contents for EMC PowerEdge R340

Page 1: ...Dell EMC PowerEdge R340 Installation and Service Manual Regulatory Model E58S Series Regulatory Type E58S001 Dec 2020 Rev A08 ...

Page 2: ...tial damage to hardware or loss of data and tells you how to avoid the problem WARNING A WARNING indicates a potential for property damage personal injury or death 2018 2021 Dell Inc or its subsidiaries All rights reserved Dell EMC and other trademarks are trademarks of Dell Inc or its subsidiaries Other trademarks may be trademarks of their respective owners ...

Page 3: ...ter 4 Installing and removing system components 18 Safety instructions 18 Before working inside your system 19 After working inside your system 19 Recommended tools 19 Front bezel 19 Removing the optional front bezel 19 Installing the optional front bezel 20 System cover 21 Removing the system cover 21 Installing the system cover 21 Air shroud 23 Removing the air shroud 23 Installing the air shrou...

Page 4: ...6 Installing the PERC card 47 System battery 48 Replacing the system battery 48 Optional internal USB memory key 50 Replacing the optional internal USB memory key 50 Optional optical drive 50 Removing the optical drive 50 Installing the optional optical drive 51 Processor and heat sink 52 Removing the heat sink 52 Removing the processor 53 Installing the processor 54 Installing the heat sink 55 Op...

Page 5: ... Installing the right control panel 78 Chapter 5 Jumpers and connectors 80 System board connectors 80 System board jumper settings 81 Disabling forgotten password 81 Chapter 6 System diagnostics and indicator codes 83 System health and system ID indicator codes 83 iDRAC Direct LED indicator codes 84 NIC indicator codes 84 Power supply unit indicator codes 85 Drive indicator codes 86 System diagnos...

Page 6: ...ument provides an overview about the system information about installing and replacing components technical specifications diagnostic tools and guidelines to be followed while installing certain components 1 6 About this document ...

Page 7: ...in this document unless specified otherwise Topics Front view of the system Rear view of the system Inside the system Locating the information tag of your system System Information label Front view of the system NOTE The 8 x 2 5 inch configuration is shorter than the 4 x 3 5 inch configuration Figure 1 Front view of the 8 x 2 5 inch drive system 1 Left control panel 2 Optical drive optional 3 Righ...

Page 8: ... panel Figure 3 Left control panel view 1 System health and system ID indicator Right control panel Figure 4 Right control panel view 1 Power button 2 USB 2 0 compliant port 3 iDRAC direct Micro USB port NOTE For more information on the ports see the Dell EMC PowerEdge R240 Technical Specifications 8 Dell EMC PowerEdge R340 system overview ...

Page 9: ...y unit 2 8 System identification button 9 System status indicator cable port CMA 10 USB 3 0 port 2 11 iDRAC9 dedicated network port 12 VGA port NOTE For more information about the ports and connectors see the Dell EMC PowerEdge R340 Technical Specifications Guide For more information see the Dell EMC PowerEdge R340 Technical Specifications on the product documentation page Dell EMC PowerEdge R340 ...

Page 10: ...tem Your system is identified by a unique Express Service Code and Service Tag number You can view the Express Service Code and Service Tag by pulling out the information tag located on the front of the system Alternatively the information may be on the Mini Enterprise Service Tag MEST label on the chassis on the rear of the system This information is used by Dell to route support calls to the app...

Page 11: ...ag back view 3 OpenManage Mobile OMM label 4 iDRAC MAC address and iDRAC secure password label 5 Service Tag Express Service Code QRL label System Information label PowerEdge R340 System Information Label Figure 8 Front and rear view configuration Dell EMC PowerEdge R340 system overview 11 ...

Page 12: ...Figure 9 Jumper settings Figure 10 Memory information 12 Dell EMC PowerEdge R340 system overview ...

Page 13: ...Figure 11 System information Dell EMC PowerEdge R340 system overview 13 ...

Page 14: ...Figure 12 Electrical overview 14 Dell EMC PowerEdge R340 system overview ...

Page 15: ...em issues and enables them to perform remote system management This reduces the need for physical access to the system Options to set up iDRAC IP address To enable communication between your system and iDRAC you must first configure the network settings based on your network infrastructure NOTE For static IP configuration you must request for it at the time of purchase This option is set to DHCP b...

Page 16: ...upported operating system by using one of the following resources Table 1 Resources to install the operating system Resources Location iDRAC www dell com idracmanuals Lifecycle Controller www dell com idracmanuals Lifecycle Controller OpenManage Deployment Toolkit www dell com openmanagemanuals OpenManage Deployment Toolkit Dell certified VMware ESXi www dell com virtualizationsolutions Installati...

Page 17: ... the web browser cache before downloading the drivers and firmware Steps 1 Go to www dell com support home 2 In the Drivers Downloads section type the Service Tag of your system in the Enter a Service Tag or product ID box and then click Submit NOTE If you do not have the Service Tag select Detect Product to allow the system to automatically detect the Service Tag or click View products and naviga...

Page 18: ...over while the system is powered on may expose you to a risk of electric shock CAUTION Do not operate the system without the cover for a duration exceeding five minutes Operating the system without the system cover can result in component damage CAUTION Many repairs may only be done by a certified service technician You should only perform troubleshooting and simple repairs as authorized in your p...

Page 19: ...ack For more information see the Rail Installation Guide at www dell com poweredgemanuals 3 Reconnect the peripherals and connect the system to the electrical outlet 4 Power on the attached peripherals and then power on the system Recommended tools You need the following tools to perform the removal and installation procedures Key to the bezel lock The key is required only if your system includes ...

Page 20: ...l front bezel Installing the optional front bezel Prerequisites 1 Follow the safety guidelines listed in the Safety instructions NOTE The bezel key is part of the bezel package Steps 1 Align and insert the tabs on the bezel into the slots on the chassis 2 Press the bezel until the release button clicks in place 3 Lock the bezel Figure 14 Installing the optional front bezel 20 Installing and removi...

Page 21: ...stem cover slides back 3 Lift the cover from the system Figure 15 Removing the system cover Next steps 1 Replace the system cover Installing the system cover Prerequisites 1 Follow the safety guidelines listed in the Safety instructions 2 Follow the procedure listed in the Before working inside your system 3 Ensure that all internal cables are connected and placed out of the way and no tools or ex...

Page 22: ... Phillips 2 screwdriver turn the lock clockwise to the lock position Figure 16 Installing the system cover Next steps 1 Follow the procedure listed in the After working inside your system 22 Installing and removing system components ...

Page 23: ...sulting in shutdown of the system and loss of data Steps Using the blue touch points lift the air shroud out of the system Figure 17 Removing the air shroud Next steps 1 Replace the air shroud Installing the air shroud Prerequisites 1 Follow the safety guidelines listed in Safety instructions 2 Follow the procedure listed in Before working inside your system Steps 1 Align the slot on the air shrou...

Page 24: ...ety guidelines listed in Safety instructions 2 Follow the procedure listed in the Before working inside your system Steps 1 Press the release tab to disengage the blank from the cooling fan cage 2 Lift the cooling fan blank out of the fan cage Figure 19 Removing a fan blank Next steps 1 Install the cooling fan or replace the cooling fan blank 24 Installing and removing system components ...

Page 25: ...emoving a cooling fan Prerequisites 1 WARNING Opening or removing the system cover when the system is on may expose you to a risk of electric shock Exercise utmost care while removing or installing the fans Follow the safety guidelines listed in the Safety instructions 2 Follow the procedure listed in the Before working inside your system 3 Remove the air shroud Steps 1 Press the release tabs on t...

Page 26: ...tructions 2 Follow the procedure listed in the Before working inside your system 3 Remove the air shroud 4 If installed remove the cooling fan blank Steps 1 Lower the cooling fan into the fan cage 2 Press the release tabs on the fan cable connector and connect the cable to the system board NOTE Route the cable properly to prevent the cable from being pinched or crimped 26 Installing and removing s...

Page 27: ...sted in Safety instructions 2 If installed remove the front bezel CAUTION To maintain proper system cooling drive blanks must be installed in all empty drive slots CAUTION Mixing drive blanks from previous generations of PowerEdge servers is not supported Steps Press the release button and slide the drive blank out of the drive slot Figure 23 Removing a drive blank Installing and removing system c...

Page 28: ...tor flashes while the drive is turning off When the drive indicators are off the drive is ready for removal For more information see the documentation for the storage controller CAUTION Before attempting to remove or install a drive while the system is running see the documentation for the storage controller card to ensure that the host adapter is configured correctly to support drive removal and ...

Page 29: ...nusable CAUTION To prevent data loss ensure that your operating system supports hot swap drive installation See the documentation supplied with your operating system CAUTION When a replacement hot swappable drive is installed and the system is powered on the drive automatically begins to rebuild Ensure that the replacement drive is blank or contains data that you wish to overwrite Any data on the ...

Page 30: ...ructions 2 If installed remove the front bezel 3 Remove the drive Steps 1 Using a Phillips 1 screwdriver remove the screws from the slide rails on the drive carrier NOTE If the hard drive or SSD carrier has Torx screw use Torx 6 for 2 5 inch drive or Torx 8 for 3 5 inch drive screw driver to remove the drive 2 Lift the drive out of the drive carrier 30 Installing and removing system components ...

Page 31: ...e rear of the carrier 2 Align the screw holes on the drive with the screws holes on the drive carrier 3 Using a Phillips 1 screwdriver replace the screws to secure the drive to the drive carrier NOTE If the hard drive or SSD carrier has Torx screw use Torx 6 for 2 5 inch drive or Torx 8 for 3 5 inch drive screw driver to install the drive NOTE When installing a drive into the drive carrier ensure ...

Page 32: ...tructions 2 If installed remove the front bezel 3 Remove the drive carrier 4 Remove the drive adapter from the drive carrier Steps 1 Using a Phillips 1 screwdriver remove the screws that secure the 2 5 inch drive to the 3 5 inch drive adapter NOTE If the 2 5 inch drive has Torx screw use Torx 6 screwdriver to remove the drive from a 3 5 inch drive adapter 2 Remove the drive from the 3 5 inch drive...

Page 33: ...in Safety instructions 2 If installed remove the front bezel 3 Remove the drive carrier Steps 1 Align the screw holes on the 2 5 inch drive with the screw holes on the 3 5 inch drive adapter 2 Using a Phillips 1 screwdriver install the screws to secure the drive to the 3 5 inch drive adapter NOTE If the 2 5 inch drive has Torx screw use Torx 6 screwdriver to install the drive to a 3 5 inch drive a...

Page 34: ...ollow the safety guidelines listed in Safety instructions 2 Follow the procedure listed in the Before working inside your system 3 Keep the plastic scribe ready Steps 1 Disconnect and remove the intrusion switch cable connector from connector on the system board NOTE Observe the routing of the cable as you remove it from the system 2 Using a plastic scribe slide the intrusion switch out of the int...

Page 35: ... system Steps 1 Align and insert the intrusion switch in the slot until it is firmly seated in the slot on the chassis NOTE Route the cable properly when you replace it to prevent the cable from being pinched or crimped 2 Connect the intrusion switch cable to the connector on the system board Figure 32 Installing the intrusion switch Next steps 1 Follow the procedure listed in After working inside...

Page 36: ...ory socket locations Memory channels are organized as follows Table 3 Memory channels Channel 0 Channel 1 Slot A1 and A3 Slot A2 and A4 Table 4 Memory population DIMM Type DIMMs Populated Channel Voltage Operating Frequency Maximum DIMM Rank Channel UDIMM 1 1 2 V 2666 MT s Dual rank or Single rank 2 The following table shows sample memory configurations 36 Installing and removing system components...

Page 37: ...es for installing memory modules All DIMMs must be DDR4 A maximum of two different ranked DIMMs can be populated in a channel regardless of rank count If memory modules with different speeds are installed they will operate at the speed of the slowest installed memory module s Populate memory module sockets only if a processor is installed For single processor systems sockets A1 to A4 are available...

Page 38: ...edges ensuring not to touch the middle of the memory module or metallic contacts 3 Lift the memory module away from the system Figure 34 Removing a memory module Next steps 1 Replace the memory module if you are removing a memory module permanently install a memory module blank NOTE The procedure to install a memory module blank is similar to the procedure to install a memory module Installing a m...

Page 39: ...ers on the memory module socket align with the levers on the other sockets that have memory modules installed Figure 35 Installing a memory module Next steps 1 Install the air shroud 2 Follow the procedure listed in After working inside your system 3 Press F2 to enter System Setup and check the System Memory setting The System Memory Size indicates the installed memory 4 If the System Memory Size ...

Page 40: ...ot on the system board Height Length Link width Slot width PCIE_G3_X8 Half Height Half Length x8 x8 The following table provides a guide for installing expansion cards to ensure proper cooling and mechanical fit The expansion cards with the highest priority must be installed first using the slot priority indicated All other expansion cards must be installed in card priority and slot priority order...

Page 41: ... LP Removing the expansion card riser Prerequisites 1 Follow the safety guidelines listed in Safety instructions 2 Follow the procedure listed in the Before working inside your system 3 Remove the air shroud Steps 1 Open the blue expansion card riser retention latch located on the system 2 Holding the blue touch points lift the expansion card riser from the system Figure 37 Removing the expansion ...

Page 42: ...ard riser Installing the expansion card riser Prerequisites 1 Follow the safety guidelines listed in the Safety instructions 2 Follow the procedure listed in the Before working inside your system 3 If applicable install the expansion card in the expansion card riser 4 Open the expansion card riser latch Steps 1 If applicable remove the expansion card riser filler bracket by performing the followin...

Page 43: ...card riser is firmly seated in the slot 4 Close the expansion card riser latch Figure 40 Installing the expansion card riser Next steps 1 Follow the procedure listed in the After working inside your system Removing an expansion card from the expansion card riser Prerequisites 1 Follow the safety guidelines listed in the Safety instructions Installing and removing system components 43 ...

Page 44: ...the expansion card riser 3 If applicable disconnect the cables from the expansion card 4 If you are removing the card permanently install a filler bracket in the empty expansion card slot NOTE Install a filler bracket over an empty expansion card slot to maintain Federal Communications Commission FCC certification of the system The brackets also keep dust and dirt out of the system and aid in prop...

Page 45: ... the filler bracket Steps 1 Remove the filler bracket NOTE Store the filler bracket for future use Filler brackets must be installed in empty expansion card slots to maintain Federal Communications Commission FCC certification of the system The brackets also keep dust and dirt out of the system and aid in proper cooling and airflow inside the system Figure 43 Removing expansion card filler 2 If ap...

Page 46: ...procedure listed in the Before working inside your system 3 Remove the expansion card riser Steps 1 Remove the screw securing the blue release latch 2 Rotate the blue release latch to disengage it from the PERC card 3 Push the blue release latch until the tab on the latch clicks into the slot on the chassis 4 Hold the PERC card by the edges and pull it to disconnect it from the connector on the sy...

Page 47: ...king inside your system 3 Remove the expansion card riser Steps 1 Connect the PERC cable to the PERC card 2 Flip and insert the PERC card in the connector on the system board 3 Press the tab on the blue release latch to disengage it from the slot on the chassis 4 Rotate the blue release latch until it locks with the PERC card 5 Secure the blue release latch with a screw Installing and removing sys...

Page 48: ...ccording to the manufacturer s instructions See the Safety instructions that came with your system for more information 1 Follow the safety guidelines listed in Safety instructions 2 Follow the procedure listed in Before working inside your system Steps 1 Push the battery holder clip away from the battery CAUTION To avoid damage to the battery holder clip ensure that you do not bend the battery ho...

Page 49: ...rt the battery in the battery holder until the battery holder clip snaps into place CAUTION To avoid damage to the battery holder clip ensure that you do not bend the battery holder clip while installing or removing a battery Figure 48 Installing the system battery Installing and removing system components 49 ...

Page 50: ...the Safety instructions 2 Follow the procedure listed in the Before working inside your system 3 Remove the expansion card riser Steps 1 Locate the USB port or USB memory key on the system board To locate the USB port see the System board jumpers and connectors section 2 If installed remove the USB memory key from the USB port 3 Insert the replacement USB memory key into the USB port Next steps 1 ...

Page 51: ...sted in the Safety instructions 2 Follow the procedure listed in the Before working inside your system 3 If installed remove the optical drive blank by pressing the blue release tab at the back of the blank and pushing the blank out of the system NOTE Route the cable properly when you replace it to prevent the cable from being pinched or crimped Steps 1 Insert the optical drive until the blue rele...

Page 52: ...eat sink and processor are too hot to touch for some time after the system has been powered down Allow the heat sink and processor to cool down before handling them Steps 1 Using a Phillips 2 screwdriver loosen the screws on the heat sink in the order that is mentioned below a Loosen the first screw three turns b Loosen the screw diagonally opposite to the screw you loosened 2 Repeat the procedure...

Page 53: ...low the procedure listed in the Before working inside your system 3 Remove the air shroud 4 Remove the heat sink Steps 1 Release the socket lever by pushing the lever down and out from under the tab on the processor shield 2 Lift the lever upward until the processor shield is fully open CAUTION Do not touch the processor socket pins they are fragile and can be permanently damaged Be careful not to...

Page 54: ...e force to seat the processor When the processor is positioned correctly it engages into the socket at ease 2 Place the processor in the socket 3 Close the processor shield by sliding it under the retention screw on the system board 4 Lower the processor shield lever and push it under the tab to lock the processor shield Figure 53 Installing the processor Next steps 1 Install the heat sink 2 Insta...

Page 55: ... can result in excess grease coming in contact with and contaminating the processor socket NOTE The thermal grease syringe is intended for one time use only Dispose the syringe after you use it Figure 54 Applying thermal grease on top of the processor 3 Align the screws on the heat sink with the standoff screws on the system board 4 Using a Phillips 2 screwdriver tighten the screws in the followin...

Page 56: ...ow the procedure listed in Before working inside your system 3 Remove the air shroud 4 If you are replacing the IDSDM vFlash card remove the MicroSD cards NOTE Temporarily label each SD card with its corresponding slot number before removal Reinstall the SD cards into the corresponding slots Steps Holding the pull tab lift the IDSDM vFlash card out of the system Next steps NOTE If you are replacin...

Page 57: ...d marked on the cards during removal 2 Install the air shroud 3 Follow the procedure that is listed in After working inside your system Removing the MicroSD card Prerequisites 1 Follow the safety guidelines listed in the Safety instructions 2 Follow the procedure listed in the Before working inside your system 3 Remove the air shroud 4 Remove the IDSDM or vFlash module Steps 1 Locate the MicroSD c...

Page 58: ...Card Port is enabled in System Setup NOTE If reinstalling ensure that you install the MicroSD cards into the same slots based on the labels you had marked on the cards during removal Steps 1 Locate the MicroSD card connector on the IDSDM vFlash module Orient the MicroSD card appropriately and insert the contact pin end of the card into the slot To locate IDSDM vFlash see the System board jumpers a...

Page 59: ...listed in Safety instructions 2 Follow the procedure listed in Before working inside your system 3 Remove the air shroud 4 Remove the BOSS card NOTE The procedure to remove the BOSS card is similar to removing an expansion card Steps 1 Using the Phillips 1 screwdriver remove the screws securing the M 2 SSD module to the BOSS card 2 Pull the M 2 SSD module to disconnect from the BOSS card connector...

Page 60: ...our system 3 Remove the air shroud 4 Remove the BOSS card NOTE The procedure to remove the BOSS card is similar to the removing an expansion card Steps 1 Align the M 2 SSD module at an angle with the BOSS card connector 2 Insert the M 2 SSD module until it is firmly seated in the BOSS card connector 3 Using the Phillips 1 screwdriver secure the M 2 SSD module on the BOSS card with the screw 60 Ins...

Page 61: ...our system Drive backplane Drive backplane Table 10 Supported backplane options for PowerEdge R340 system System Supported backplane options PowerEdge R340 2 5 inch x8 SAS SATA SSD backplane 3 5 inch x4 SAS SATA backplane Figure 61 2 5 inch x8 SAS SATA SSD backplane 1 Release tabs 2 2 Backplane SAS B0 connector 3 Backplane signal connector 4 Backplane SAS A0 connector 5 Backplane Power A connector...

Page 62: ...w the safety guidelines listed in Safety instructions 2 Follow the procedure listed in Before working inside your system 3 Remove the drives 4 Disconnect the following cables from the backplane a Backplane signal cable b Backplane power cable c PERC cable NOTE Observe the routing of the cable as you remove it from the system Steps 1 Press the blue release tabs to disengage the drive backplane from...

Page 63: ... system 3 Remove the drives NOTE To avoid damaging the backplane ensure to move the control panel cables from the cable routing clips before removing the backplane NOTE Route the cable properly when you replace it to prevent the cable from being pinched or crimped Steps 1 Align the slots on the backplane with the hooks on the chassis 2 Lower the backplane until the blue release tabs click into pla...

Page 64: ...plane a Backplane signal cable b Backplane power cable c PERC cable 2 Install the drives in their original locations 3 Follow the procedure listed in the After working inside your system Cable routing Figure 65 Cable routing 4 x 3 5 inch SAS backplane 64 Installing and removing system components ...

Page 65: ...ply unit PSU redundancy When the hot spare feature is enabled one of the redundant PSUs is switched to the sleep state The active PSU supports 100 percent of the load thus operating at higher efficiency The PSU in the sleep state monitors output voltage of the active PSU If the output voltage of the active PSU drops the PSU in the sleep state returns to an active output state If having both PSUs a...

Page 66: ...instructions Steps Pull the blank out of the system CAUTION To ensure proper system cooling the power supply unit blank must be installed in the second power supply unit bay in a non redundant configuration Remove the power supply unit blank only if you are installing a second power supply unit Figure 68 Removing a power supply unit blank Next steps 1 Replace the power supply blank or install the ...

Page 67: ...om the power outlet and from the PSU you intend to remove 3 Remove the cable from the strap on the PSU handle 4 Unlatch and lift the optional cable management arm if it interferes with the PSU removal For information about the cable management arm see the system s rack documentation at www dell com poweredgemanuals Steps Press the release latch and holding the PSU handle slide the PSU out of the P...

Page 68: ...k documentation at www dell com poweredgemanuals 2 Connect the power cable to the PSU and plug the cable into a power outlet NOTE When connecting the power cable to the PSU secure the cable to the PSU with the strap NOTE When installing hot swapping or hot adding a new PSU wait for 15 seconds for the system to recognize the PSU and determine its status The PSU redundancy may not occur until discov...

Page 69: ... 1 Replace the power distribution board Installing the power distribution board Prerequisites 1 Follow the safety guidelines listed in the Safety instructions 2 Follow the procedure listed in Before working inside your system Steps 1 Align the slots on the power distribution board PDB with the standoffs on the chassis 2 Using a Phillips 2 screwdriver replace the screws that secure the PDB to the c...

Page 70: ...es listed in Safety instructions 2 Follow the procedure listed in Before working inside your system 3 Remove the following components a Air shroud b Memory modules c Disconnect the fan cables d Expansion card riser e If applicable storage controller card f Heat sink and processor CAUTION To prevent damage to the processor socket when replacing a faulty system board ensure that you cover the proces...

Page 71: ...Using the system board holder slightly lift the system board and then slide it toward the front of the chassis 3 Lift the system board out of the chassis Figure 75 Removing the system board Installing and removing system components 71 ...

Page 72: ...nents CAUTION Take care not to damage the system identification button while placing the system board into the chassis 2 Holding the system board holder lower the system board it into the system 3 Incline the system board at an angle and align the connectors with the slots on the rear of the chassis 4 Slide the system board towards the rear of the chassis until the connectors are firmly seated in ...

Page 73: ...onfiguration data after replacing the system board All data is backed up in a backup flash device automatically If BIOS detects a new system board and the service tag in the backup flash device BIOS prompts the user to restore the backup information About this task Below is a list of options available Restore the service tag license and diagnostics information press Y Navigate to the Lifecycle Con...

Page 74: ...PM connector on the system board 2 Press to hold the module down and remove the screw using the security Torx 8 bit shipped with the TPM module 3 Slide the TPM module out from its connector 4 Push the plastic rivet away from the TPM connector and rotate it 90 counterclockwise to release it from the system board 5 Pull the plastic rivet out of its slot on the system board Installing the TPM Steps 1...

Page 75: ... screen click System BIOS System Security Settings 3 From the TPM Security option select On with Preboot Measurements 4 From the TPM Command option select Activate 5 Save the settings 6 Restart your system 7 Enter System Setup again 8 On the System Setup Main Menu screen click System BIOS System Security Settings 9 From the Intel TXT option select On Initializing the TPM 2 0 for TXT users Steps 1 ...

Page 76: ... on the bottom of the left control panel assembly 4 Hold the left control panel assembly and remove it from the system Figure 78 Removing the left control panel Next steps 1 Replace the left control panel Installing the left control panel Prerequisites 1 Follow the safety guidelines listed in Safety instructions 2 Follow the procedure listed in Before working inside your system Steps 1 Route the c...

Page 77: ...safety guidelines listed in Safety instructions 2 Follow the procedure listed in Before working inside your system Steps 1 Disconnect the control panel cable from the connector on the system board NOTE Observe the routing of the cable as you remove it from the system 2 Using the appropriate screwdriver remove the screws that secure the right control panel assembly 3 Hold the right control panel as...

Page 78: ...ble through the side wall and the guide slots in the system NOTE Route the cable properly to prevent the cable from being pinched or crimped 2 Align and insert the right control panel assembly in the slot on the system 3 Using the appropriate screwdriver fasten the screws that secure the right control panel assembly 4 Connect the control panel cable to the connector on the system board 78 Installi...

Page 79: ...Figure 81 Installing the right control panel Next steps 1 Follow the procedure listed in After working inside your system Installing and removing system components 79 ...

Page 80: ...boards in the system Jumpers on the system board help to disable the system and setup passwords You must know the connectors on the system board to install components and cables correctly Topics System board connectors System board jumper settings Disabling forgotten password System board connectors Figure 82 System board connectors Table 11 System board connectors 5 80 Jumpers and connectors ...

Page 81: ...ion switch connector 22 IDSDM vFlash IDSDM vFlash connector 23 BATTERY CMOS coin cell battery socket 24 HDD ODD_PWR Optical drive power connector 25 CTRL_PNL Right control panel connector System board jumper settings For information on resetting the password jumper to disable a password see the Disabling a forgotten password section Disabling forgotten password The software security features of th...

Page 82: ...you assign a new system and or setup password with the jumper on pins 4 and 6 the system disables the new password s the next time it boots 5 Reconnect the system to its electrical outlet and power on the system including any attached peripherals 6 Power off the system including any attached peripherals and disconnect the system from the electrical outlet 7 Remove the system cover 8 Move the jumpe...

Page 83: ...d system ID indicator is located on the left control panel of your system Figure 83 System health and system ID indicator Table 12 System health and system ID indicator codes System health and system ID indicator code Condition Solid blue Indicates that the system is turned on system is healthy and system ID mode is not active Press the system health and system ID button to switch to system ID mod...

Page 84: ...codes iDRAC Direct LED indicator code Condition Solid green for two seconds Indicates that the laptop or tablet is connected Flashing green on for two seconds and off for two seconds Indicates that the laptop or tablet connected is recognized Powers off Indicates that the laptop or tablet is unplugged NIC indicator codes Each NIC on the back of the system has indicators that provide information ab...

Page 85: ...d or unplug the PSU when updating firmware If firmware update is interrupted the PSUs do not function Blinking green and turns off When hot plugging a PSU the PSU handle blinks green five times at a rate of 4 Hz and turns off This indicates a PSU mismatch with respect to efficiency feature set health status or supported voltage CAUTION If two PSUs are installed both the PSUs must have the same typ...

Page 86: ...nd Drive failed Flashes green slowly Drive rebuilding Solid green Drive online Flashes green for three seconds amber for three seconds and then turns off after six seconds Rebuild stopped System diagnostics If you experience a problem with your system run the system diagnostics before contacting Dell for technical assistance The purpose of running system diagnostics is to test your system hardware...

Page 87: ...ecuting the tests on all the detected devices Results Running the Embedded System Diagnostics from the Dell Lifecycle Controller Steps 1 As the system boots press F10 2 Select Hardware Diagnostics Run Hardware Diagnostics The ePSA Pre boot System Assessment window is displayed listing all devices detected in the system The diagnostics starts executing the tests on all the detected devices System d...

Page 88: ...e various support categories is displayed 4 For general support a Select your product category b Select your product segment c Select your product The support page that lists the various support categories is displayed 5 For contact details of Dell Global Technical Support a Click Global Technical Support b The Contact Technical Support page is displayed with details to call chat or e mail the Del...

Page 89: ...r storage and networking devices By installing and setting up a SupportAssist application in your IT environment you can receive the following benefits Automated issue detection SupportAssist monitors your Dell EMC devices and automatically detects hardware issues both proactively and predictively Automated case creation When an issue is detected SupportAssist automatically opens a support case wi...

Page 90: ...tion For information about setting up your system see the Getting Started Guide document that is shipped with your system www dell com poweredgemanuals Configuring your system For information about the iDRAC features configuring and logging in to iDRAC and managing your system remotely see the Integrated Dell Remote Access Controller User s Guide For information about understanding Remote Access C...

Page 91: ... Enterprise see the Dell OpenManage Enterprise User s Guide https www dell com openmanagemanuals For information about installing and using Dell SupportAssist see the Dell EMC SupportAssist Enterprise User s Guide https www dell com serviceabilitytools For information about partner programs enterprise systems management see the OpenManage Connections Enterprise Systems Management documents www del...

Page 92: ...Table 17 Additional documentation resources for your system Task Document Location PowerEdge server issues see the Server Troubleshooting Guide 92 Documentation resources ...

Reviews: