background image

22"LCD Color Monitor


 Dell E228WFPc 


10

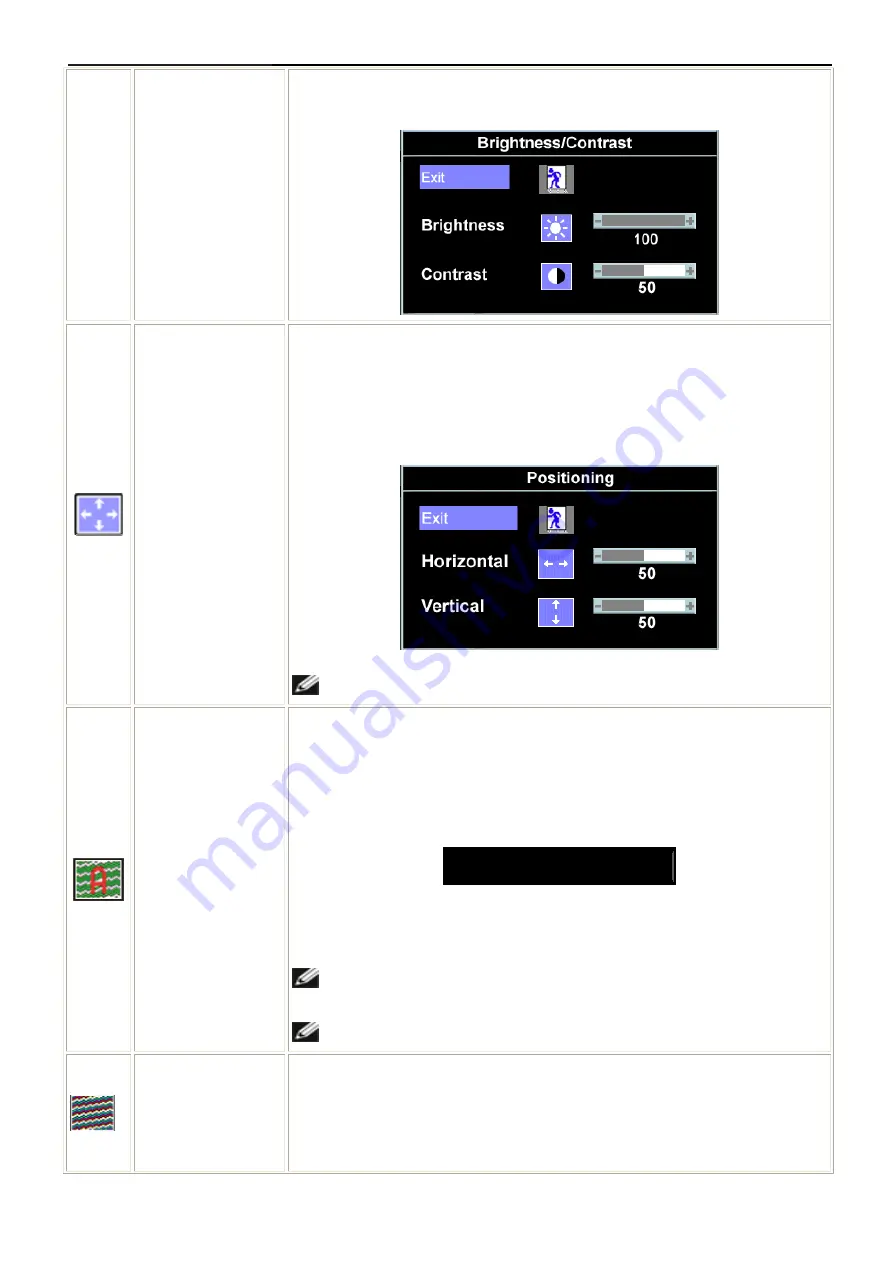
Push the + button to increase the contrast and push the - button to decrease the 

contrast (min 0 ~ max 100).


Positioning: 

Horizontal


Vertical 

Positioning moves the viewing area around on the monitor screen.   

When making changes to either the Horizontal or Vertical settings, no changes 

occur to the size of the viewing area. The image shifts in response to your 

selection. 

Minimum is 0 (-) and maximum is 100 (+)


NOTE: When using DVI source, the Positioning option is not available.


Auto Adjust


Even though your computer recognizes your monitor on startup, the Auto 

Adjustment function optimizes the display settings for use with your particular 

setup. 

Select to activate automatic setup and adjustment. The following dialog appears 

on a black screen as the monitor self-adjusts to the current input: 


Auto Adjust In Progress   

Auto Adjustment allows the monitor to self-adjust to the incoming video signal. 

After using Auto Adjustment, you can further tune your monitor by using the Pixel 

Clock (Coarse) and Phase (Fine) controls under Image Settings. 


NOTE: In most cases, Auto Adjust produces the best image for your 

configuration. 


NOTE: When using DVI source, the Auto Adjust is not available. 


Image settings: 


The Phase and Pixel Clock adjustments allow you to more closely adjust your 

monitor to your preference. These settings are accessed through the main OSD 

menu, by selecting Image Settings. 


Summary of Contents for E228WFPc

Page 1: ... 9 Maintainability 44 9 1 Equipments and Tools Requirement 44 9 2 Trouble Shooting 45 10 White Balance Luminance adjustment 51 11 ISP Instruction 52 12 Monitor Exploded View 55 13 BOM List 61 14 Different Parts List 75 CAUTION USE A SEPARATE ISOLATION TRANSFOMER FOR THIS UNIT WHEN SERVICING Table Of Contents 1 Revision List 2 ECN History 3 Important Safety Notice 4 1 Monitor Specifications 5 2 LCD...

Page 2: ...SGHHLWDDZHC A01 May 09 2008 Add new BOM TC8GGHHLWDDDHC TC8MGHHKWDDNHC TC8MGHHKWDDDHN TC8GGHHKWDDNHC TC8MGHHMWDDDHC TC8MGHHLWDDDHC TC8MGHHJWDDDHC TC8MGHHMWDDFHC TC8MGHHFWDDDHC A02 May 13 2008 Add new BOM TC8MGHHBWDDD4C TC8SGHHFWDDZHC TC8SGHHJWDDZHC TC8GGHHFWDDDHC TC8GGHHJWDDDHC TC8GGHHMWDDFHC A03 Jul 05 2008 Add new BOM TC8SGHHMWDDEHC A04 Dec 24 2008 Change Y value to Ymin min luminance value in it...

Page 3: ...22 LCD Color Monitor Dell E228WFPc 3 ECN History ECN No Change Description Service Deposition Cut in date MSR ...

Page 4: ... characteristics may create shock fire or other hazards Under no circumstances should the original design be modified or altered without written permission from AOC AOC assumes no liability express or implied arising out of any unauthorized modification of design Servicer assumes all liability FOR PRODUCTS CONTAINING LASER DANGER Invisible laser radiation when open AVOID DIRECT EXPOSURE TO BEAM CA...

Page 5: ...e Center of screen 300cd m2 Contrast Ratio Center of screen 1000 Dot Clock 165MHz Max Max Resolution 1680 x 1050 at 60 Hz Plug Play VESA DDC ON Mode 45W EPA ENERGY STAR OFF Mode 1W Input Connector 15 pin D subminiature blue connector DVI D white connector Maximum Screen Size 473 76mm H x 296 1mm V Power Source 100 to 240 VAC 50 or 60 Hz 3 Hz 1 5A Environmental Considerations Operating Temp 5 to 35...

Page 6: ...ol logic brightness control logic and DDC The power board will provide AC to DC Inverter voltage to drive the backlight of panel and the main board chips each voltage Video signal DDC Power board Flat Panel and CCFL backlight Main Board Key board RS232 Connector For white balance adjustment in factory mode CCFL Drive AC IN 100 240V Monitor Block Diagram Host Computer ...

Page 7: ...e and buttons to move between the setting options As you move from one icon to another the option name is highlighted See the table below for a complete list of all the options available for the monitor 3 Push the MENU button once to activate the highlighted option 4 Push and button to select the desired parameter 5 Push MENU to enter the slide bar and then use the and buttons according to the ind...

Page 8: ...g screen savers best to set both to the exact times Whichever mouse is moved first will activate that video input first NOTE The floating Dell Self test Feature Check dialog appears on a black background if the monitor cannot sense a video signal Using the input select button select the desired input to be tested either Analog Input or Digital Input Disconnect the video cable from the video card a...

Page 9: ... tune your monitor by using the Pixel Clock Coarse and Phase Fine controls under Image Settings NOTE Auto Adjust will not occur if you press the button while there are no active video input signals or attached cables E Power Button and Indicator Use the power button to turn the monitor on and off The green light indicates the monitor is on and fully functional An amber light indicates power save m...

Page 10: ...ion optimizes the display settings for use with your particular setup Select to activate automatic setup and adjustment The following dialog appears on a black screen as the monitor self adjusts to the current input Auto Adjust In Progress Auto Adjustment allows the monitor to self adjust to the incoming video signal After using Auto Adjustment you can further tune your monitor by using the Pixel ...

Page 11: ...erature color hue and saturation The color hue is most noticeable in areas of white NOTE Pixel Clock and Phase Adjustments are only available for VGA input To achieve the different color domain for PC RGB and HD YPbPr HD YPbPr is suitable for HD video playback over DVI PC RGB is suitable for normal PC graphics display over DVI Blue Preset is selected to obtain a bluish tint This color setting is t...

Page 12: ...ition OSD Hold Time OSD Lock Adjust the settings for the OSD including the location and the amount of time the menu remains on screen Position of the OSD To adjust the horizontal position of the OSD use the and buttons and move OSD to the left and right To adjust the vertical position of the OSD use the and buttons and move OSD down and up OSD Hold Time The OSD stays active for as long as it is in...

Page 13: ...DC CI Display Data Channel Command Interface allows your monitor parameters brightness color balance etc to be adjustable via software on your PC You can disable this feature by selecting Disable Enable this feature for best user experience and optimum performance of your monitor Exit Select to exit out of Reset to Factory Settings menu without resetting any OSD options Position settings only Chan...

Page 14: ... DDC CI Display Data Channel Command Interface allows your monitor parameters brightness color balance etc to be adjustable via software on your PC Default is Enable You can disable this feature by selecting Disable For best user experience and optimum performance of your monitor keep this feature enabled NOTE If user select Disable display Warning message box as below Select Yes disable DDC CI an...

Page 15: ... X 1050 60Hz NOTE The floating Dell Self test Feature Check dialog appears on screen if the monitor cannot sense a signal cable Occasionally no warning message appears but the screen is blank This could also indicate that the monitor is not synchronizing with the computer See solving problems for more information 1 Auto Detect Digital Input Cannot Display This Video Mode Optimum Resolution 1680 x1...

Page 16: ...VGA Connector layout DVI Connector Note Pin 1 is at the top right Pin Signal Assignment Pin Signal Assignment Pin Signal Assignment 1 T M D S Data 2 9 T M D S Data 1 17 T M D S Data 0 2 T M D S Data 2 10 T M D S Data 1 18 T M D S Data 0 3 T M D S Data 2 Shield 11 T M D S Data 1 Shield 19 T M D S Data 0 Shield 4 No Pin 12 No Pin 20 No Pin 5 No Pin 13 No Pin 21 No Pin 6 DDC Clock 14 5V Power 22 T M ...

Page 17: ...768 75Hz 1312x800 60 023 P 75 029 P 78 750 1152x864 75Hz 1600x900 67 500 P 75 000 P 108 00 1280x1024 60Hz 1688x1066 64 000 P 60 000 P 108 00 SXGA 1280x1024 75Hz 1688x1066 79 976 P 75 025 P 135 00 WSXGA 1680x1050 60H 2240x1899 65 16 P 60 0 P 146 DOS 720x400 70Hz 900 x 449 31 469 N 70 087 P 28 322 4 3 Power Supply Requirements A C Line voltage range 100 V 240 V A C Line frequency range 50 3Hz 60 3Hz...

Page 18: ... circuit and a back light unit The resolution of a 22 is 1680 x1050 and this model can display up to 16 7 millions colors Features High contrast ratio high aperture structure TN Twisted Nematic mode Wide Viewing Angle High speed response WSXGA 1680 x 1050 pixels resolution Low power consumption DE Data Enable only mode LVDS Low Voltage Differential Signaling interface 2pixel clock Compact Size Des...

Page 19: ...22 LCD Color Monitor Dell E228WFPc 19 4 4 2 Optical Characteristics Ta 25 2 C VDD 5V fv 60Hz fDCLK 59 6MHz IL 7 5mArms ...

Page 20: ...TN 90 45 PVA display pattern Pure R G B Black White Dot Gray pattern inspection area Active area 4 5 3 Classification of defects dark bright spots points on the display which appear dark bright and remain unchanged in size dark bright lines lines on the display which appear dark bright and remain unchanged in size polarizer scratch when the unit is lit a light line is seen across a darker backgrou...

Page 21: ...When bright area in a sub pixel R B is under 20 of a sub pixel that sub pixel can be ignored When bright area in a sub pixel G is under 10 of a sub pixel that sub pixel can be ignored 2 Display Inspection Defect Type Accept mm Reject mm Dark bright spot 1 foreign material Stain Dust 0 3 D 0 7 N 5 D 0 7 N 5 Bright line light lint or dark line dark lint hair 0 01 W 0 1 0 3 L 7 0 N 3 W 0 1 L 7 0 N 3 ...

Page 22: ...22 LCD Color Monitor Dell E228WFPc 22 5 Block Diagram 5 1 Software Flow Chart 1 2 N Y 5 Y N 10 Y N 12 Y N 7 Y N 6 4 3 8 9 14 11 13 Y N 15 Y N 16 17 19 Y N 18 ...

Page 23: ...on the LED and set it to green color Scalar initializes 10 In standby mode 11 Update the lifetime of back light 12 Check the analog port are there any signals coming 13 Does the scalar send out an interrupt request 14 Wake up the scalar 15 Are there any signals coming from analog port 16 Display No connection Check Signal Cable message And go into standby mode after the message disappears 17 Progr...

Page 24: ... CN403 GM5766H LF PQFP 128 Include MCU ADC OSD U401 Flash Memory SST25LF020A 33 4C SAE U402 EEPROM M24C16 U403 D Sub Connector CN202 EEPROM M24C02 U201 R G B RXD TXD Digital video signal EPR_SDA EPR_SCL LCD Interface CN501 H V DVI Connector CN201 EEPROM M24C02 U202 DB15_SDA DB15_SCL DDC_SCL_DVI DDC_SDA_DVI ...

Page 25: ...dge Rectifier and Filter Start Circuit R905 PWM Control IC Over Voltage Protect AC input 14V PWM Control IC Feedback Circuit Rectify and Output Circuit Transformer MOSFET Over Voltage Protect Lamp ON OFF ON OFF Control Rectifier diodes Feedback Circuit Transformer DIM 5V CN902 ...

Page 26: ...struction Remove stand Press the Stand release button and lift up the Stand and away from the monitor Symbol TPV Part Number Description 1 A34G0152 VH 1B 30 Rear Cover 2 705GQCK0P34002 Stand Base Ass Y 3 A34G0151 VH 1B Bezel Remove the cosmetic cover 1 Remove the 4 screws by Torque A 2 Pry the monitor up then find out the hooks position use the tool like the picture or other card to insert into th...

Page 27: ...g and take off the rear cover 4 Remove the small cover shield 5 Disconnect the Key board connector and then remove the bezel 6 The harness must along with the yellow line indicate Symbol TPV Part Number Description 4 A85G0041 1 Shield 5 052G 1150 C Black Adhesive Tape 4 5 ...

Page 28: ...ol TPV Part Number Description 6 A85G0036 1 shielding light Remove the small shield and back light connector 1 Remove the screw by Torque B or by manual 2 Push the small shield as the arrowhead direction 3 Disconnect the back light connectors 6 ...

Page 29: ...tion 7 A15G0112 4 Main Frame Remove the main frame 1 Remove the four screws by Torque B 2 Remove the four screws and remove the main frame by manual or torque 3kgF Cm 3 Remove the main frame and at the same time disconnect the LVDS connector and remove the EVA washers 7 ...

Page 30: ...Do not tighten the cable when screw the Fix Button 1 Insert LVDS PIN to CN501 on the main board insert Power board connector cable to CN601 of main board Note 1 Harness can t be pressed by emanated foil and can t touch main frame s ear 2 Be careful of the CN403 PIN seat when install the main board because the CN403 PIN seat is higher 8 9 Note Make connector s metal side adown A B LVDS Harness betw...

Page 31: ...d The Black Adhesive Tape should be affixed as the figure showed Symbol TPV Part Number Description 8 S95G80183608 LVDS ASS Y 9 044G3231 15571 EVA WASHER 11 095G 825 9W507 HARNESS 12P 10P 230mm 12 Q52G6025 13156 Mylar 13 CBPC7SGHDDQ1 Main Board 14 PWPC7C42LAA1 PWPC Board 15 750GLSC0L0132D000D Panel SAMSUNG 16 052F 1150501 Black Adhesive Tape 11 12 13 14 15 16 ...

Page 32: ...ble LVDS cable process Step1 LVDS cable with plugging in Step2 remove foam Step3 pull out LVDS cable via pressing side clip but the core is still sticked there Step4 take off LVDS with core Through the process the LVDS connector will not be damaged ...

Page 33: ...2 3 1 2 D210 BAV70 1 5V NC NC NC E0 E0 1 NC NC E1 E1 E1 2 NC E2 E2 E2 E2 3 VSS 4 SDA 5 SCL 6 WC 7 VCC 8 U202 M24C02 WMN6TP ZD201 UDZS5 6B VS 3 HS 3 C262 0 001uF C219 0 1uF 16V R262 10K 1 10W 5 GND GND R224 100Ω 1 10W R230 100Ω 1 10W R225 4 7KΩ 1 10W Q202 PMBS3904 GND GND R238 220Ω 1 10W R239 220Ω 1 10W 1 2 3 4 5 6 7 8 17 18 19 20 21 22 23 24 9 11 13 15 10 12 14 16 C1 C5 C5 C2 C3 C4 CN201 JACK HDCP...

Page 34: ...ERVED 19 RESERVED 20 RESERVED 21 RESERVED 22 E_CH2_P 11 RESERVED 23 RED 99 SPI_CSn 59 GREEN 97 AVSS_ADC 103 AVDD_ADC_18 104 VBUFC_RPLL 105 VDD_RPLL_18 106 XTAL 108 TCLK 109 AVDD_RPLL_33 110 RESETn 111 HSYNC 89 VSYNC 90 DDC_SDA_VGA 65 DDC_SCL_VGA 64 GPIO_9 121 GPIO_8 120 GPIO_10 122 GPIO_14 126 AVDD_BIAS_33 128 GPO_2 57 GPO_3 58 RVDD_33 63 HOST_SCL 66 HOST_SDA 67 REXT 69 RX2 72 RX2 73 RX1 75 RX1 76...

Page 35: ... 47KΩ 1 10W R414 1 5KΩ 1 10W C408 0 1uF 16V OEM MODEL Size Rev Date Sheet of TPV MODEL PCB NAME 称爹 T P V Top Victory Electronics Co Ltd KeyComponent 絬 隔 瓜 絪 腹 TC7GGHHKWDDLHN 1 0 DELL E228WFP B 4 6 715G2089 1 称爹 04 key pad G2089 1 del X 4 071015 1 2 3 4 5 6 7 8 CN403 CONN LINE IN L LINE IN R NC Reserved LINE IN R NC Reserved NC Reserved NC Reserved M onday A ugust 20 2007 KEY_MENU Audio cut of f 3 ...

Page 36: ...501 22uF 50V 2 4 6 8 10 12 14 16 18 20 22 24 1 3 5 7 9 11 13 15 17 19 21 23 CN501 CONN C503 1000pF 50V RXO3 LVDS_O8 RXO1 LVDS_O2 RXO2 LVDS_O4 RXE3 LVDS_E8 RXE1 LVDS_E2 RXE2 LVDS_E4 RXEC LVDS_E6 RXO0 LVDS_O0 RXE0 LVDS_E0 RXOC LVDS_O7 RXOC LVDS_O6 LVDS_O2 LVDS_O0 LVDS_O5 RXO0 LVDS_O1 RXE2 LVDS_E5 LVDS_E3 LVDS_E7 LVDS_O3 LVDS_O6 LVDS_E0 LVDS_E2 LVDS_O4 LVDS_O7 RXE0 LVDS_E1 LVDS_O9 LVDS_E5 LVDS_E4 RXO...

Page 37: ... 3 3V_VDD VCC12V 5V GND 12V 1 3 2 Q602 AO3401 R605 47KΩ 1 10W Audio Det GND PPWR 3 Q603 PMBS3904 R609 47KΩ 1 10W Audio cut GND GND GND R608 47KΩ 1 10W C609 220uF 25V C611 220uF 25V R616 NC Burst CTRL 3 ON_OFF 8 16 Modified OEM MODEL Size Rev Date Sheet of TPV MODEL PCB NAME 称爹 T P V Top Victory Electronics Co Ltd KeyComponent 絬 隔 瓜 絪 腹 TC7GGHHKWDDLHN 1 0 DELL E228WFP B 6 6 715G2089 1 称爹 06 power G...

Page 38: ...000pF C929 0 1uF C900 2200PF D904 NC D916 LL4148WP R902 330K 1 4W PWPC7C42LAA1 1 DELL 22 cost down Custom 2 3 Tuesday March 04 2008 715G2594 1 4 称爹 01 POWER G2594 1 4 X 14 080303 OEM MODEL Size Rev Date Sheet of TPV MODEL PCB NAME 称爹 T P V Top Victory Electronics Co Ltd Key Component 絬 隔 瓜 絪 腹 R927 1K 1 8W L902 L 1 4 2 3 CN902 WIRE HARNESS 1 2 3 4 5 6 7 8 9 R928 1K 1 8W FB902 JUMPER 1 2 C921 0 001...

Page 39: ...MR 6 3 7 4 8 1 R819 10K 1 10W FB DTC D801 BAV99 3 1 2 C814 0 1uF 16V R853 10K 1 10W R844 22R 1 10W 5 R852 10K 1 10W C805 470uF 25V Q809 AM9945N T1 PF 1 2 3 4 8 7 6 5 S G S G D D D D R824 2 4K 1 10W D808 BAW56 3 1 2 C B E L801 NC 1 4 2 3 Q808 RK7002 OLP1 R841 1K 1 10W 1 C803 1500PF 50V OLP1 L802 NC 1 4 2 3 R835 1K 1 10W 1 R812 1K 1 10W 1 OLP2 R836 1M 1 10W 5 R809 NC R832 0R05 1 10W 5 CN802 CONN 1 2...

Page 40: ...22 LCD Color Monitor Dell E228WFPc 40 8 PCB Layout 8 1 Main Board ...

Page 41: ...22 LCD Color Monitor Dell E228WFPc 41 ...

Page 42: ...22 LCD Color Monitor Dell E228WFPc 42 8 2 Power Board ...

Page 43: ...22 LCD Color Monitor Dell E228WFPc 43 8 3 Key Board ...

Page 44: ...22 LCD Color Monitor Dell E228WFPc 44 9 Maintainability 9 1 Equipments and Tools Requirement 1 Voltage meter 2 Oscilloscope 3 Pattern Generator 4 LCD Color Analyzer 5 Service Manual 6 User Manual ...

Page 45: ...power key and look if the picture is normal Please reinsert and make sure the AC of 100 240 is normal Measure U602 PIN2 1 8V U601 PIN2 3 3V Reinsert or check the Adapter Inverter section X301 oscillate waveforms are normal Check CN601 or replace U601 U602 Replace U401 Replace X301 OK OK OK NG OK NG NG ...

Page 46: ... U602 PIN2 1 8V U601 PIN2 3 3V Replace U401 X301 oscillate waveform is normal Replace U601 U602 OK OK OK NG Check HS VS from CN202 is normal Replace X301 Check Correspondent component NG NG Replace U401 Whether the reset of the Scalar IC is useful Check U302 C333 C329 ZD301 NG OK ...

Page 47: ...easure Q603 base is low level X301 oscillate waveform is normal Check Q603 Q602 is broken or CN501 solder Check Correspondent component Replace PANEL Check Correspondent component Replace U401 OK OK OK Replace X301 OK NG NG NG NG Check reset circuit of U401 is normal ...

Page 48: ...02 C914 OVP circuit Check CN902 pin6 7 5V Check the voltage of C907 Check start voltage for the pin8 of U901 Check R905 NG Check the auxiliary voltage is bigger than 10V and smaller than 20V NG NG NG Check R912 D910 D900 T901 D920 Q902 ZD920 Check IC901 pin5 PWM wave Check IC901 NG OK NG OK OK OK OK Check AC line volt 110V or 220V Check AC input ...

Page 49: ... signal Check Interface board or main board NG OK Check IC801 PIN2 5V NG OK Change on off circuit Check IC801 PIN9 10 have the output of square wave at short time NG OK Check Q804 Q809 Check the output of PT801 PT802 Check connecter lamp OK NG Check PT801 PT802 Change IC801 Check the input of Q804 Q809 NG OK ...

Page 50: ...50 9 2 3 Keypad Board OSD is unstable or not working Is Key Pad Board connecting normally Connect Key Pad Board Is Button Switch normally Replace Button Switch Y N N Is Key Pad Board normally Replace Key Pad Board Y N Y Check Main Board ...

Page 51: ...color temperature 1 Switch the Minolta CA210 to RGB mode with press MODE button 2 Switch the MEM channel to Channel 0 with up or down arrow on Minolta CA210 3 The LCD indicator on Minolta CA210 will show x 313 30 y 329 30 Ymin 180cd m2 b Adjust Color1 93000 K color temperature 8 Switch the Minolta CA210 to RGB mode with press MODE button 9 Switch the MEM channel to Channel 0 with up or down arrow ...

Page 52: ...h I2 C DDC bus from PRINT Parallel port or VGA Source The power source of the debug board is from one among PRINT Parallel port 12V DC IN and USB b Print port cable 2 Installation Install GProbe 5 on your PC a Copy GProbe5 0 0 15 exe to your PC b Install it by the prompts and finish that c Unzip the file of DELL_E228WFP_ISP_Code rar to D Install Hardware and setup G Probe ISP by print port a Power...

Page 53: ...VGA input g Connect the VGA signal source SG or PC to the debug board VGA Source connector h Launch GProbe 5 on your PC i Press the key F10 on your keyboard and then Connection Settings dialogue box will be displayed on screen j Set up the dialogue box as following and press OK button Connection Connected GProbe 5 LPT Port ...

Page 54: ...ar the batch dialogue box In file blank select L191_VISTA_ISP ibm_L191_gm2621_auoeg02_v019_061214_1 txt OR select L191_VISTA_ISP ibm_L191_gm2621_secex l2_v019_061214_1 txt Press Execute Than plug the AC power immediately It will show the ISP information About 18s the ISP have be finished ...

Page 55: ...22 LCD Color Monitor Dell E228WFPc 55 12 Exploded View ...

Page 56: ...22 LCD Color Monitor Dell E228WFPc 56 ...

Page 57: ...22 LCD Color Monitor Dell E228WFPc 57 ...

Page 58: ...22 LCD Color Monitor Dell E228WFPc 58 ...

Page 59: ...22 LCD Color Monitor Dell E228WFPc 59 ...

Page 60: ...22 LCD Color Monitor Dell E228WFPc 60 ...

Page 61: ...INSULATING TAPE 052G6022 1500 SMALL TAPE 052G6022 1500 SMALL TAPE 070GHDCP500HDC HDCP CODE E08902 089G 728LAA 2D SIGNAL CABLE E08903 089G1748LAA 1D DVI CABLE 089G402A18NYHD POWER CORD 0M1G 130 4 47 CR3 SCREW 0M1G 130 4 47 CR3 SCREW 0M1G1730 6120 SCREW 42 D020523 0M1G2940 10225 CR3 SCREW 0M1G2940 10225 CR3 SCREW 0M1G3030 5125 SCREW 705GQ734561 20 DELL MAIN FRAME ASS Y 015G8185 1 HOLDER BRACKET L 01...

Page 62: ...KET 028F0625080 SHAFT 019F25183L1 SPRING 019F25183R1 SPRING 027F0605 00 RING 002F0604100 NUT 750GLSC0L0132D000D PANEL LTM220M1 L01 CLB 10S SZ SEC A33G0025 VH 1L RELEASE BUTTON A33G0049 SNA2L CONTROL BUTTON A34G0151 VH 2B BEZEL E228WFPC A34G0152 VH 1B 30 REAR_COVER A85G0036 1 SHIELDING LIGHT A85G0041 1 SHIELDING COVER CBPC7SGHDDQ1 MAIN BOARD 040G 45762412B CBPC LABEL CN403 033G8019 8Z J WAFER CN501...

Page 63: ...G 417 12 T KEC 2N3904S RTK PS Q403 057G 417 12 T KEC 2N3904S RTK PS Q404 057G 417 12 T KEC 2N3904S RTK PS Q601 057G 417 12 T KEC 2N3904S RTK PS Q603 057G 417 12 T KEC 2N3904S RTK PS Q201 057G 758 1 2N7002ESOT23 SILICONIX Q602 057G 763 1 A03401 SOT23 BY AOS A1 R606 061G0603000 RST CHIPR 0 OHM 5 1 10W R331 061G0603000 RST CHIPR 0 OHM 5 1 10W R243 061G0603000 RST CHIPR 0 OHM 5 1 10W R301 061G0603100 ...

Page 64: ...03 RST CHIPR 10 KOHM 5 1 10W R418 061G0603103 RST CHIPR 10 KOHM 5 1 10W R415 061G0603152 RST CHIPR 1 5 KOHM 5 1 10W R414 061G0603152 RST CHIPR 1 5 KOHM 5 1 10W R413 061G0603152 RST CHIPR 1 5 KOHM 5 1 10W R412 061G0603152 RST CHIPR 1 5 KOHM 5 1 10W R411 061G0603152 RST CHIPR 1 5 KOHM 5 1 10W R210 061G0603221 RST CHIPR 220 OHM 5 1 10W R228 061G0603221 RST CHIPR 220 OHM 5 1 10W R232 061G0603221 RST C...

Page 65: ...1 10W R226 061G0603472 RST CHIPR 4 7K OHM 5 1 10W R227 061G0603472 RST CHIPR 4 7K OHM 5 1 10W R242 061G0603472 RST CHIPR 4 7K OHM 5 1 10W R212 061G0603472 RST CHIPR 4 7K OHM 5 1 10W R409 061G0603473 RST CHIPR 47 KOHM 5 1 10W R410 061G0603473 RST CHIPR 47 KOHM 5 1 10W R605 061G0603473 RST CHIPR 47 KOHM 5 1 10W R608 061G0603473 RST CHIPR 47 KOHM 5 1 10W R609 061G0603473 RST CHIPR 47 KOHM 5 1 10W R23...

Page 66: ... 065G0603104 12 CER2 0603 X7R 16V 100N P C330 065G0603104 12 CER2 0603 X7R 16V 100N P C333 065G0603104 12 CER2 0603 X7R 16V 100N P C408 065G0603104 12 CER2 0603 X7R 16V 100N P C502 065G0603104 12 CER2 0603 X7R 16V 100N P C603 065G0603104 12 CER2 0603 X7R 16V 100N P C604 065G0603104 12 CER2 0603 X7R 16V 100N P C608 065G0603104 12 CER2 0603 X7R 16V 100N P C612 065G0603104 12 CER2 0603 X7R 16V 100N P...

Page 67: ...PM C328 065G0603330 31 CER1 0603 NP0 50V 33P PM L307 071G 56K121 M CHIP BEAD L306 071G 56K121 M CHIP BEAD L305 071G 56K121 M CHIP BEAD L304 071G 56K121 M CHIP BEAD L303 071G 56K121 M CHIP BEAD L302 071G 56K121 M CHIP BEAD L301 071G 56K121 M CHIP BEAD FB204 071G 59B431 BK1608 HW 431 FB203 071G 59C600 CHIP BEAD FB202 071G 59C600 CHIP BEAD FB201 071G 59C600 CHIP BEAD D201 093G 64 33 DIO SIG SM BAV99 ...

Page 68: ... C1 065G0603104 12 CER2 0603 X7R 16V 100N P LED1 081G 14501 GP LED GPTD1210YGC3 HB GUANGPU 715G2746 1 2 KEY BOARD PCB PWPC7C42LAA1 POWER G2594 1 4 X 14 080303 040G 45762412B CBPC LABEL GND3 009G6005 1 GROUND TERMINAL GND2 009G6005 1 GROUND TERMINAL GND1 009G6005 1 GROUND TERMINAL 011G6091 1 NYLON SPACER SUPPORT CN804 033G8021 2E F WAFER CN803 033G8021 2E F WAFER CN802 033G8021 2E F WAFER CN801 033...

Page 69: ...8 391 PT801 080GL22T 1 DN X FMR 86 7UH TK 2003U 101 PT802 080GL22T 1 DN X FMR 86 7UH TK 2003U 101 CN901 087G 501 32 S AC SOCKET BD901 093G 50460 28 BRIDGE DIODE KBP208G LITEON CN902 095G 825 9W507 WIRE HARNESS 9P SCN 12P 140MM 705GQ761018 NR901 ASS Y NR901 061G 58 9T RST NTCR 10 OHM 20 5A THINKING 096G 29 10 H S TUBE 705GQ793015 D921 ASS Y HS2 090G6263 1 HEAT SINK D921 093G 60526 SCHOTTKY MBRF1060...

Page 70: ...HM 1 1 10W R834 061G0603100 1F RST CHIPR 1 KOHM 1 1 10W R835 061G0603100 1F RST CHIPR 1 KOHM 1 1 10W R839 061G0603100 1F RST CHIPR 1 KOHM 1 1 10W R841 061G0603100 1F RST CHIPR 1 KOHM 1 1 10W R848 061G0603100 1F RST CHIPR 1 KOHM 1 1 10W R849 061G0603100 1F RST CHIPR 1 KOHM 1 1 10W R853 061G0603100 2F RST CHIPR 10K OHM 1 1 10W R852 061G0603100 2F RST CHIPR 10K OHM 1 1 10W R840 061G0603100 2F RST CHI...

Page 71: ...KOHM 1 1 8W R923 061G0805100 2F RST CHIPR 10KOHM 1 1 8W R911 061G0805100 3F RST CHIPR 100KOHM 1 1 8W R802 061G0805101 RST CHIPR 100 OHM 5 1 8W R908 061G0805102 RST CHIPR 1K OHM 5 1 8W R826 061G0805180 3F RST CHIPR 180 KOHM 1 1 8W R929 061G0805240 1F RST CHIPR 2 4K OHM 1 1 8W R924 061G0805360 1F RST CHIPR 3 6K OHM 1 1 8W R926 061G0805430 2F RST CHIPR 43 KOHM 1 1 8W R922 061G0805471 RST CHIPR 470 OH...

Page 72: ...4 12 CER2 0603 X7R 16V 100N P C810 065G0603104 22 CAP CHIP 0603 0 1UF K 25V X7R C806 065G0603105 12 CHIP 1UF 16VX7R 0603 C802 065G0603105 12 CHIP 1UF 16VX7R 0603 C818 065G0603222 22 CHIP 2200PF 25V X7R C815 065G0603222 22 CHIP 2200PF 25V X7R C817 065G0603222 22 CHIP 2200PF 25V X7R C813 065G0603222 22 CHIP 2200PF 25V X7R C823 065G0805104 22 0 1UF 10 25V X7R 080 C824 065G0805104 22 0 1UF 10 25V X7R ...

Page 73: ...93G 64S511SEM IN4148W D813 093G 64S511SEM IN4148W D811 093G 64S511SEM IN4148W NR901 006G 31 4 1 7MM RIVET CN901 006G 31500 EYELET T901 006G 31502 1 5MM RIVET IC903 056G 158 12 KIA431A AT P TO 92 R907 061G 20815152T RST MOFR 150 OHM 5 1W R909 061G152M10452T RST MOFR 100KOHM 5 2WS R916 061G152M43852T RST MOF 0R43 5 2W C910 065G 2K152 1T6921 1 5NF 2KV Y5P 10 C920 065G517K102 5T 1000PF 10 Y5P 500V C92...

Page 74: ...IC SLIPSHEET Q44GSLIP10040A PLASTIC SLIPSHEET Q44GSLIP10072A PLASTIC SLIPSHEET Q44GSLIP10073A PLASTIC SLIPSHEET Q45G 88609 60 R EPE BAG FOR MONITOR Q45G 88609 61 R EPE BAG FOR STAND Q52G 1185 91 BIG TAPE FOR DELL CARTON Q52G6020 2D03 PROTECT FILM Q52G6020 2D03 PROTECT FILM Q52G6025 13156 MYLAR Q70G2200700 1F CD MANUAL S95G80183608 LVDS ASS Y 033F206H24JWT0 A2006H00 2 12PHK 033F303SM24K30 PK2407P30...

Page 75: ...2F6354268 M3 RIVET 015F0112 0 LOCK 015F 008200 A1 SGCC E750 750GLGC0W1D32D000D PANEL LM220WE1 TLD3 NJ LPL CBPC7GGHDDQ1 MAIN BOARD U402 056G1133 81 WDLGHTCGHQ3 SST25LF020A 33 4C SAE Q40G 22N700 1D RATING LABEL Diversity of TC8MGHHKWDDDHC compared with TC8SGHHKWDDNHC Location Part No Description 040G 581 26704 SHIPPING LABEL 044G6002695 2A PALLET PLATE 044G6002728 1A PAPER BOARD 052G6019 1 INSULATIN...

Page 76: ...N Diversity of TC8GGHHMWDDDHC compared with TC8SGHHKWDDNHC Location Part No Description 040G 581 26704 SHIPPING LABEL 041G 68623 1A Certificated card 044G6002695 2A PALLET PLATE 044G6002728 1A PAPER BOARD 044G9003210 CORNER PAPER 052G6019 1 INSULATING TAPE 705GQ734535 20 DELL MAIN FRAME ASS Y M015 SQ15G01733 MAIN Frame 002F6570105 M4 RIVET 002F6354168 M3 RIVET 002F6354273 M3 RIVET 002F6354238 M3 R...

Page 77: ...N Diversity of TC8GGHHLWDDDHC compared with TC8SGHHKWDDNHC Location Part No Description 040G 581 26704 SHIPPING LABEL 052G6019 1 INSULATING TAPE 089G412A18NIS3 POWER CORD 32E1818058 705GQ734535 20 DELL MAIN FRAME ASS Y M015 SQ15G01733 MAIN Frame 002F6570105 M4 RIVET 002F6354168 M3 RIVET 002F6354273 M3 RIVET 002F6354238 M3 RIVET 002F6354268 M3 RIVET 015F0112 0 LOCK 015F 008200 A1 SGCC E750 750GLGC0...

Page 78: ...d with TC8SGHHKWDDNHC Location Part No Description 040G 581 26704 SHIPPING LABEL 044G6002695 2A PALLET PLATE 052G6019 1 INSULATING TAPE 750GLMC0Z1112Z000D PANEL M220Z1 L01 C1 NB CMO CBPC7MGHDDQ1 MAIN BOARD G2089 1 DEL X 2 080421 Q40G 22N700 1D RATING LABEL Q44GC039700 1B 22 DELL LCD CARTON 026G 800700 6A S N LABEL U402 056G1133 81 LDEGHTCMHQ3 SST25LF020A 33 4C SAE Diversity of TC8GGHHKWDDNHC compa...

Page 79: ... No Description 040G 581 26704 SHIPPING LABEL 052G6019 1 INSULATING TAPE 089G412A18NIS3 POWER CORD 32E1818058 E750 750GLMC0Z1112D000D PANEL M220Z1 L01 C1 NB CMO CBPC7MGHDDQ1 MAIN BOARD G2089 1 DEL X 2 080421 Q40G 22N700 1D RATING LABEL Q41G780070090A TECH SHEET Q44GC039700 1B 22 DELL LCD CARTON 026G 800700 6A S N LABEL U402 056G1133 81 WDLGHTCGHQ3 SST25LF020A 33 4C SAE Diversity of TC8MGHHJWDDDHC ...

Page 80: ...GHDDQ1 MAIN BOARD G2089 1 DEL X 2 080421 U402 056G1133 81 LDEGHTCMHQ3 SST25LF020A 33 4C SAE Q40G 22N700 1D RATING LABEL Q44GC039700 1B 22 DELL LCD CARTON Diversity of TC8MGHHBWDDD4C compared with TC8SGHHKWDDNHC Location Part No Description 040G 581654 3A CARTON LABEL Q44G600022D 1A CARTON Q44GC039624 1A 22 CARTON 705GQ8SK021 22 DELL SKD KITS ASS Y CBPC7MGHDDQ1 MAIN BOARD G2089 1 DEL X 2 080421 U40...

Page 81: ...44G6002CP226A PAPER CAP Q44GC039700 1B 22 DELL LCD CARTON Diversity of TC8GGHHFWDDDHC compared with TC8SGHHKWDDNHC Location Part No Description Remark 040G 581 26704 SHIPPING LABEL 044G9003109 CORNER PAPER 052G6019 1 INSULATING TAPE 705GQ734535 20 DELL MAIN FRAME ASS Y M015 Q15G0173 3 MAINFRAME 2nd source M015 SQ15G01733 MAIN Frame E750 750GLGC0W1D21D000D PANEL LM220WE1 TLD2 KR LPL 2nd source E750...

Page 82: ...PC7GGHDDQ1 MAIN BOARD G2089 1 DEL X 2 080421 Q07G 1 5D31 X WOODEN PALLET Q07G 1 5D32 X WOODEN PALLET Q40G 22N700 2C Rating label Q44G6002CP226A PAPER CAP Q44GC039700 1B 22 DELL LCD CARTON Diversity of TC8GGHHMWDDFHC compared with TC8SGHHKWDDNHC Location Part No Description Remark 040G 581 26704 SHIPPING LABEL 044G9003109 CORNER PAPER 052G6019 1 INSULATING TAPE 705GQ734535 20 DELL MAIN FRAME ASS Y ...

Page 83: ...f TC8SGHHMWDDEHC compared with TC8SGHHKWDDNHC Location Part No Description Remark 040G 581 26704 SHIPPING LABEL 044G9003109 CORNER PAPER 052G6019 1 INSULATING TAPE Q40G 22N700 1D Rating label Q41G780070090A tech sheet Q44GC039700 1B 22 DELL LCD CARTON ...

Reviews: