background image

Great user manuals database on 

UserManuals.info


Side View 

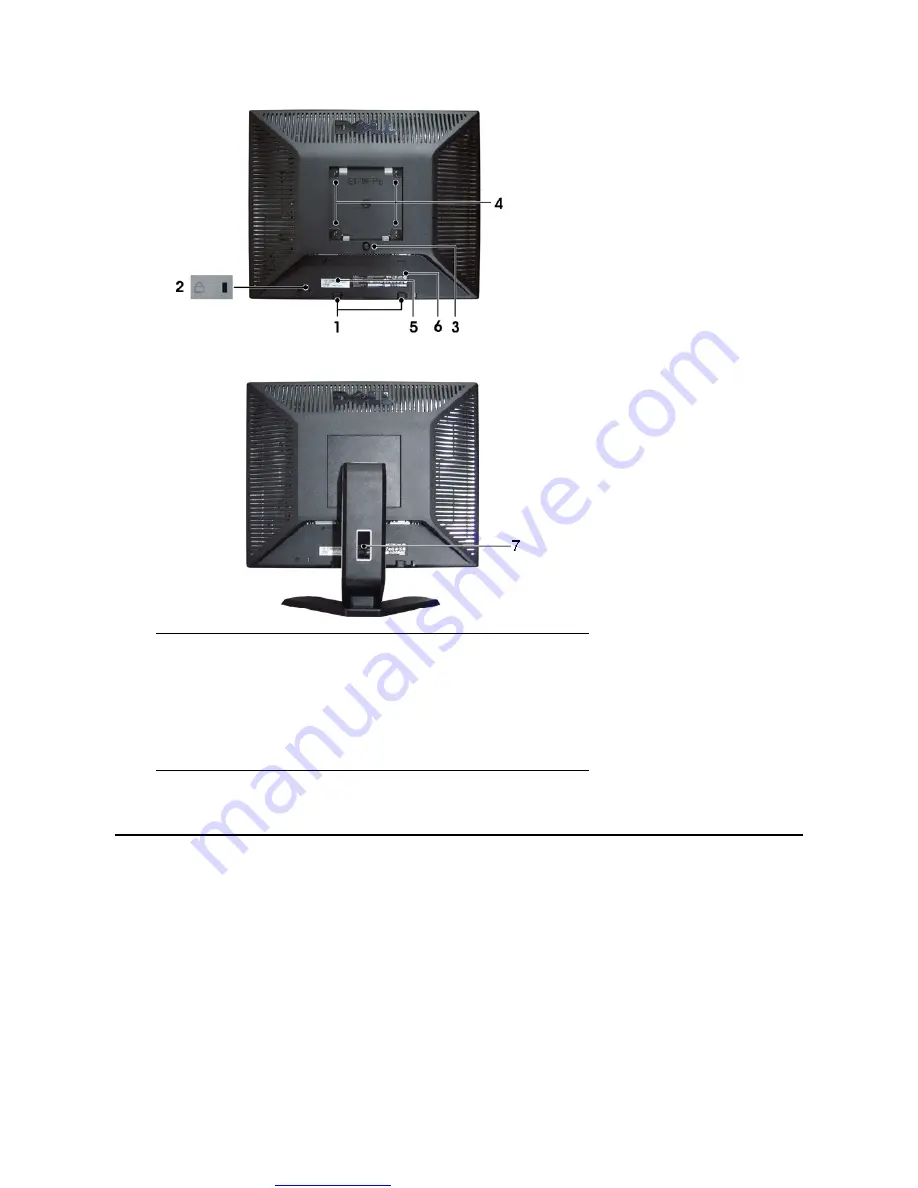
Security lock slot 

Attach a lock to secure your monitor.  

Dell Soundbar mounting brackets  

Attach the optional Dell Soundbar.  

Barcode serial number label 

Refer to this label if you need to contact Dell 
for technical support. 

4  

Regulatory rating label  

List the regulatory approvals.  

Stand removal button  

Press to release the stand.  

V E S A   m o u n t i n g   h o l e s   (  100mm  -  behind 
attached stand)  

Use to mount monitor.  

Cable holder  

Help organize cables by passing them through 
the holder.  

Summary of Contents for E178FP

Page 1: ...tection Agency As an ENERGY STAR partner Dell Inc has determined that this product meets the ENERGY STAR guidelines for energy efficiency Other trademarks and trade names may be used in this document to refer to either the entities claiming the marks and names or their products Dell Inc disclaims any proprietary interest in trademarks and trade names other than its own February 2008 Rev A02 About ...

Page 2: ...P Flat Panel Monitor User s Guide Front View Back View Side View Bottom View Monitor Specifications LCD Monitor Quality Pixel Policy Caring for your Monitor Front View Back View 1 Menu selection button 2 Brightness Contrast Down button 3 Auto Adjust Up button 4 Power On Off button with LED indicator ...

Page 3: ...onal Dell Soundbar 3 Barcode serial number label Refer to this label if you need to contact Dell for technical support 4 Regulatory rating label List the regulatory approvals 5 Stand removal button Press to release the stand 6 VESA mounting holes 100mm behind attached stand Use to mount monitor 7 Cable holder Help organize cables by passing them through the holder ...

Page 4: ...Great user manuals database on UserManuals info Right side Left side Bottom View Monitor Specifications 1 AC power cord connector 2 VGA connector ...

Page 5: ...can range 30 kHz to 81 kHz automatic Vertical scan range 56 Hz to 76 Hz Optimal preset resolution 1280 x 1024 at 60 Hz Highest preset resolution 1280 x 1024 at 75 Hz Preset Display Modes The following table lists the preset modes for which Dell guarantees image size and centering Display Mode Horizontal Frequency kHz Vertical Frequency Hz Pixel Clock MHz Sync Polarity Horizontal Vertical VGA 720 x...

Page 6: ...quency current 100 to 240 VAC 50 60 Hz 1 5A RMS Max Inrush current 110V 30A Max 220V 60A Max Physical Characteristics The following table lists the physical characteristics Signal cable type D sub Detachable Analog 15pin blue connector attached to the monitor Dimensions with stand Height 380 6 mm 14 98 inches Width 374 7 mm 14 75 inches Depth 140 mm 5 51 inches Weight Monitor Stand and Head 4 63 k...

Page 7: ...ttings Most monitor installations are automatic you can select different settings if required ON Active Yes Yes maximum 40W typical 34W 0 Green Power Saving Blanked No Yes 2W 80 Amber Blanked Yes No 2W 80 Amber Blanked No No 2W 80 Amber Switch Off Blanked 1W 80 Off NOTE The OSD functions only in the normal operation mode Otherwise one of the following messages will appear depending upon the select...

Page 8: ...special screen cleaning tissue or solution suitable for the antistatic coating Do not use benzene thinner ammonia abrasive cleaners or compressed air l Use a slightly dampened warm cloth to clean the plastics Avoid using detergent of any kind as some detergents leave a milky film on the plastics l If you notice a white powder when you unpack your monitor wipe it off with a cloth This white powder ...

Page 9: ... 60 hertz Hz and Taiwan 230 volts V 50 hertz Hz in most of Europe the Middle East and the Far East Always be sure that your monitor is electrically rated to operate with the AC power available in your location l Do not store or use the LCD monitor in locations that are exposed to heat direct sunlight or extreme cold l Avoid moving the LCD monitor between locations with large temperature difference...

Page 10: ...rovided in the following table If you need assistance in determining which codes to use contact a local or an international operator NOTE Toll free numbers are for use within the country for which they are listed NOTE In certain countries support specific to Dell XPS computers is available at a separate telephone number listed for participating countries If you do not see a telephone number listed...

Page 11: ...port Customer Service Sales toll free 1 866 874 3038 Barbados Online Support www dell com bb la techsupport dell com Technical Support Customer Service Sales 1 800 534 3142 Belgium Brussels International Access Code 00 Country Code 32 City Code 2 Online Support support euro dell com Technical Support for XPS computers onlycomputers only 02 481 92 96 General Support 02 481 92 88 General Support Fax...

Page 12: ...ne Support la techsupport dell com Technical Support Customer Service Sales 1 877 262 5415 Chile Santiago Country Code 56 City Code 2 Online Support www dell com cl la techsupport dell com Sales and Customer Support toll free 1230 020 3397 or 800 20 1385 China Xiamen Country Code 86 City Code 592 Online Support support dell com cn Technical Support E mail cn_support dell com Customer Service E mai...

Page 13: ... 2711 Denmark Copenhagen International Access Code 00 Country Code 45 Online Support support euro dell com Technical Support for XPS computers onlycomputers only 7010 0074 Technical Support 7023 0182 Customer Service Relational 7023 0184 Home Small Business Customer Service 3287 5505 Switchboard Relational 3287 1200 Switchboard Fax Relational 3287 1201 Switchboard Home Small Business 3287 5000 Swi...

Page 14: ...try Code 49 City Code 69 Online Support support euro dell com tech_support_central_europe dell com Technical Support for XPS computers only 069 9792 7222 Technical Support 069 9792 7200 Home Small Business Customer Service 0180 5 224400 Global Segment Customer Service 069 9792 7320 Preferred Accounts Customer Service 069 9792 7320 Large Accounts Customer Service 069 9792 7320 Public Accounts Custo...

Page 15: ...5 8045 Server Support E mail india_support_Server dell com Phone Numbers 080 25068032 or 080 25068034 or your city STD code 60003355 or toll free 1800 425 8045 Gold Support Only E mail eec_ap dell com Phone Numbers 080 25068033 or your city STD code 60003355 or toll free 1 800 425 9045 XPS Support Only E mail Indiaxps_AP dell com Phone Numbers 080 25068066 or toll free 1 800 425 2066 Customer Serv...

Page 16: ...rt jp dell com Technical Support XPS computers only toll free 0120 937 786 Technical Support outside of Japan XPS computers only 81 44 520 1235 Technical Support Dimension and Inspiron toll free 0120 198 226 Technical Support outside of Japan Dimension and Inspiron 81 44 520 1435 Technical Support Dell Precision OptiPlex and Latitude toll free 0120 198 433 Technical Support outside of Japan Dell P...

Page 17: ...08 08 075 Home Small Business Sales 32 0 2 713 15 96 Corporate Sales 26 25 77 81 Customer Service 32 0 2 481 91 19 Fax 26 25 77 82 Malaysia Penang International Access Code 00 Country Code 60 City Code 4 Online Support support ap dell com Technical Support XPS computers only toll free 1 800 885 784 Technical Support Dell Precision OptiPlex and Latitude toll free 1 800 880 193 Technical Support Dim...

Page 18: ...de 00 Country Code 47 Online Support support euro dell com Technical Support for XPS computers only 815 35 043 Technical Support 671 16882 Relational Customer Service 671 17575 Home Small Business Customer Service 23162298 Switchboard 671 16800 Fax Switchboard 671 16865 Panama Online Support www dell com pa la techsupport dell com Technical Support Customer Service Sales 011 800 507 1264 Peru Onli...

Page 19: ... Service toll free 1800 394 7430 option6 Transaction Sales toll free 1 800 394 7412 Corporate Sales toll free 1 800 394 7419 Slovakia Prague International Access Code 00 Country Code 421 Online Support support euro dell com czech_dell dell com Technical Support 02 5441 5727 Customer Service 420 22537 2707 Fax 02 5441 8328 Tech Fax 02 5441 8328 Switchboard Sales 02 5441 7585 South Africa Johannesbu...

Page 20: ...lex Latitude Inspiron Dimension and Electronics and Accessories toll free 0080 186 1011 Technical Support servers and storage toll free 0080 160 1256 Customer Service toll free 0080 160 1250 option 5 Transaction Sales toll free 0080 165 1228 Corporate Sales toll free 0080 165 1227 Thailand International Access Code 001 Country Code 66 Online Support support ap dell com Technical Support OptiPlex L...

Page 21: ...ee 1 800 624 9896 Portable and Desktop AutoTech toll free 1 800 247 9362 Small Business toll free 1 800 456 3355 Medium and Large Business toll free 1 877 671 3355 State and Local Government toll free 1 800 981 3355 Federal Government toll free 1 800 727 1100 Healthcare toll free 1 800 274 1550 K 12 Education toll free 1 888 977 3355 Higher Education toll free 1 800 274 7799 Printers Projectors PD...

Page 22: ...ls Sales toll free 1 800 671 3355 U S Virgin Islands Online Support www dell com vi la techsupport dell com Technical Support Customer Service Sales toll free 1 877 702 4360 Venezuela Online Support www dell com ve la techsupport dell com Technical Support Customer Service Sales 0800 100 4752 ...

Page 23: ...ge from 100 to 240 Volt at a frequency of 50 60 Hz Be sure that your local power is within the supported range If you are unsure ask your electricity supplier 5 Turn on your display and computer If your monitor displays an image installation is complete If it does not display an image see Troubleshooting Using the Front Panel Buttons Use the control buttons on the front of the monitor to adjust th...

Page 24: ...er Button Indicator The green LED indicates the monitor is on and fully functional An amber LED indicates DPMS power save mode The Power button turns the monitor on and off Function Adjustment Method Auto adjustment Use this button to activate automatic setup and adjustment The following dialog will appear on screen as the monitor self adjusts to the current input Auto Adjustment button allows the...

Page 25: ...olution Icon Menu Name and Sub menus Description EXIT This is used to exit out of the Main Menu Positioning Horizontal Vertical Positioning moves the viewing area around on the monitor screen When making changes to either the Horizontal or Vertical settings no changes occur to the size of the viewing area the image gets shifted based on what you select Minimum is 0 Maximum is 100 Image settings Au...

Page 26: ... 100 NOTE Color temperature is a measure of the warmth of the image colors red green blue The two available presets Blue and Red favor blue and red accordingly Select each one to see how each range suits your eye or utilize the User Preset option to customize the color settings to your exact choice OSD Settings Each time the OSD opens it displays in the same location on the screen OSD Settings hor...

Page 27: ...settings to the factory preset values for the selected group of functions Exit is used to exit out of Factory Reset menu For All settings all user adjustable settings are reset at one time except Language settings IR This feature will help reduce minor cases of image retention Enable LCD Conditioning If an image appears to be stuck on the monitor select LCD Conditioning to help eliminate any image...

Page 28: ... by this monitor Recommended mode is 1280 X 1024 60Hz Occasionally no warning message appears but the screen is blank This could also indicate that the monitor is not synchronizing with the computer DDC CI Display Data Channel Command Interface allows you to adjust the monitor parameters brightness color balance etc via software applications on your PC Select Disable to disable this feature For be...

Page 29: ...Soundbar is a stereo two channel system adaptable to mount on Dell Flat Panel Displays The Soundbar has a rotary volume and on off control to adjust the overall system level a blue LED for power indication and two audio headset jacks Soundbar Attachment to the Monitor 1 Headphone connectors 2 Power indicator 3 Power Volume control ...

Page 30: ...Slide the Soundbar to the left until it snaps into place 3 Connect the Soundbar with the power brick 4 Plug the power cables of the power brick into a nearby outlet 5 Insert the lime green mini stereo plug from the rear of the Soundbar into the computer s audio output jack NOTICE Do not use with any device other than Dell Soundbar NOTE Soundbar Power Connector 12V DC output is for optional Dell So...

Page 31: ...operly OSD Warning Messages For OSD related issues see OSD Warning Messages Common Problems The following table contains general information about common monitor problems you might encounter CAUTION Before you begin any of the procedures in this section follow the Safety Instructions The floating Dell Self Test Feature Check dialog box should appear on screen against a black background if the moni...

Page 32: ...ted Issues Visible signs of smoke or sparks l Do not perform any troubleshooting steps l Monitor needs to be replaced Intermittent Problems Monitor malfunctions on off l Ensure monitor is in proper video mode l Ensure video cable connection to computer and to the flat panel is secure l Perform monitor reset on All Settings l Perform monitor self test feature check to determine if the intermittent ...

Page 33: ...ck the signal source Make sure the Computer is not in power saving by moving mouse or pressing any key on the keyboard l Check whether the signal cable is plugged in and seated properly Re plug the signal cable if necessary l Re boot the computer or video player OSD Lock All buttons are locked except the menu button No user adjustments are allowed l Press the menu button for over 15 seconds to unl...

Page 34: ...f the monitor onto the two teeth of the upper stand 3 Lower the monitor so that the monitor mounting area snaps on locks to the stand Organizing Your Cables After attaching all necessary cables to your monitor and computer See Connecting Your Monitor for cable attachment use the cable holder to neatly organize all cables as shown above Using the Tilt With the built in pedestal you can tilt the mon...

Page 35: ...or panel on a soft cloth or cushion press and hold the LCD removal button and then remove the stand Back to Contents Page NOTE To prevent scratches on the LCD screen while removing the stand ensure that the monitor is placed on a clean surface ...

Reviews: