


Installing System Components
97
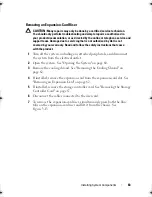
Figure 3-18. Installing and Removing the Heat Sink
10
Rotate the processor shield upward and out of the way. See Figure 3-19.
11
Lift the processor out of the socket and leave the release lever up so that
the socket is ready for the new processor.
CAUTION:
Be careful not to bend any of the pins on the ZIF socket when removing
the processor. Bending the pins can permanently damage the system board.
NOTE:
In single-processor configurations, the processor must be installed in
socket CPU1. Install the blank in socket CPU2 only.
1
heat sink
2
retention screws (4)
2
1
book.book Page 97 Friday, January 6, 2012 2:11 PM
Summary of Contents for DR4000 Restore Manager
Page 1: ...Dell DR4000 Systems Owner s Manual Regulatory Model E13S Series Regulatory Type E13S001 ...
Page 10: ...10 Contents ...
Page 120: ...120 Installing System Components ...
Page 138: ...138 Troubleshooting Your System ...
Page 142: ...142 Running the System Diagnostics ...
Page 148: ...148 Jumpers and Connectors ...
Page 150: ...150 Getting Help ...
Page 156: ...156 Index ...