background image

Removing the Front Panel  


1.


Follow the procedures in "

Before You Begin

."  


2.


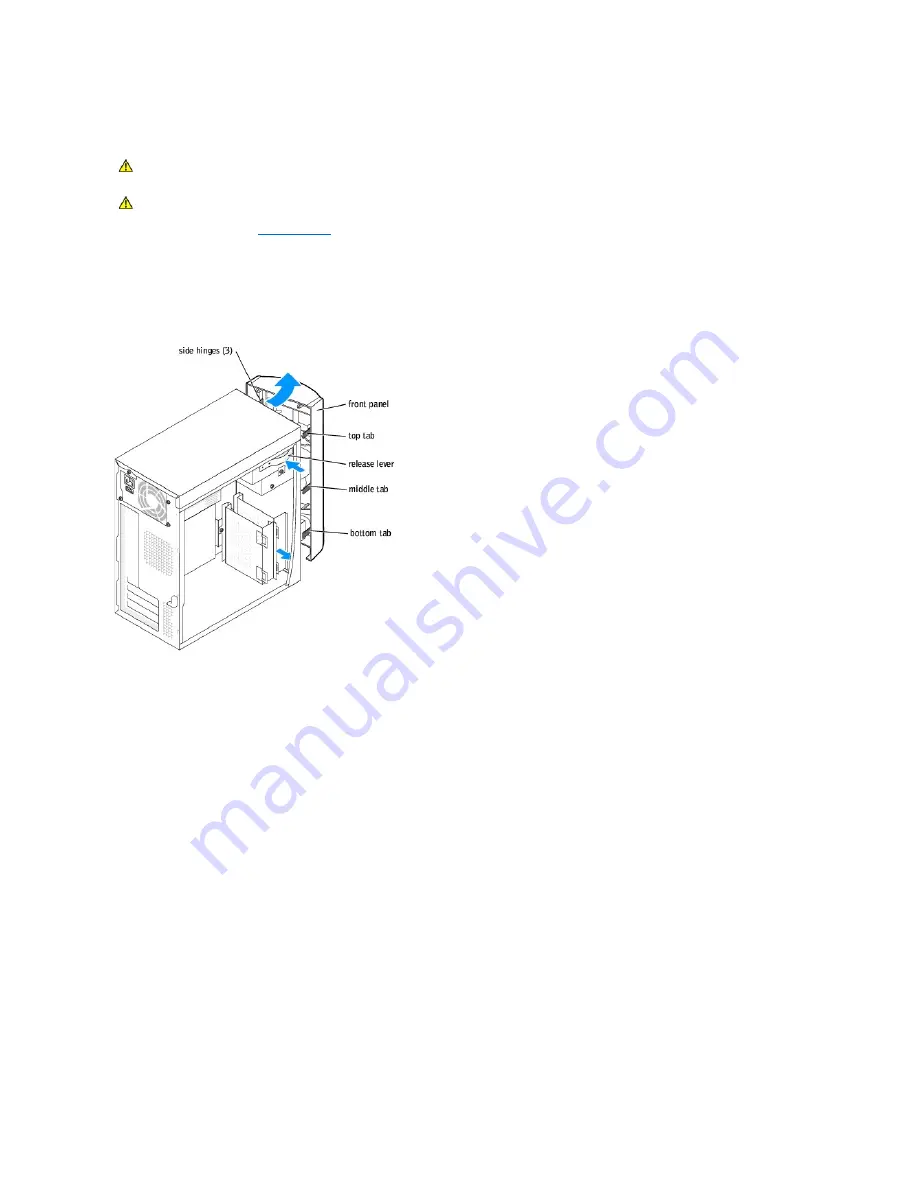
Release and remove the front panel:  


a.


Push the release lever to release the top tab.  


b.


Reach inside the computer and push the bottom tab towards you to release it (the middle tab releases automatically).  


c.


Rotate the front panel to separate it from the side hinges.  


Replacing the Front Panel  


To replace the front panel, attach the side hinges and then rotate the front panel until it snaps onto the front of the computer. 


CAUTION: 

Before you begin any of the procedures in this section, follow the safety instructions in your 

Owner's Manual

 or 

Product Information 

Guide.


CAUTION: 

To guard against electrical shock, always unplug your computer from the electrical outlet before removing the cover.

Summary of Contents for Dimension 4600 Series

Page 1: ...ut the written permission of Dell Inc is strictly forbidden Trademarks used in this text Dell the DELL logo and Dimension are trademarks of Dell Inc Intel Pentium and Celeron are registered trademarks of Intel Corporation Microsoft and Windows are registered trademarks of Microsoft Corporation Other trademarks and trade names may be used in this document to refer to either the entities claiming th...

Page 2: ... video card and then restarting the computer 2 If the problem persists reinstall the card that you removed remove a different card and then restart the computer 3 Repeat this process for each card If the computer starts normally troubleshoot the last card removed from the computer for resource conflicts see Resolving Software and Hardware Incompatibilities in your Owner s Manual 4 If the problem p...

Page 3: ...bilities in your Owner s Manual 4 If the problem persists see Contacting Dell in your Owner s Manual for instructions on obtaining technical assistance Other failure has occurred l Ensure that the cables are properly connected from the hard drive CD drive and DVD drive to the system board l If there is an error message on your screen identifying a problem with a device such as the floppy drive or ...

Page 4: ...h CMOS Time and Date Not Set The system configuration information in system setup is incorrect or the battery charge may be low Enter system setup verify the system configuration and then restart the computer Diskette Boot Failure Drive A or B is present but has failed the BIOS POST Ensure that the drive is installed correctly in the computer and defined correctly in system setup Check the interfa...

Page 5: ...Back to Contents Page ...

Page 6: ...r and all attached devices from their electrical outlets and then press the power button to ground the system board CAUTION Before you begin any of the procedures in this section follow the safety instructions in your Owner s Manual or Product Information Guide NOTICE Only a certified service technician should perform repairs on your computer Damage due to servicing that is not authorized by Dell ...

Page 7: ...electrical outlet before removing the cover NOTICE Before touching anything inside your computer ground yourself by touching an unpainted metal surface such as the metal at the back of the computer While you work periodically touch an unpainted metal surface to dissipate any static electricity that could harm internal components ...

Page 8: ...ols or extra parts are left inside the computer 3 Place the cover on the computer 4 Slide the cover towards the front of the computer until it fits completely into place 5 Connect your computer and devices to electrical outlets and turn them on Back to Contents Page NOTICE To connect a network cable first plug the cable into the network wall jack and then plug it into the computer ...

Page 9: ...old the cover latch 4 Grip the indents on the computer cover and slide the computer cover toward the back of the computer 5 Place the computer cover on a level surface Back to Contents Page CAUTION Before you begin any of the procedures in this section follow the safety instructions in your Owner s Manual or Product Information Guide CAUTION To guard against electrical shock always unplug your com...

Page 10: ...ed Ensure that the card is fully seated and that its bracket is within the card slot PCI Cards AGP Card Memory Front Panel Drives Microprocessor Fan Assembly System Board Power Supply Battery CAUTION Before you begin any of the procedures in this section follow the safety instructions in your Owner s Manual or Product Information Guide CAUTION To guard against electrical shock always unplug your c...

Page 11: ...egin 2 Lay the computer on its side so that the system board is on the bottom of the inside of the computer Removing an AGP Card 1 Press the card lever toward the PCI connector 2 Pull the card up and out of the card clip NOTICE Do not route card cables over or behind the cards Cables routed over the cards can cause damage to the equipment NOTICE To connect a network cable first plug the cable into...

Page 12: ...e an AGP card installed move the monitor cable to the VGA connector on the new card 5 Replace the computer cover 6 Connect your computer and devices to electrical outlets and turn them on Memory You can increase your computer memory by installing memory modules on the system board For information on the type of memory supported by your computer see Memory NOTICE To connect a network cable first pl...

Page 13: ...procedures in Before You Begin 2 Lay the computer on its side so that the system board is on the bottom of the inside of the computer 3 If necessary remove a memory module a Press out the securing clip at each end of the memory module connector b Grasp the module and pull up NOTE Always install DDR memory modules in the order indicated on the system board NOTICE If you remove your original memory ...

Page 14: ...ule until it snaps into place If you insert the module correctly the securing clips snap into the cutouts at each end of the module 7 Replace the computer cover 8 Connect your computer and devices to electrical outlets and then turn them on 9 Click the Start button right click My Computer and then click Properties 10 Click the General tab 11 To verify that the memory is installed correctly check t...

Page 15: ...te the front panel to separate it from the side hinges Replacing the Front Panel To replace the front panel attach the side hinges and then rotate the front panel until it snaps onto the front of the computer CAUTION Before you begin any of the procedures in this section follow the safety instructions in your Owner s Manual or Product Information Guide CAUTION To guard against electrical shock alw...

Page 16: ... in this section follow the safety instructions in your Owner s Manual or Product Information Guide CAUTION To guard against electrical shock always unplug your computer from the electrical outlet before removing the cover NOTE See Boot Sequence for instructions on booting to a different device such as a floppy drive CAUTION Before you begin any of the procedures in this section follow the safety ...

Page 17: ...at all three screw hole tabs insert into the three screw holes on the hard drive b Secure the drive to the bracket with the screws that you removed in step 2 c Install the bracket into the computer with the two bracket securing screws that you removed in step 2 CAUTION To guard against electrical shock always unplug your computer from the electrical outlet before removing the cover NOTICE To avoid...

Page 18: ...er 4 If you are replacing the additional hard drive remove the drive from the bracket a Remove the hard drive securing screws b Remove the hard drive from the bracket NOTICE Match the colored strip on the cable with pin 1 on the drive pin 1 is marked as 1 NOTICE To connect a network cable first plug the cable into the network wall jack and then plug it into the computer CAUTION Before you begin an...

Page 19: ...he computer s front panel c Swing the bracket forward so that it is flush with the computer s front panel d Replace the bracket securing screws 8 Reinstall the existing hard drive into the computer NOTICE Ground yourself by touching an unpainted metal surface on the back of the computer NOTICE When you unpack the drive do not set it on a hard surface which may damage the drive Instead set the driv...

Page 20: ...onnect the data cable to the back of the drive and to the floppy drive connector on the system board 6 Position the top of the floppy drive bracket so that it is completely flush with the bottom of the upper drive bay and then slide the floppy drive bracket NOTICE To connect a network cable first plug the cable into the network wall jack and then plug it into the computer CAUTION Before you begin ...

Page 21: ... Diskette Interface entry is set to Auto If necessary use the left and right arrows to set it to Auto 18 Press Enter 19 Press Esc 20 Press Enter to save changes and exit The computer restarts See the documentation that came with the drive for instructions on installing any software required for drive operation Adding a Second CD or DVD Drive 1 Follow the procedures in Before You Begin NOTE The top...

Page 22: ...into the drive 6 Gently slide the drive into place 7 Once the drive is in place apply pressure to ensure that the drive is fully seated 8 Use the securing screw that came with the drive to attach the drive to the computer NOTE Drives sold by Dell come with their own operating software and documentation After you install a drive see the documentation that came with the drive for instructions on ins...

Page 23: ...peration Microprocessor Removing the Microprocessor 1 Follow the procedures in Before You Begin 2 Disconnect the cooling fan power cable from the fan connector J1F1 on the system board 3 Disconnect the power cable from the microprocessor power connector J5B1 on the system board 4 Lift the air shroud to disengage the anchors and then rotate the shroud up NOTICE Match the colored strip on the cable ...

Page 24: ...ready for the new microprocessor CAUTION The heat sink can get very hot during normal operation Be sure that the heat sink has had sufficient time to cool before you touch it NOTICE Lay the heat sink down with the thermal grease facing upward NOTICE If you are installing a microprocessor upgrade kit from Dell discard the original heat sink If you are not installing a microprocessor upgrade kit fro...

Page 25: ...ch your replacement kit was sent 6 Install the heat sink a Insert the notched end of the heat sink onto the end of the retention module which is next to the power supply NOTICE Ground yourself by touching an unpainted metal surface on the back of the computer NOTICE Be careful not to bend any of the pins when you unpack the microprocessor Bending the pins can permanently damage the microprocessor ...

Page 26: ...low the procedures in Before You Begin 2 Disconnect the AC power cable from the AC power connector on the back of the power supply 3 Unplug the DC power cables from the drives and system board 4 Disconnect the fan power cable from its connector on the system board 5 Pull the fan release lever away from the back of the computer and slide the fan toward the release lever NOTICE To connect a network ...

Page 27: ...stalled 4 Disconnect all cables from the system board 5 Lift up the heat sink shroud 6 Remove the microprocessor heat sink 7 Remove the fan assembly 8 Remove the 12 screws that secure the system board to the computer frame Four of the 12 screws that secure the system board to the computer frame also secure the heat sink base to the system board NOTICE To connect a network cable first plug the cabl...

Page 28: ...em board so that they are identical to the ones on the existing board 3 Place the system board inside the computer frame place the heat sink base on the system board and then replace the screws that you removed in step 8 of the preceding procedure 4 Reinstall the fan assembly 5 Reinstall the microprocessor heat sink and then lower the heat sink shroud 6 Reattach the cables to the system board 7 Re...

Page 29: ...f the power supply 7 Connect your computer and devices to electrical outlets and turn them on Battery Battery Overview A coin cell battery maintains computer configuration date and time information The battery can last several years CAUTION Before you begin any of the procedures in this section follow the safety instructions in your Owner s Manual or Product Information Guide CAUTION To guard agai...

Page 30: ...em setup and restore the settings you recorded in step 1 9 Properly dispose of the old battery See the safety instructions in your Owner s Manual or Product Information Guide Back to Contents Page CAUTION A new battery can explode if it is incorrectly installed Replace the 3 V CR2032 battery only with the same or equivalent type recommended by the manufacturer Discard used batteries according to t...

Page 31: ...System chip set Intel 865PE or 865G DMA channels eight Interrupt levels 24 APIC mode System BIOS chip 4 Mb 512 KB System clock 533 or 800 MHz data rate Expansion Bus Bus types PCI Bus speed PCI 33 MHz PCI connectors three PCI connector size 120 pins PCI connector data width maximum 32 bits AGP AGP 1X 4X 8X Memory Architecture Dual Channel DDR SDRAM Memory connectors Four Memory capacities 128 256 ...

Page 32: ...ontroller AGP video card AGP 8X Audio Audio controller ADI 1980 Network Network controller Integrated Intel PRO 10 100 Ethernet Controls and Lights Power control push button Front panel power light green light Blinking green indicates sleep state solid green indicates power on state amber light Blinking amber indicates a problem with an installed device solid amber indicates an internal power prob...

Page 33: ...o 80 noncondensing Maximum vibration Operating 0 25 G at 3 to 200 Hz Storage 2 20 Grms at 10 to 500 Hz Maximum shock Nonoperating half sine pulse 105 G 2 ms Nonoperating faired square wave 32 G with a velocity change of 596 9 cm sec 235 inches sec Altitude Operating 15 2 to 3048 m 50 to 10 000 ft NOTE At 35 C 95 F the maximum operating altitude is 914 m 3000 ft Storage 15 2 to 10 670 m 50 to 35 00...

Page 34: ...ion for your computer Information on the screen is divided into five areas l Title The box at the top of all screens that lists the computer name l Computer data Two boxes below the title box that display your computer processor L2 cache Service Tag and the version number of the BIOS l Options A scrollable box listing options that define the configuration of your computer including installed hardw...

Page 35: ...ed to the primary IDE interface if you have an IDE device connected to the secondary IDE interface If you have a problem see Hard Drive Problems in your Owner s Manual Hard Disk Drive Sequence If you insert a boot device and restart this option appears in the system setup menu System BIOS boot device USB Device To boot from a USB memory device select the USB device and move it so it becomes the fi...

Page 36: ...M4 for Serial Port 2 If you set a serial connector to Auto and then add a card that is also set to Auto the computer automatically remaps the integrated port to the next available connector designation that shares the same IRQ setting as follows l COM1 I O address 3F8h which shares IRQ4 with COM3 is remapped to COM3 I O address 3E8h l COM2 I O address 2F8h which shares IRQ3 with COM4 is remapped t...

Page 37: ...y or every Monday through Friday Time is kept in a 24 hour format hours minutes Change the start up time by pressing the right or left arrow key to increase or decrease the numbers or type numbers in both the date and time fields The default setting is Disabled This feature does not work if you turn off your computer using a power strip or surge protector Fastboot On default Your computer starts m...

Page 38: ...puter 2 When F2 Setup F12 Boot Menu appears in the upper right corner of the screen press F12 If you wait too long and the operating system logo appears continue to wait until you see the Microsoft Windows desktop Then shut down your computer and try again The Boot Device Menu appears listing all available boot devices Each device has a number next to it 3 At the bottom of the menu enter the numbe...

Page 39: ...e computer cover 9 Locate the 3 pin password jumper CLR PASSWRD on the system board and attach the jumper to pins 1 and 2 to reenable the password feature 10 Replace the computer cover 11 Connect your computer and devices to electrical outlets and turn them on Back to Contents Page NOTICE To connect a network cable first plug the cable into the network wall jack and then plug it into the computer ...

Page 40: ...onnector Pin Assignments Inside View of Your Computer System Board Components CAUTION Before you begin any of the procedures in this section follow the safety instructions in your Owner s Manual or Product Information Guide CAUTION To guard against electrical shock always unplug your computer from the electrical outlet before removing the computer cover ...

Page 41: ...he 250 W power supply can operate from an AC power source of 115 VAC at 60 Hz or 230 VAC at 50 Hz The power supply provides the DC operating voltages and currents listed in the following table Output Voltage Minimum Current A Maximum Current A 1 ...

Page 42: ...W 2 In system applications where 3 3 VDC is not used these values may be 0 A without affecting the regulation on the other outputs 3 The required full load combinations are adjusted so that the total output power is less than or equal to 250 W Pin Number Signal name 18 AWG Wire 1 3 3 VDC Orange 2 3 3 VDC Orange 3 COM Black 4 5 VDC Red 5 COM Black 6 5 VDC Red 7 COM Black 8 POK Gray 9 5 VFP Purple 1...

Page 43: ...C Yellow 4 12 VDC Yellow Pin Number Signal Name 18 AWG Wire 1 12 VDC Yellow 2 COM Black 3 COM Black 4 5 VDC Red Pin Number Signal Name 22 AWG Wire 1 No connect 2 COM Black 3 COM Black 4 3 3 VDC Orange 5 5VDC Red 6 12VDC Yellow Pin Number Signal Name 22 AWG Wire 1 5 VDC Red 2 COM Black 3 COM Black 4 12 VDC Yellow ...

Page 44: ...n are trademarks of Dell Inc Intel Pentium and Celeron are registered trademarks of Intel Corporation Microsoft and Windows are registered trademarks of Microsoft Corporation Other trademarks and trade names may be used in this document to refer to either the entities claiming the marks and names or their products Dell Inc disclaims any proprietary interest in trademarks and trade names other than...

Reviews: