


11
2.5.6 “PRESSURE LOW” and “CUFF LEAK” ALARM CHECK:
Connect the hose assembly and a cuff to the P.T.S. and press the ‘INFLATE’ button. The cuff inflates to the
default pressure set point of 250 mmHg. Create a leak by partially detaching the hose from the unit while the
cuff is inflated. Make the leak large enough that the pressure drops more than 15 mmHg below set point.
The pump in the P.T.S. unit will start as the unit tries to maintain the set pressure. After the cuff pressure has
been more than 15 mmHg below the set point constantly for more than 1 second, confirm that:
a) The pressure display flashes on/off;
b) “PRESSURE LOW” appears in the message display (“CUFF LEAK” may also appear);
c) The red alarm indicator light is illuminated;
d) The alarm tone sounds constantly.
Press the ‘PR ‘, ‘PRESSURE – ‘, ‘TIME + ‘, or ‘TIME – ‘ button to silence the alarm tone. Confirm
that the alarm tone restarts after 30 seconds. Stop the leak and confirm that the displayed pressure returns to
the set point and stops flashing, the “PRESSURE LOW” (and “CUFF LEAK” if present) messages disappear,
the red alarm indicator light turns off, and the alarm tone stops.
2.6
PRESSURE AND TIME DEFAULTS
Changing the default pressure set point and time limit set point values may only be done after power-up and
before inflation of the cuff. To modify the default set points:
a) Adjust the pressure set point to the desired default value by pressing and holding the ‘PR ‘ or
‘PRESSURE – ‘ buttons as required.
b) Adjust the time limit set point to the desired default value by pressing and holding the ‘TIME + ‘ or ‘TIME –
‘ buttons as required.
c) Momentarily press and release the ‘PRESSURE + ‘ and ‘PRESSURE – ‘ buttons simultaneously. The
alarm tone sounds briefly, then the pressure and time set points appear (with trailing asterisk symbols) in
the pressure and time displays to indicate that the new default values have been stored.
d) After about 2 seconds, the unit resumes normal operation.
e) The new default set point values will now be present every time the machine is turned on.
2.7
OPERATION
NOTE: The P.T.S. unit should be powered up at least once each day of use to ensure the self-test
routine is performed regularly. The P.T.S. should be powered off and left plugged in to AC power
when not in use.
a) Press the ‘ON/STANDBY’ button to turn the unit on. The unit will execute a self-check diagnostic test as
described in Section 2.5.2 of this manual. Observe that all the display segments and the red alarm
indicator light illuminate during the self-check as shown in Figs 2.2 and 2.3. Successful completion of the
self-check indicates that the unit is ready for use.
WARNING: If a connected cuff is pressurized to 50 mmHg or more during power-up, the P.T.S. will
assume that a surgical procedure is in progress, adopt the pressure sensed in the cuff as the new set
point, and will automatically regulate the cuff at this pressure. To alert the operator of this condition,
the unit will sound the alarm tone, illuminate the red alarm indicator light, flash the pressure display,
and show "PRESSURE” in the message display. The operator should immediately check the
pressure set point and readjust to the proper set point if necessary. The alarm will be cleared as
soon as the set point is examined or adjusted (‘PRESSURE + ‘ or ‘PRESSURE – ‘ button pressed
momentarily or pressed and held).
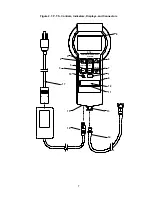
b) Connect the hose assembly and a single port cuff to the unit at the hose connector.
c) Select the appropriate tourniquet pressure and tourniquet time limit set points for the specific procedure,
as specified by the surgeon. The default set points for pressure and time limit are retrieved from the


