Dejero LIVE+ GoBox User Manual Download Page 26


www.dejero.com


!

26  

|


LIVE+ GoBox User Guide 


!

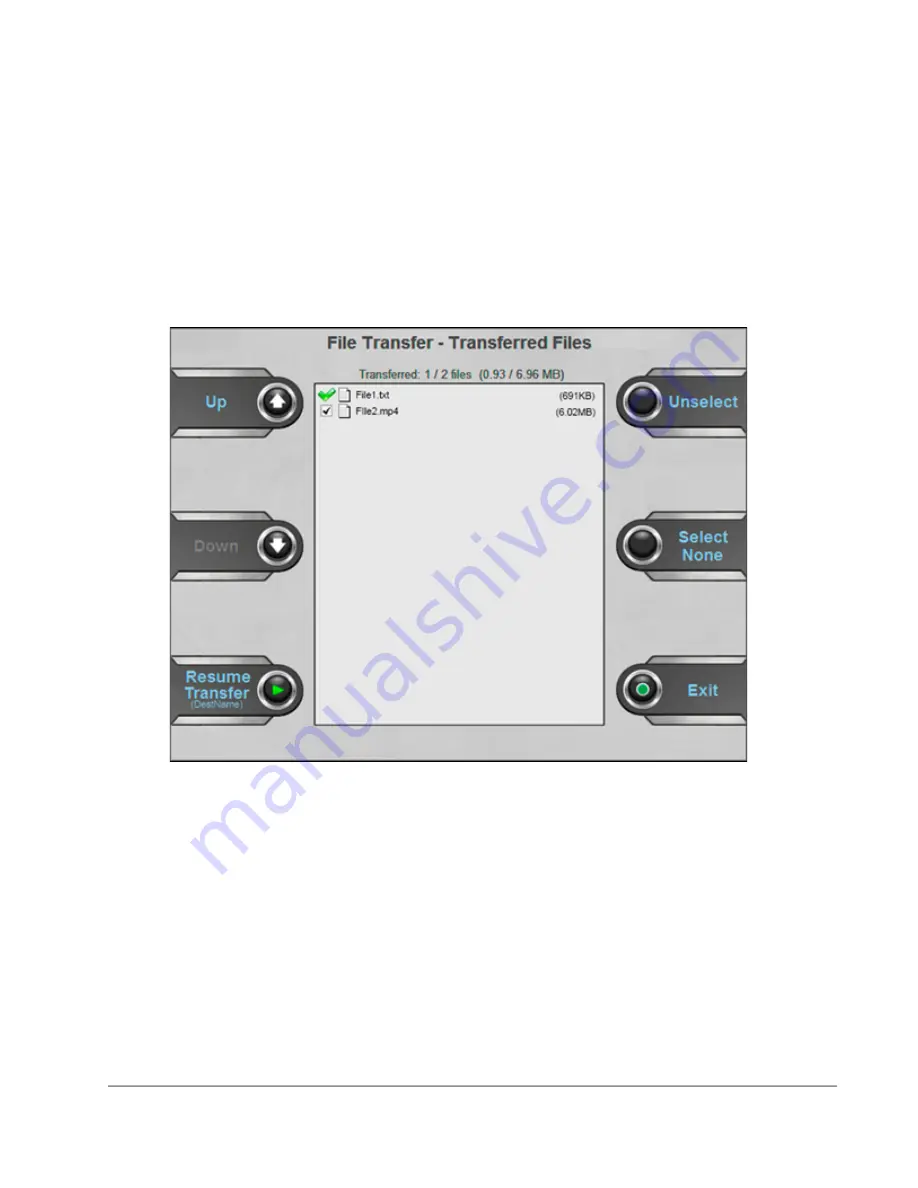
When the files are transferring, you can monitor the progress on the File Transfer screen. The 
overall progress appears on the main progress bar, as well as each file’s transfer percentage. 
When the transfer is complete, Transfer Complete appears and the File Transfer – Transferred 
Files screen opens. 

Resume a file transfer 

On the File Transfer – Transferred Files screen, green checkmarks indicate the files that 
transferred successfully. Black checkmarks indicate partially transferred files.  

You can press the 

Resume Transfer

 touchpad button to continue the file transfer of any 

partially transferred file. 


File transfer error codes 

If an error occurs during a file transfer, an error code appears beside the name of the file. The 
following errors might occur on the server during file transfer:  

  ER1: Unknown Error 

  ER2: Invalid File Transfer Session 

  ER3: Could not create file – invalid file transfer session 

  ER4: Could not create file – invalid directory structure 

  ER5: File Not Found 

  ER6: MD5 Checksum Failed 

  ER7: Could not create file – filename too long 

Summary of Contents for LIVE+ GoBox

Page 1: ...LIVE GoBox User Guide January 2015 D UG112 002 www dejero com...

Page 2: ...ducts or portions thereof are protected by patents granted and pending Symbols and Conventions This document uses the following symbols and conventions Note Shares important related information remind...

Page 3: ...rts 10 Connect video 11 Connect Ethernet 11 Connect IFB 12 Specify camera input type 12 DC output 12 USB ports 13 Device Ready screen 13 Mode selection 15 Video window 15 Start stop and configuration...

Page 4: ...ditions below Safety Warnings and Hazards Read this section in its entirety before operating the LIVE GoBox RF Exposure Notice The LIVE GoBox wireless modems are subject to the same RF exposure compli...

Page 5: ...a minimum distance of 200 mm 8 from the LIVE GoBox while it is powered on Hearing Devices People with hearing aids or cochlear implants may experience interfering noises when using mobile devices or...

Page 6: ...to ensure adequate airflow Keep Device as Cool as Possible For optimal performance keep the LIVE GoBox in well ventilated areas away from heat sources and direct exposure to sunlight Do not operate t...

Page 7: ...live from virtually anywhere with bonded cellular Wi Fi and portable satellite connections or record up to 40 hours of HD video for later broadcast Dependable and robust The GoBox is the most ruggediz...

Page 8: ...the LIVE Portal You can send live or recorded video to the broadcast center for playout or to the cloud for online distribution What s included The LIVE GoBox includes the following items LIVE GoBox...

Page 9: ...r you must use a fuse that is the same type and rating as the original fuse For more information contact Dejero Support Install the batteries 1 Slide each battery onto the battery mounting plates on t...

Page 10: ...side of the GoBox case While the transmitter powers on and establishes a network connection start up messages appear on the Device Ready screen For more information about the Device Ready screen see...

Page 11: ...sure that all cables are firmly connected The GoBox selects the correct video input automatically If you do not see video in the Preview screen make sure that the cables are connected properly and tha...

Page 12: ...Server User Guide 1 Connect your audio device earpiece headset or IFB amplifier input to the 3 pin XLR IFB connector on the GoBox As soon as a live stream starts IFB is on an IFB Active appears on th...

Page 13: ...test and Device Ready appears when the transmitter is ready to use Note The LIVE Portal administrator must activate the transmitter before it can be used If your administrator has not activated the t...

Page 14: ...in real time Glass to glass refers to the total amount of delay from the camera lens to the video output from the SDI port of LIVE Broadcast Server in the studio Stream Health indicator The Stream He...

Page 15: ...of the Video window The destination also appears At the bottom of the Video window sound meters appear The top bar corresponds to the right input channel and the bottom bar corresponds to the left in...

Page 16: ...de the green dot icon Configuring the transmitter Use the Configuration screen to specify transmitter settings Use the touchpad buttons to change settings as required Set the video input 1 On the Devi...

Page 17: ...quested latency upwards to a value that is supported by the current conditions Up to Latency mode In Up to Latency mode the system measures the network conditions during the beginning of the stream an...

Page 18: ...en the bandwidth increases and remains at 200 Kb s or better the transmitter resumes sending video Note If you set a maximum connection bitrate less than 400 Kb s manually the transmitter does not swi...

Page 19: ...Operation touchscreen button 3 On the Operation Mode screen press the Ethernet Type touchpad button to set the type of connection attached to the wired Ethernet port on the transmitter Normal Uses a...

Page 20: ...ame and the signal strength Each modem connection shows the network type such as HSPA LTE UMTS A received signal strength indicator RSSI value also appears to show approximate strength of the connecti...

Page 21: ...Configuration screen press the Operation touchpad button 3 Press the Mode touchpad button to select Live Live S F or S F Only 4 Press the Back touchpad button 5 On the Configuration screen press the...

Page 22: ...elect Clip touchpad button 5 Repeat steps 2 and 3 for any additional clips 6 To perform additional actions on the clips such as transfer delete or backup the clips press the Actions touchpad button Ea...

Page 23: ...Forward touchpad button 2 Press the S F Clips touchpad button 3 On the S F Clip Selection screen select clips 4 Press the Actions touchpad button 4 Press the Backup Clips touchpad button 5 Use the Up...

Page 24: ...clip The Preview screen shows the video that you are recording Statistics about the current clip also appear including the clip length resolution quality setting and encode rate Based on the availabl...

Page 25: ...ppears on the S F Clip Selection screen and is available for transfer File transfer You can insert a USB drive into either of the USB ports on the GoBox After you insert a USB drive you can transfer f...

Page 26: ...les that transferred successfully Black checkmarks indicate partially transferred files You can press the Resume Transfer touchpad button to continue the file transfer of any partially transferred fil...

Page 27: ...activity continue to appear on the screen and the touchpad buttons work when Remote Control is active Auto Start You can use the Auto Start Mode to initiate a live transmission automatically when you...

Page 28: ...the connections are secure Then try to power on the GoBox again If it does not power on contact Dejero Support Low battery warning Battery too low to transmit Insert fresh batteries or use adaptor ca...

Page 29: ...put port The video input might not be specified correctly on the Configuration screen For more information see page 16 There is sound but no picture The video input might not be specified correctly on...

Page 30: ...u call Dejero Support reference the error number as listed below A complete table is also available in the Dejero Support Hub at http support dejero com Error Message Description Possible Solution Err...

Page 31: ...ngs on the transmitter to make sure that they match the connected camera and microphone Error 07 Battery too low to transmit Insert fresh batteries or use adaptor cable Insufficient battery power rema...

Page 32: ...ed on To reinitialize the modems 1 Power off the GoBox 2 Wait 60 seconds then restart the transmitter If this does not resolve the problem contact Dejero Support Error 13 The device requires service P...

Page 33: ...r one of the other users to finish using a LIVE server output and try again Error 100 Could not broadcast LIVE Server output in use by another unit MU serial This error message appears if the assigned...

Page 34: ...m capacity reached Servers are limited to 4 streams Wait for a stream to become available or contact your system administrator Error 114 Failed to complete clip transfer to LIVE Broadcast Server Serve...

Page 35: ...s Cellular Up to 6 x 3G 4G LTE Ethernet 1 Gb s port for LAN WAN and portable satellite including BGAN Ku band Ka band Wi Fi Dual band wireless N 802 11 a b g n User Interface Control One button auto s...

Page 36: ...er reading this guide Visit the Dejero Support Hub online knowledge base at support dejero com Email the Dejero technical support team at support dejero com Call the 24 hour technical support number f...

Page 37: ...ent Number Revision Date Changes D UG112 001 September 24 2014 New Document D UG112 002 January 2015 Hardware spec updates Technical Support support dejero com US Canada Toll Free 1 866 808 3665 Europ...

Reviews: