
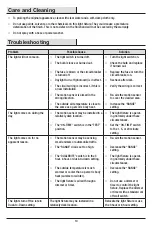
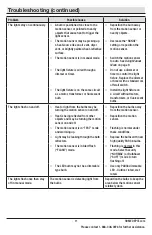


7 HOMEDEPOT.com
Please contact 1-866-308-3976 for further assistance.
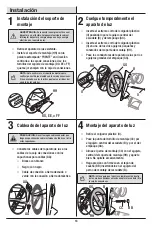
Installation (continued)
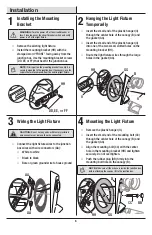
5
Caulking Around the Light
Fixture
□
Caulk around the canopy (B) and mounting
surface with silicone sealant (not included).
6
Installing the Shells and Bulbs
□
Align the three slots on the shell (D) with the
three nibs on the bulb holder (A).
□
Insert the shell (D) into the bulb holder (A) and
twist clockwise to lock.
□
Repeat for the other shell (D).
□
Install bulbs (not included) into both bulb
holders (A).
Operation
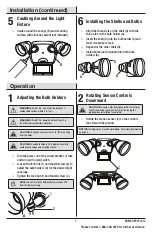
1
Adjusting the Bulb Holders
WARNING:
Risk of fire. Do not aim the bulbs at a
combustible surface within 3 ft. (1 m).
WARNING:
Risk of fire. Keep the bulbs at least 2 in.
(51 mm) from combustible materials.
CAUTION:
Keep the sensor at least 1 in. (25 mm) away
from the bulbs.
CAUTION:
Keep bulb holders 30° below horizontal to
avoid water damage and electrical shock.
□
Turn the power on at the circuit breaker or fuse
and turn on the wall switch.
□
Loosen the lock nut (1) and thumb screw (2) to
adjust the bulb holders (A) for the desired light
coverage.
□
Tighten the lock nut (1) and thumb screw (2).
NOTE:
Do not rotate the bulb holders more than 180°
from the factory setting.
2
Rotating Sensor Controls
Downward
CAUTION:
To avoid water damage and risk of electrical
shock, the motion sensor controls must be facing the
ground when installation is complete.
□
Rotate the motion sensor (C) so the controls
face toward the ground.
NOTICE:
All clearances must be maintained. See
Safety Information
on page 2.
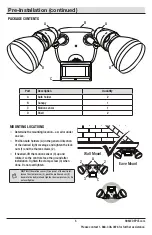
B
A
1
2
D
D
A
A
C