


6
Installation
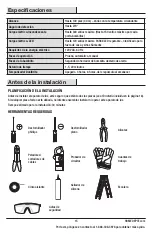
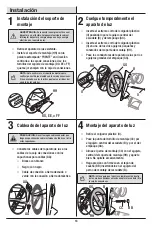
1
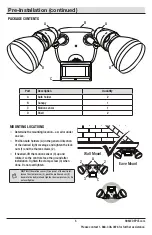
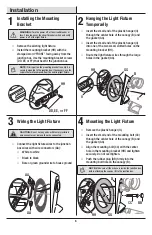
Installing the Mounting
Bracket
WARNING:
Turn the power off at the circuit breaker or
fuse. Place tape over the circuit breaker switch and verify
power is off at the light fixture.
□
Remove the existing light fixture.
□
Install the mounting bracket (HH) with the
stamped word “FRONT” facing away from the
junction box. Use the mounting bracket screws
(DD, EE, or FF) that best fit the junction box.
NOTE:
Firmly pull on the mounting bracket to verify it is
securely mounted to the junction box. If necessary, use the
screws that were removed from the existing light fixture.
FR
ON
T
FR
ON
T
2
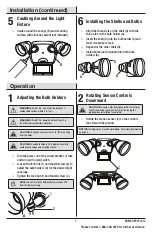
Hanging the Light Fixture
Temporarily
□
Insert the small end of the plastic hanger (II)
through the center hole of the canopy (B) and
the gasket (GG).
□
Insert the small end of the plastic hanger (II)
into one of the two small, slotted holes on the
mounting bracket (HH).
□
Route the light fixture wires through the large
holes in the gasket (GG).
FR
O
N
T
FR
ON
T
3
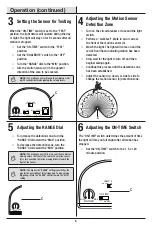
Wiring the Light Fixture
CAUTION:
Do not cut any wires with factory installed
wire connectors or remove the wire connectors.
□
Connect the light fixture wires to the junction
box wires with wire connectors (AA):
□
White to white
□
Black to black
□
Bare or green ground wire to house ground
4
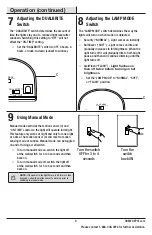
Mounting the Light Fixture
□
Remove the plastic hanger (II).
□
Insert the small end of the mounting bolt (CC)
through the center hole of the canopy (B) and
the gasket (GG).
□
Align the mounting bolt (CC) with the center
hole in the mounting bracket (HH) and tighten
securely. Do not overtighten.
□
Push the rubber plug (BB) firmly into the
mounting bolt hole on the canopy (B).
NOTE:
Make sure all the wires are inside the junction box
before attaching the canopy (B) to the junction box.
FR
O
N
T
DD, EE, or FF
HH
HH
II
GG
B
II
HH
GG
CC
BB
B
AA
AA