background image

CAUTION

 : 

When you intend on changing speed, continue pedalling normally without 
forcing, push the gear changer switch until the chain is in place on the chosen 


crown


or spindle, if your gear changers are not indexed.

Each clog on the switch corresponds to a position on the spindles. If the chain


tends not to go up or down quickly on the spindle, stretch the cable turning the


adjustment cylinder located on the switch all the gear changer, anticlockwise.
If the chain tends not to go up or down too quickly, turn at the cylinder clockwise.


The spindle must be changed fluidly

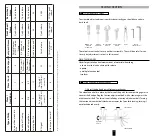
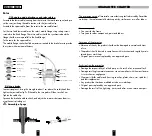
5/Bearing adjustment

The fork is responsible for holding the front wheel of your bicycle. The headset is
the bearing system, which allows the steering of your bike by the rotation of the
fork, the stem and the handlebar.  

There are several areas on your bicycle containing bearings that must be adjusted
and/or lubricated. Proper maintenance in these areas will insure longer bearing
life, and easier and safer riding of your bicycle.
Proper adjustment of these bearings requires special tools and knowledge. We
suggest these adjustments be made by a qualified repairman. Please see instruc-
tions below for checking if bearings need to be adjusted. If so, follow these
instructions: 

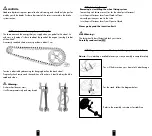
1. Put the key washer onto the fork stem so it is down as far as possible. The small

tab inside the key washer must fit into the slot on the fork stem.

2. Thread the lock nut onto the fork stem by hand.
3. If there is front to rear play in the headset tighten the adjusting cone, then secu-

rely tighten the lock nut

4. To check the headset for proper tightness, bounce the front wheel on the

ground and turn the wheel from side to side. If the fork binds, it means that it’s
(too tight). If the fork shifts, it’s (too loose). Loosen the lock nut, readjust the
adjusting cone, and then re-tighten the lock nut.

DANGER

 : 

An over tightening of the stem-to-fork assembly bolts can make irreversible dama-
ges in the steering tube and may provoke an accident that can cause serious inju-
ries or death  (can pull a blocking or a breakage of the movements, damage the
tube of direction…)
To avoid an over tightening, please respect the torques given in the “Assembly
and adjustments” chapter.

23

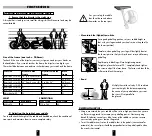
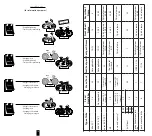
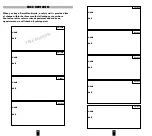
CONVENTIONAL GEAR CHANGER

The gear changer stroke (front and rear) should not be too large so as not to
derail the chain. "Both gear changers should be adjusted as explained below:
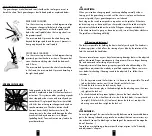
REAR GEAR CHANGER:
Turn the screws stop as shown in the diagrams to align
the rear gear changer roller below the large spindle
(when the turning wheel is at the slow speed) and
below the small spindle (when the turning wheel is at
the greatest speed).
The screw marked H prevents the chain from going
beyond the large spindle and the screw L prevents it
from going beyond the small spindle.
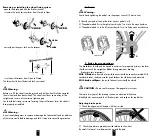
FRONT GEAR CHANGER:
Turn the screws stop as shown in the diagrams having
previously position the chain as shown. The space bet-
ween the chain and the guide should be between 0
and 0.5 mm.
The screw marked L prevents the chain from derailing
in the frame, the screw marked H prevents derailing in
the right-hand pedal.
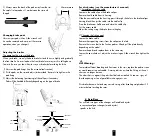
SPEEDS IN THE HUB

Setting speeds in the hub is very simple. The
method is explained in detail in the manufacturer's
instructions. This system enables you change speeds
when stopped, without noise and instantly and you
cannot derail. Single speed bicycles or those fitted
with hubs do not have gear changers and need no
specific maintenance. The chain tension should
however be verified (it slackens over time). Too
strong tension in the chain could damage the effec-
tiveness of the bicycle amateurs in its lifespan
(pedalling hard). Too week tension may lead to fre-
quent derailments.

22

L

H

L

H

Summary of Contents for B'Original

Page 1: ...Guide and guarantee instructions www decathlon com ...

Page 2: ... So that it gives you riding pleasure for as long as possible please read this user guide It will give you information necessary for adjusting maintaining and properly using your Decathlon bicycle Keep this guide in a safe place Decathlon is not liable for accidents or injuries due to improper use of the product failure to adhere to the instructions given in this guide or modifications to the prod...

Page 3: ... on earth mounds Flat for figures on the ground Racing on an earth circuit with bumps So properly identify your discipline Children s bicycles 16 to 24 Look price accessories according to requirements To ride tear long and have fun in complete safety Well fitted comfortable solid practical and full of clever tricks it will be the ideal friend for going to school and outside school activities 5 IMP...

Page 4: ...nd be careful 7 SAFETY PRECAUTIONS AND USER INSTRUCTIONS Precious advice for riding in complete safety Always carry out a complete check before riding Thoroughly read the safety section I 4 Always wear helmets when you are riding to protect your head in a fall Ride in the same direction as traffic never against the flow Never attach yourself to a car or any other vehicle Check your speed avoid big...

Page 5: ...nd To set the saddle recoil sat on the saddle feet in the pedals conventional or automatic the swivel joint should be perpendicular to the pedal spindle when the crank is horizontal A A x 0 88 9 FIRST SECTION I Setting the riding position and safety 1 Ensure that the bicycle is the right size A bicycle that is too big or two small for riding is difficult to control and may be uncomfortable Size of...

Page 6: ... the section on changing speeds and adjustments Do you wear a helmet reinforced clothing and equipment like glo ves and glasses Never wear clothes that are too big and could get stuck in the wheels 35 60 PSI 2 5 5 5 BAR ROTATING DIRECTION Fig 1 Fig 2 57 589 26x2 125 11 3 Setting the stem and the handlebar For your safety the handlebar may be extended until the maximum markers diagram 1 Road Once t...

Page 7: ...n plates and cogs 13 Is it raining or wet In this case be even more careful The risks in braking increase and the adheren ce of your tyres on the road is reduced Also remember that the visibility of motor vehicles is reduced in bad weather Are your pedals properly tightened Check your pedal is properly tightened to the crank Read the section on how to fix your pedals IV 2 How do clipless pedals fu...

Page 8: ...ront wheel Frame Rear wheel Frame Child 12 14 20 Not applicable 10 12 14 8 Child 14 16 Not applicable 20 Not applicable 10 12 22 30 22 30 Junior 20 24 1 screw 18 2 screws 12 1 screw 21 2 screws 12 22 Quick release or 12 14 Quick release or 22 30 Quick release or 22 30 BMX 10 10 16 or pivotal system 6 Quick release or 8 10 35 40 35 40 Town and country 1 screw 18 2 screws 14 4 screws 7 1 screw 18 2 ...

Page 9: ...wise reduces it regulation of force open closed closed open open position open position closed position closed position 17 Medium size standard screwdriver Phillips screwdriver 10 adjustable wrench 6 adjustable wrench Pliers Metric allen wrenchs Type of bike Stem Handlebar Stem Fork Seat Seat post Seat post Frame Front wheel Frame Rear wheel Frame Competition mountain bike 5 7 8 Quick release or 8...

Page 10: ...d the V Brake system and calipers for road bikes Adjusting brake pads 1 Check the alignment of the pad with the rim side 2 Check the pads are properly centred relative to the wheel Be careful to leave 1 mm between the rim and the pad L R Left and right L R 19 Removing or installing the wheel fixing system opened the brake pad see the Brakes section turned in the quick fastener lever from Closed to...

Page 11: ...rim Disc brakes become hot and may cause burning after breaking weight about 30 minutes before touching the rotor 4 Derailleur You will find two types of the changer on Decathlon bicycles a conventional gear changer most bicycles speeds in the hub 21 3 Always move the back of the pad away from the rim Be careful to leave about 1 mm between the rim and the pad Changing brake pads Unscrew your pad w...

Page 12: ...shifts it s too loose Loosen the lock nut readjust the adjusting cone and then re tighten the lock nut DANGER An over tightening of the stem to fork assembly bolts can make irreversible dama ges in the steering tube and may provoke an accident that can cause serious inju ries or death can pull a blocking or a breakage of the movements damage the tube of direction To avoid an over tightening please...

Page 13: ...e For the stand follow the diagram below Refer to the assembly instructions for stabilisers 25 CAUTION Headset adjustment requires special tools and training and should only be perfor med by your bike dealer Further adjustment of the rotor is covered in the brake system section 6 Chain tension for single speed bicycles The chain transmits the energy that you supply when you pedal to the wheel As w...

Page 14: ...ism or non secure transport 27 V BMX BIKES Rotor 1 Changing and adjusting rear brake cables Assemble the lower cable coming from the rotor to the rear brake jaws and pre set the rear jaw fixing the cable tension with the jaw cable clip Assemble the upper cable from the rotor to the rear cable lever Set the two fixed lower cables on the rotor s mobile flange using setting screws screwed to the fixe...

Page 15: ...hen you buy a Decathlon bicycle a safety visit is provided free of charge within the three months following your purchase Contact out after sales service department and make an appointment we will check all safety points 28 3 months NAME DATE 6 months NAME DATE 1 year NAME DATE 2 years NAME DATE FREE REVISION ...

Page 16: ...ight brake levers positioned and tight Cantilever Caliper mounting Brake pads positioned and tight Brake cable adjusted Bottom bracket adjusted Crank arm bolt tight Derailleur mounting bolt Front rear derailleur aligned adjusted Air in tires to proper pressure Tires inspected for mounting on rim Reflector kit installed Kickstand straight tight Accessories installed tight Cable end caps on Valve du...

Page 17: ...nership with the Sportlab so that you may fully live your passion Our design department ensures that our products meet your expectations of the image of the b Twin They bring specialcare to make sure that the technicalnature the comfort and the look of our bicyclesare perfectly adapted to their use Modernity simplicityand passion guide our imagination Designer Industrial design Design Innovation M...

Reviews: