background image

USER MANUAL - MULTI-FUNCTION FOOD PROCESSOR - PM1800

ASSEMBLING THE SLICER ANT AD SHREDDER HOUSING

1. Attach  the  Shredder  Housing  (Q)  by  pushing  it  into  the  matching  slots  on  the  Basic  Unit 

Housing(A). See notes in”Main Unit Housing Backplate “section for assembly.

2. Select either the Slicer Blade (S) or the Shredder Blade (T) and insert the blade onto the three 

fins at the back of the Shredder Housing. While holding the Outer Tab, rotate the blade so it locks 

into the housing.

3. Place the Food and Pulp Collector where food will exit the appliance.

4. Remove the blade prior to removing the housing CAUTION: To avoid personal injury, do not gro

the sharp parts of the blades.
SLICER/SHREDDER PARTS

A  Basic Unit Housing   S  Slicer Blade

Q  Shredder Housing   T  Shredder Blade

R  Pusher
NOTE: All slicer parts are marked with an”S” to

 identify which parts are used for slicing. The parts of

 each housing are also color coded to help you identify

 which parts are used with which housing.


Outher Tab
Use the tab to twist the Slicer or Shredder

Blade to lock and unlock. Do not put your

finger into the blades to remove because

the bl lades are sharp. 

Summary of Contents for PM1800

Page 1: ......

Page 2: ...MANUALE D USO ROBOT DA CUCINA MULTIFUNZIONE PM1800 PER LA VOSTRA SICUREZZA E PER UN CORRETTO USO DELL APPARECCHIO LEGGERE ATTENTAMENTE E CONSERVARE QUESTO MANUALE...

Page 3: ...Prima di pulire la macchina rimuovere i dischi per la pasta 4 L uso di questo apparecchio non indicato per persone con ridotte capacit fisiche sensoriali o mentali mancanza di esperienza e conoscenze...

Page 4: ...disco con l apposito strumento in dotazione Non immergere i dischi in acqua 26 Non versare acqua nella cavit di miscelazione prima di aver posizionato il coperchio 27 Per evitare danni alla macchina...

Page 5: ...muovere tutto il contenuto variabile da modello a modello dal materiale di imballaggio Prima dell uso rimuovere dai componenti eventuali pellicole trasparenti o azzurre Alcuni accessori potrebbero non...

Page 6: ...E SPATOLA STRUMENTO PER LA PULIZIA Per tagliare l impasto in base alla dimensione desiderata Le estremit in metallo servono per rimuovere l impasto rimasto incastrato nei fori dei dischi SPAZZOLINO PE...

Page 7: ...emblare l accessorio per dessert Potrebbe essere venduto separatamente Attenzione Le lame e altre parti metalliche in uso in questo apparecchio sono affilate Prestare la massima attenzione per evitare...

Page 8: ...orio per dessert utilizzabile per l estrusione della pasta Tempo standard 6 minuti 6 Tasto miscelazione si usa per mescolare impasti senza estrusione vedere il paragrafo Miscelare la farina Tempo stan...

Page 9: ...coclea 5 Posizionare l anello collettore H sulla parte anteriore dell apparecchio NOTA l albero dell anello collettore si inserisce nella fessura anteriore della cavit di miscelazione 6 Posizionare i...

Page 10: ...ettore I Cappuccio a vite NOTA su tutte le parti destinate alla preparazione della pasta riportata la lettera P Inoltre le parti di ciascun accessorio sono contrassegnate da un colore che ne facilita...

Page 11: ...della piastra nelle fessure nella parte anteriore del tritacarne 4 Fissare tutte le parti avvitando il cappuccio di estrusione P sulla filettatura nella parte anteriore del tritacarne 5 Rimuovere la...

Page 12: ...limenti 4 Prima di disinstallare l accessorio rimuovere le lame ATTENZIONE non afferrare le parti affilate delle lame Pericolo di infortunio DESCRIZIONE DELLE PARTI A Corpo principale Q Accessorio per...

Page 13: ...re il collettore della polpa all esterno vedere il paragrafo Usare l estrattore DESCRIZIONE DELLE PARTI A Corpo principale K Scivolo Vaschetta L Accessorio per la spinta degli alimenti U Estrattore V...

Page 14: ...ta a stella A1 fino a fissarla in posizione 6 Posizionare il collettore della polpa all esterno del corpo principale vedere il paragrafo Usare l accessorio per dessert DESCRIZIONE DELLE PARTI A Corpo...

Page 15: ...empire il misurino creando una piccola montagnetta al centro A questo punto livellarla con la spatola strumento per la pulizia o con la parte liscia della lama di un coltello facendola scorrere lungo...

Page 16: ...remere il tasto di miscelazione per mescolare la farina Il ciclo di miscelazione si svolge come segue IMPOSTAZIONI DOSI Premere una volta il tasto Dose per una dose premerlo di nuovo per due dosi MISC...

Page 17: ...e sia stato usato tutto l impasto premere il tasto Avanti per far ripartire l estrusione NOTA potrebbe essere necessario un po di tempo perch la pasta fuoriesca in modo uniforme e regolare dalla macch...

Page 18: ...processo di estrazione premere il tasto Start Pausa in qualunque momento PROMEMORIA per estrarre succhi usare il filtro forato e la punta tonda CONSIGLIO tagliare le verdure a strisce o pezzetti pi pi...

Page 19: ...are la macchina in caso di ostruzione vedere il paragrafo Usare il pannello dei comandi 4 Per mettere in pausa il processo premere il tasto Start Pausa in qualunque momento PULIZIA E CONSERVAZIONE Pul...

Page 20: ...i con acqua 7 Pulire tutte le parti rimovibili e asciugarle con un panno 8 Pulire il pannello dei comandi e la superficie esterna della macchina con un panno asciutto 9 Qualunque altro tipo di interve...

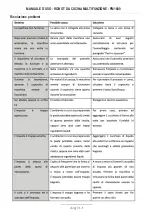
Page 21: ...MANUALE D USO ROBOT DA CUCINA MULTIFUNZIONE PM1800 Risoluzione problemi...

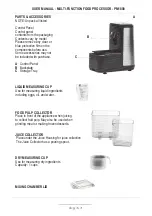
Page 22: ...age Tray LIQUID MEASURING CUP Use for measuring liquid ingredients including eggs oil and water FOOD PULP COLLECTOR Place in front of the appliance when juicing to collect fruit pulp May also be used...

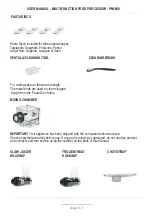
Page 23: ...are used to clean clogged dough from the Pasta Disc holes MIXING CHAMBER IMPORTANT Your appliance has been shipped with the components shown above Check everything carefully before use If any part is...

Page 24: ...d ON to be displayed on the Control Panel indicating that the appliance Is in Ready mode 2 Time Display Shows the total time and elapsed time for the selected process 3 Start Pause Button Press to pau...

Page 25: ...NOTE Pasta needs to be cut to length by hand during this process MAIN UNIT HOUSING BACKPLATE SLOTS FOR MIXING CHAMBER LID The appliance s lid slides into these slots and locks in place MOUNTING RING A...

Page 26: ...Screw Cap 1 on the front of the appliance and hand tighten until all parts are secure 7 Place the Mixing Chamber Lid C on top and snap in place CAUTION Operating this appliance with misaligned or miss...

Page 27: ...ate tabs into the slots on the front of the Grinder Housing 4 Secure everything in place by screwing the Extrusion Cap P on the threads on front of the Grinder Housing 5 Remove the black storage tray...

Page 28: ...using 3 Place the Food and Pulp Collector where food will exit the appliance 4 Remove the blade prior to removing the housing CAUTION To avoid personal injury do not gro the sharp parts of the blades...

Page 29: ...ly inside the Basic Unit Housing and then place the Pulp Collector on the outside refer to the Slow Juicer Mode section SLOW JUICER PARTS A Basic Unit Housing W Juice Pulp Filter K Chute Tray Y Juice...

Page 30: ...ay Blocker L Pusher Y Juice Frozen Treat U Juicer Housing Seal Cap V Juice Frozen Treat A1 Extrusion Cap Star Center NOTE All juicer attachments are marked with a J to identify which parts are used fo...

Page 31: ...Beat the eggs and add the egg to the measuring cup if your recipe calls for eggs Then add oil and water to the same measuring cup with the ggs until you reach required measurement Stir to mix all the...

Page 32: ...xing Button to mix flour The mixing Cycle will perform the following actions Batch Programming Press batch button once for batch 1 press again For batch 2 Flour Mixing Dough Consistency Too Dry Press...

Page 33: ...see large clumps of dough stuck on the paddle pause the appliance and scrape the paddles Then close the lid and resume the mixing process If the timer runs out before all dough is extruded press the F...

Page 34: ...o pause the juicing process REMINDER Use the perforated screen and round tip for juicing TIP Cut vegetables into smaller chunks or strips to allow for an easier feed into the slow juicer and to reduce...

Page 35: ...jam the appliance see the Using the Control Panel section 4 Press the Start Pause Button at any time to pause the slicing or shredding process CLEANING Clean the appliance after each use The parts and...

Page 36: ...7 Clean all detachable parts and wipe them dry 8 Use a dry cloth to clean the Control Panel and the exterior of the appliance 9 Any other servicing should be performed by an authorized service represe...

Page 37: ......

Page 38: ...lettrotecnici oppure riconsegnarla al rivenditore al momento dell acquisto di nuova apparecchiatura di tipo equivalente in ragione di uno a uno oppure 1 a zero per le apparecchiature aventi lato maggi...

Page 39: ...Attuazione delle Direttive 2002 95 CE 2022 96 CE e 2003 108 CE certificazione A13 relative alla riduzione dell uso di sostanze pericolose nelle apparecchiature elettriche ed elettroniche nonch allo s...

Page 40: ...DCG SRL Via G Garibaldi 68 20861 Brugherio MB MADE IN CHINA...

Reviews: