background image

Page 8

For technical questions, please call 1-888-866-5797.
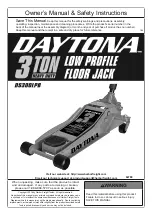
Floor Jack 


Maintenance and Servicing

  Procedures not specifically explained in this manual must 

be performed only by a qualified technician.

TO PREVENT SERIOUS INJURY FROM TOOL FAILURE:  Do not use damaged equipment.  

If abnormal noise or vibration occurs, have the problem corrected before further use.

1. 

BEFORE EACH USE,

 inspect the general 

condition of the tool.  Check for:

•  leaking hydraulic fluid,

•  loose hardware or parts, 

•  misalignment or binding of moving parts, 

•  cracked, bent or broken parts, and 

•  any other condition that may 

affect its safe operation.

Thoroughly investigate and correct the causes for 

all issues that are found.  Do not use Jack until all 

issues are understood and properly corrected.

ALSO, BEFORE EACH USE,

 thoroughly test 

the Jack for proper operation prior to actual use.   

If the Jack’s motion seems spongy or the 

Saddle does not lift completely, follow 

Bleeding instructions on page 6.

2. 

AFTER USE,

 wipe dry with a clean cloth. Then, 

store the Jack in a safe, dry location out of reach 

of children and other non-authorized people.

NOTICE:

  Storing the Jack in a humid area or 

exposing it to corrosive vapor voids the warranty.

3. 

Weekly - Jack Lubrication:

a.  Lubricate according to the below steps using 

only general purpose lithium grease.

b.  Inject grease into each of the grease fittings.

c.  Lubricate the linkages and pivot points lightly.

Note:

  Improper or inadequate 

lubrication voids the warranty.

4.  Change the hydraulic oil at least 

once every three years:

a.  With the Jack fully lowered, remove both Screws 

on the end of the Cover Plate that is closer to 

the Saddle.  Swing the Cover Plate open.

b.  Remove the Fill Plug on the top of the Cylinder.

c.  Tip the Jack to allow the old hydraulic oil 

to drain out of the Housing completely, 

and dispose of the old hydraulic oil in 

accordance with local regulations.

d.  Turn the Jack upright.  Add non-detergent 

22 weight hydraulic jack oil into the Fill Plug 

hole slowly until the oil level just reaches 

the top of the Piston inside the Cylinder.

e.  Replace the Fill Plug, close the 

Cover Plate, and reinstall the Screws.

f.  Follow instructions for 

Bleeding Trapped Air on page 6.

Fill Plug

Cylinder 

Piston

Oil

fill level

Figure C:  Fill Level

Summary of Contents for DS400S

Page 1: ...nce 22j When unpacking make sure that the product is intact and undamaged If any parts are missing or broken please call 1 888 866 5797 as soon as possible Copyright 2022 by Harbor Freight Tools All r...

Page 2: ...not use for aircraft purposes 18 Do not use any objects such as blocks of wood in between Saddle Pad or Saddle and lifting point Objects placed on the Saddle will reduce the stability of the Jack and...

Page 3: ...safety messages that follow this symbol to avoid possible injury or death Indicates a hazardous situation which if not avoided will result in death or serious injury Indicates a hazardous situation wh...

Page 4: ...pacity lb 8 000 Maximum Height in 20 562 Minimum Height in 4 125 Handle Length in 49 Front Wheel Diameter in 3 27 Front Wheel Width in 1 97 Rear Caster Diameter in 2 56 Rear Caster Width in 1 38 Saddl...

Page 5: ...Page 5 For technical questions please call 1 888 866 5797 Floor Jack Overview Saddle Pad Saddle Handle Foam Bumper Handle Socket Handle Release behind Socket Contoured Lift Arm...

Page 6: ...end of the Cover Plate that is closer to the Saddle Swing the Cover Plate open See Figure A 2 Remove the Fill Plug on top of the Cylinder Check that the oil level inside the Cylinder is at the top of...

Page 7: ...to in the vehicle owner s manual Always use two jack stands position them at the same point on each side of the vehicle WARNING The rated capacity of jack stands is per pair not the individual capaci...

Page 8: ...n a safe dry location out of reach of children and other non authorized people NOTICE Storing the Jack in a humid area or exposing it to corrosive vapor voids the warranty 3 Weekly Jack Lubrication a...

Page 9: ...le lowers under load Pump stroke feels spongy or Saddle does not lift all the way Handle moves up when Jack under load Fill Plug leaking oil or Jack will not lower without a load X X Check that Releas...

Page 10: ...Ring 18 2 34 Zerk Fitting 1 35 Lift Arm 1 36 Saddle 1 37 Saddle Screw 1 38 Handle Bumper 1 39 Saddle Pad 1 PLEASE READ THE FOLLOWING CAREFULLY THE MANUFACTURER AND OR DISTRIBUTOR HAS PROVIDED THE PAR...

Page 11: ...l number record month and year of purchase instead Note Some parts are listed and shown for illustration purposes only and are not available individually as replacement parts Parts may not be intercha...

Page 12: ...usion or limitation of incidental or consequential damages so the above limitation of exclusion may not apply to you THIS WARRANTY IS EXPRESSLY IN LIEU OF ALL OTHER WARRANTIES EXPRESS OR IMPLIED INCLU...

Reviews: