background image

11

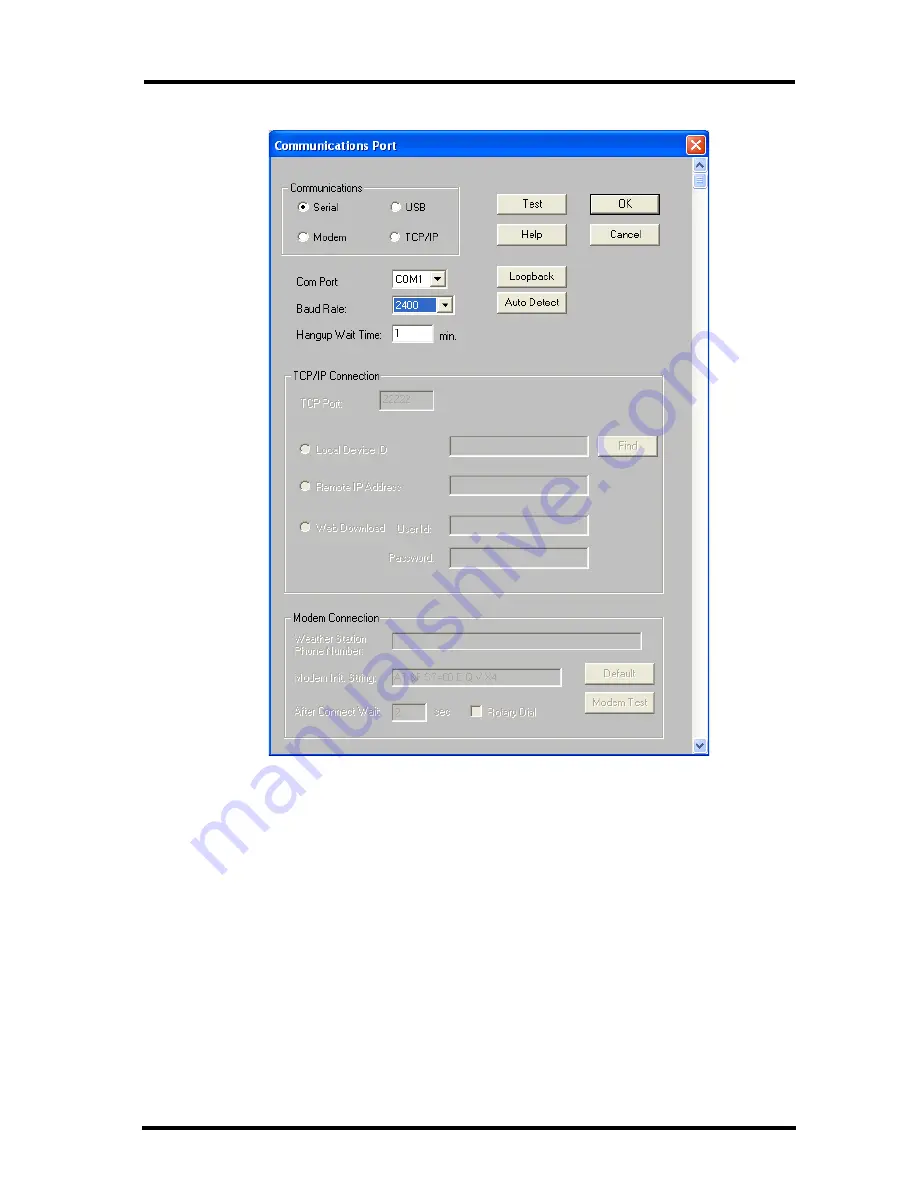
Communication Port Settings

The 

Communications Port

 dialog box displays.

2. Select 

Serial

 from the communications field. 

3. Select the rate at which weather station connects to the computer from the 

Baud Rate

 drop-down list box. Select from either the 1200 or 2400 Baud 

Rate.

4. Select the communications port that connects the data logger to the 

computer from the 

Com Port

 drop-down list box or click 

Auto-Detect

 to 

to find and select the correct COM port being used for your serial port 
connection.

5. Click 

Test

 to verify communication. 

6. Click 

OK 

to save the 

Communications Port

 settings.

Summary of Contents for WeatherLink for Windows 7862

Page 1: ......

Page 2: ...ntial installation This equipment generates uses and can radiate radio frequency energy and if not installed and used in accordance with the instructions may cause harmful interference to radio commu nications However there is no guarantee that interference will not occur in a particular installation If this equip ment does cause harmful interference to radio or television reception which can be d...

Page 3: ... cable with a phone plug at one end and a red plastic cap at the other WeatherLink Software CD ROM Optional Accessories The following optional accessories designed for use with WeatherLink are available from your dealer or may be ordered directly from Davis Telephone Modem Adapter 7870 For transmission of data from the data logger using a modem Standard 4 Conductor Extension Cable 7876 For more fl...

Page 4: ... or USB Port with USB to Serial cable Remote Modem Connection Hardware Requirements In addition to the provided hardware and the computer equipment listed above the following hardware is required for a remote modem connection One external modem to connect to the data logger at the remote site One internal or external modem connected to your computer Modems must be Hayes Compatible and able to send...

Page 5: ...llation The WeatherLink Setup for NET Framework dialog box may display WeatherLink 5 8 requires the Microsoft NET Framework 2 0 to operate If your computer does not have it installed the above dialog box displays 2 Click Accept to install the necessary components The License Agreement dialog box displays ...

Page 6: ... version of WeatherLink installed and allows you to use those available database files 5 Click Next once you have selected a location The Confirm Installation dialog box displays 6 Click Next to start the installation The Installing WeatherLink dialog box displays the installation progress The Installation Successful dialog box displays once the software installation has been completed 7 Click OK ...

Page 7: ...er may cause damage to the data logger and or console 4 A small switch near the data logger cables controls the baud rate The default setting is 2400 baud If you need to run at 1200 baud change the setting before connecting the data logger to the console 5 Connect the short data logger cable to the cable jack marked WeatherLink on the bottom of your weather station console 6 Restore power to the c...

Page 8: ... connect your computer to a remote weather station using a modem This involves using the data logger to connect the weather station console to a modem at the remote site Your computer can then use a modem to communicate to the remote weather station via a phone line At Your Computer 1 If you don t have a modem install and set up an internal or external modem according to the instructions supplied ...

Page 9: ... Connect the blue Telephone Modem Adapter to the external modem The Telephone Modem Adapter 7870 is required to use the data logger with a modem A standard DB25 connector with a gender changer will not work 8 Connect the long data logger cable to the Telephone Modem Adapter 9 Turn the modem on 10 Restore power to the weather station console by reattaching the power adapter and listen for the conso...

Page 10: ... tool bar This icon indicates that WeatherLink has established a connection with the remote console and weather station To disconnect the phone connection select the On Line icon from the tool bar or select Hang Up from the File menu Toolbar with On Line Icon By default WeatherLink disconnects from the modem after one minute without any communication with the station Use the Communications Port di...

Page 11: ...ox displays 2 Type the desired station name up to 40 characters spaces into the Station Name text box The software uses the first eight characters of the station name not counting spaces or punctuation marks as the name of the direc tory where it saves this station s database and configuration files The first eight characters of each station name must therefore be unique 3 Click OK to save the new...

Page 12: ...he entire walkthrough process select Cancel Note Please refer to the WeatherLink Online Help for more information about the complete Walkthrough process Communication Port Settings WeatherLink contains a dialog box for configuring the communication settings for your serial or modem configuration Use the Communications Port dialog box to select the communications type and to test communication betw...

Page 13: ...om the Baud Rate drop down list box Select from either the 1200 or 2400 Baud Rate 4 Select the communications port that connects the data logger to the computer from the Com Port drop down list box or click Auto Detect to to find and select the correct COM port being used for your serial port connection 5 Click Test to verify communication 6 Click OK to save the Communications Port settings ...

Page 14: ... box displays 4 Click Loopback The software searches all standard ports and displays the COM port number where the loopback connector is located The correct COM port is automatically selected in the Communications Port dialog box If the loopback connector is not found on any COM port your serial port may not be working See Communications Problems on page 14 for more information Updating Previous V...

Page 15: ...e Files The Import Database Files menu option allows you to select individual files or groups of files to be converted for use by WeatherLink 5 4 or later Note WeatherLink does not import database files created by versions of WeatherLink 5 4 or later using the Import Database File option The Import Database Files option imports only database files created by WeatherLink versions 3 or 4 or earlier ...

Page 16: ...lug in the backup battery If you hear all three beeps See Communication Port Settings on page 10 for instructions on checking your standard serial ports If this identifies a serial port other than the one you selected in station setup try connecting to the data logger again Make sure you are using the black serial port adapter supplied with WeatherLink 7862 Check the switch setting on the data log...

Page 17: ...the Set Archive Interval command in the Setup menu to clear the archive memory and see if this corrects the problem You will lose any undownloaded data in your archive memory but all your calibration numbers and alarm settings will remain intact If this doesn t work restart your weather station by removing the AC power adapter and the backup battery and then reconnecting them All data which has no...

Page 18: ... software dashes out the entry rather than showing invalid data You can use the record editor to correct these entries The data I want to see such as humidity Monitor is missing completely or is grayed out Why All optional sensors must be enabled in the Station Configuration Setup dialog box before the data will be displayed in WeatherLink If you are not seeing data from a sensor that is installed...

Page 19: ...Technical Support Most questions can be answered on the phone Note Sorry we are unable to accept collect calls Phone Support 510 732 7814 Monday Friday 7 00 a m 5 30 p m Pacific Time 510 670 0589 Technical Support Fax E mail Support support davisnet com Technical Support e mail info davisnet com General e mail www davisnet com Davis Instruments website Includes Weather support information ...

Page 20: ...t Report F7 NOAA This Month F8 NOAA This Year Strip Chart Window ESC Halt Redraw Ctrl M Make Default Ctrl P Print Strip Chart F1 Context Sensitive Help F3 Zoom In F4 Zoom Out Plot Window ESC Halt Redraw Ctrl D Choose Date Ctrl M Make Default Ctrl P Print Plot F1 Context Sensitive Help F3 Zoom In F4 Zoom Out F9 Overlay Plots F10 Last Year Plot Database Window Ctrl D Choose Date Ctrl N Add Note Ctrl...

Reviews: