background image


H


A R D W A R E


  I


N S T A L L A T I O N


Typical Phone Modem Installation


6


6. Locate a free serial port on the back of your computer and connect the DB9 to the port.

7. Insert the cable plug at the end of the short cable coming from the data logger into the 

receptacle on the end of the 8’ cable. Then insert the cable plug on the end of the 8’ 
cable into the DB9 adapter.


The cable connecting the data logger to the computer is 8’ (2.4 m) long. If you 
need to place the station console more than 8’ from the computer, use a 40’ (12 
m) standard 4-conductor extension cable. Do not attempt to use more than 40’ 
of extension cable, or the data logger may have difficulty communicating with 
the computer.


Note:


You do not need to keep the console connected to the computer for the logging to work. You 
can connect the cable to the computer when you’re ready to download, then disconnect it if 
you want to place the console somewhere else. However, you can only run WeatherLink’s bul-
letin, summary, or real-time strip charts if the console is attached to the computer. 


8. Check the Baud rate settings on the console.


Enter the console SETUP mode by pressing and holding the DONE key, then 
pressing the DOWN arrow key. Use the BAR and DONE keys to scroll to the 
Baud Rate screen. The Baud Rate setting here on the console must be same as 
that set in the WeatherLink software. Use the UP and DOWN arrow keys to 
change the baud rate setting, if needed. Press and hold DONE to return the 
console to current weather mode.


T


Y P I C A L


  P


H O N E


  M


O D E M


  I


N S T A L L A T I O N


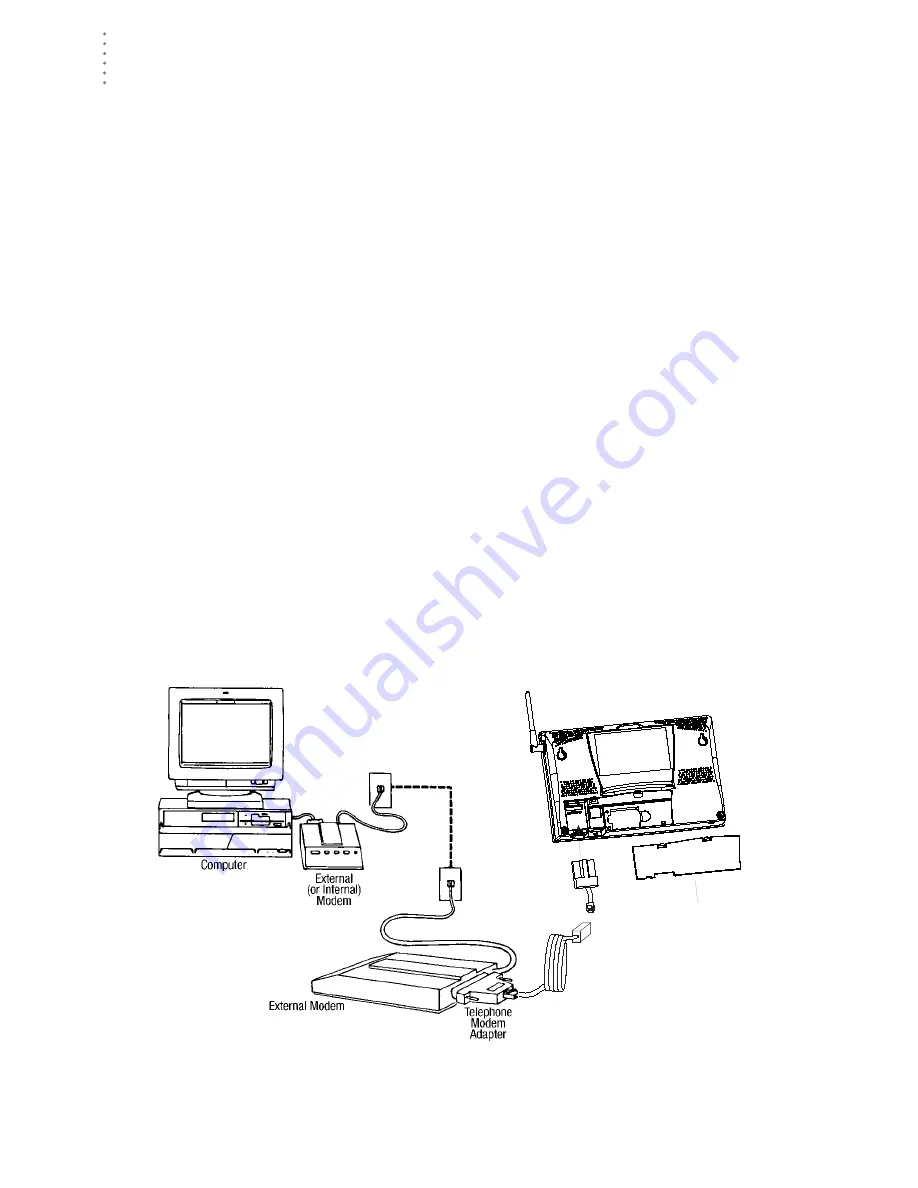
The illustration below shows a typical phone modem connection. This involves 
connecting the data logger to the weather station and to a modem at the station 
console site and connecting your computer’s modem to a phone line, which will 
allow you to dial the weather station.


T


YPICAL


 P


HONE


 M


ODEM


 I


NSTALLATION


Note:


Before installing the console and modem at a remote location, test the data logger and con-
nection first using a direct connection like that shown in the section above.

Vantage Pro console

battery cover

8' (2.5 m)

data logger

cable 

data logger

Summary of Contents for and Vantage Pro

Page 1: ...Getting Started Guide WeatherLink Vantage ProTM Product 6510 For...

Page 2: ...r more of the following measures Reorient or relocate the receiving antenna Increase the separation between the equipment and receiver Connect the equipment into an outlet on a circuit different from...

Page 3: ...ct Davis Instruments technical support at 510 732 7814 Loopback connector The loopback connector is a short piece of cable with a phone plug at one end and a red plastic cap at the other The loopback...

Page 4: ...ry for the data files depends on the archive inter val Database files containing data stored at a 30 minute archive interval require approximately 36K of disk space per month of data The file size cha...

Page 5: ...logger may cause damage to the data logger or console 3 Carefully insert the data logger into the large receptacle jack marked EXPANSION inside the battery compartment Guide the data logger cable thro...

Page 6: ...eatherLink s bul letin summary or real time strip charts if the console is attached to the computer 8 Check the Baud rate settings on the console Enter the console SETUP mode by pressing and holding t...

Page 7: ...he battery cover from the console back and remove all power by removing the batteries and AC power adapter if present Failure to remove power to the console before installing the data logger may cause...

Page 8: ...have to turn the console on and off again A Few Notes About Phone Modem Connections If you indicate a phone modem connection when setting up your station the soft ware automatically dials the station...

Page 9: ...with your station you must add your station to WeatherLink s database which means naming the station configuring the software to work with that station and with your computer hardware and setting stat...

Page 10: ...Set Barometer Elevation Set the barometric pressure and your elevation on the station and on the soft ware Set Rain Calibration Set the station s rainfall calibration number Set Temperature and Humid...

Page 11: ...ocedure for locating the serial port to which your sta tion is connected or determining whether that serial port is working Using the Loopback command as opposed to Test will help you find the correct...

Page 12: ...d serial ports and inform you of the COM port at which the loopback connector is located The software automatically selects the correct COM port for you in the Serial Port dialog box If it cannot find...

Page 13: ...he first beep tells you the processor is running The second beep will be for the logger if installed and the third beep is for the display If you do not hear one or more of these beeps contact Davis I...

Page 14: ...e time and date on the weather station are correct I have duplicate records in my database Why If you do not download from the data logger prior to changing the weather station s time and date for a D...

Page 15: ...ower to the sta tion Note Make sure to put the console in Setup Mode by pressing the DONE and DOWN arrow keys before removing the batteries The ensures the station will not try to write any data when...

Page 16: ...lose Window F1 Context Sensitive Help F2 Sunrise Sunset Report F7 NOAA This Month F8 NOAA This Year Strip Chart Window ESC Halt redraw Ctrl M Make Default Ctrl P Print Strip Chart F1 Context Sensitive...

Reviews: