background image


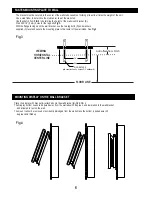
MOUNTING DISPLAY ON THE WALL BRACKET


XXXX


Fig 3

Fig 4


FLOOR LINE

   VIEWING 

 HORIZONTAL

CENTER LINE

24

"

16 

"

WOOD STUDS

(std construction 2 x 4 studs/1/2” wallboard)

The bracket must be secured to the center of the wall studs capable of holding at least four times the weight of the unit. 
Use a stud finder to determine the stud center line of the wall stud. 
Use the sketch from 

FIG 2

 to determine the height of the wall mount bracket (B).

Pre drill 3/16” (5 mm) holes for the lag bolts 

Fig 3.

With the flange facing up on the wall bracket, use the two lag bolts (D) and washers 
supplied (C) level and secure the mounting plate to the center of the wall studs. See 

Fig 3


FASTEN MOUNTING PLATE TO WALL

Add offset from FIG 5


Place the display with bracket (A) attached onto the wall bracket (B) SEE FIG 4
The Display bottom needs to be puled away from the wall about 20 degrees, and lowered onto the wall bracket 
     and allowed to rest on the wall. 
The mount cannot be removed or accidently dislodged from the wall unless the bottom is pulled away 20 
     degrees and lifted up.

6

Summary of Contents for PDR psfm3042

Page 1: ...esponsibility for injuries and damages that may occur due to improper installation and handling Please remember that if you remove the panel display from the wall later you will find the screw holes and anchor bolts for the mounting unit left on the wall Also note that long use of the panel display may discolor the wall around it due to its heat and airflow To ensure customer safety be sure to dec...

Page 2: ...ient clearance in regard to the surroundings to avoid blocking the ventilation The internal temperature could elevate and possibly result in fire Install the panel 4 or more away from surroundings Install only on a vertical surface Avoid sloped surfaces Also do not install facing upward The internal temperature could elevate and possibly result in fire Injury or damage could also result from falli...

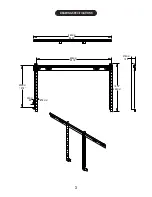
Page 3: ...DRAWING SPECIFICATIONS 25 18 639mm 13 78 350mm 98 25mm ø 8 mm 16 13 409mm 1 24 31 5mm 26 00 660mm 3 ...

Page 4: ... x 40mm Philip screws 4 pcs Plastic spacer 4 pcs Display bracket 2 pcs F E 6 mm x 16 mm Phillip screws 4 pcs 5 16 Flat washers 4 pcs 8mm x 16mm Philip screw 4 pcs G Square multi mount washers 4 pcs use with E F G H Lor M mounting screws H 5 mm x 40 mm Phillip screws 4 pcs 4 mm steel flat washer 4 pcs 4mm x 16 phillips screw 4pcs PARTS LIST 4 ...

Page 5: ...top See Fig 1 Fig 2 Attach the bracket using the mounting holes that will place the top of the bracket closest to the top of the display using the proper screws and the square multi mount washers supplied E F G J and H NOTE In some applications the plastic spacer N and longer screws K L M may be required to add clearance for the back panel to allow enough tilt to locate on the wall mount bracket B...

Page 6: ...cket B Pre drill 3 16 5 mm holes for the lag bolts Fig 3 With the flange facing up on the wall bracket use the two lag bolts D and washers supplied C level and secure the mounting plate to the center of the wall studs See Fig 3 FASTEN MOUNTING PLATE TO WALL Add offset from FIG 5 Place the display with bracket A attached onto the wall bracket B SEE FIG 4 The Display bottom needs to be puled away fr...

Page 7: ...this page is blank ...

Reviews: