31
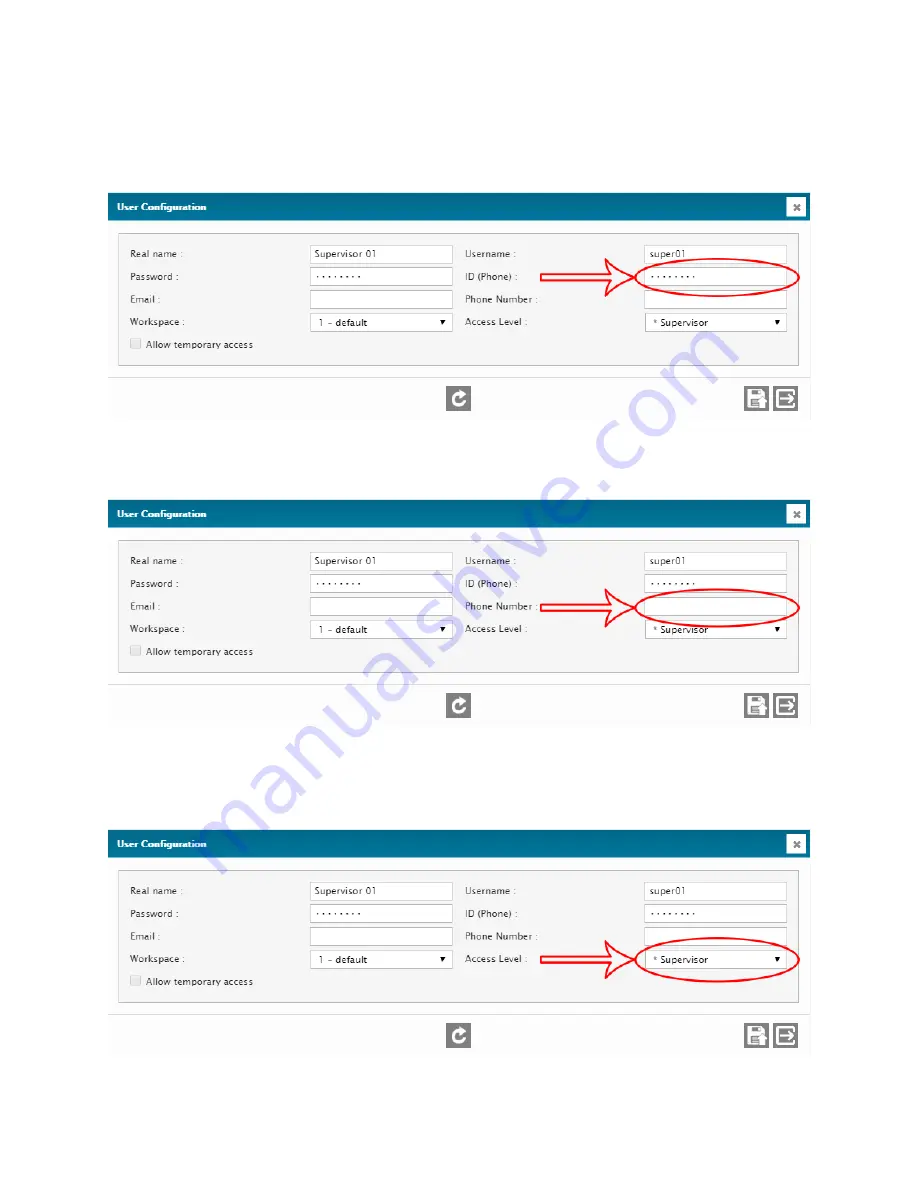
6. ID (Phone): Set an identification number associated with the user and used for
phone access. This ID is used instead of a usual username and password, which
simplifies login and alarm acknowledgement by telephone.
7. PHONE NUMBER: Set the user's phone number.
8. ACCESS LEVEL: Set the access level of the
user’s
account (can be a default access
level or a custom access level).
Summary of Contents for Cortex 360
Page 15: ...15 2 Go to IP Configurations...
Page 17: ...17 4 IP ADDRESS Set the IP address of the unit 5 NETMASK Set the Netmask of the unit...
Page 19: ...19 8 SAVE Save the screen content 9 EXIT Exit menu...
Page 20: ...20 Configuring the Cortex 360 IP Parameters E mail tab 1 Go to the E mail tab...
Page 27: ...27 Configuring Users Go to the Users menu...
Page 33: ...33 Configuring Site ID Go to Site ID...
Page 35: ...35 4 SAVE Save the screen content 5 EXIT Exit menu...
Page 36: ...36 Configuring Date Time and Location 1 Go to Time Date and Location...
Page 40: ...40 7 SYNC NOW Perform a manual clock synchronization 8 SAVE Save the screen content...
Page 42: ...42 Configuring Alarm Call Lists 1 Go to Alarm Call Lists...
Page 55: ...55 Configuring Alarm Parameters Go to Alarm Parameters...
Page 58: ...58 1 Go to the Inputs menu 2 Go to AC Power Fail...
Page 62: ...62 10 Save the configuration 11 Exit the configuration screen...
Page 67: ...67 6 Your setup should look like this You are now ready to move on to the configuration step...
Page 68: ...68 Configuring Metering Inputs 1 Go to the Inputs menu 2 Go to Metering Inputs...
Page 71: ...71 6 Go to the Actions tab 7 Set the Voltage Range to 2 5...
Page 72: ...72 8 Set the desired Measurement Unit Fahrenheit Celsius For this example we will be using F...
Page 75: ...75 11 Set the Low and High Limits These limits determine when the alarm will go off...
Page 77: ...77 13 Save the configuration 14 Exit the configuration window...
Page 81: ...81 4 Your setup should look like this You are now ready to move on to the configuration step...
Page 86: ...86 8 Save the configuration 9 Exit the configuration screen...
Page 91: ...91 6 Your setup should look like this You are now ready to move on to the configuration step...
Page 103: ...103 3 In the System Status tab select the Log Transfer Type 4 Select the Callout Device...
Page 105: ...105 7 Set the Number of attempts 8 Set the Delay between attempts in minutes...
Page 107: ...107 11 Go to the System Log tab 12 Select the Log Transfer Type...
Page 108: ...108 13 Select the Callout Device 14 Set the Transfer Time...
Page 109: ...109 15 Set how often the transfer will occur 16 Set the Number of attempts...
Page 112: ...112 21 Exit the configuration screen...
Page 124: ...124 2 Go to IP Configurations...
Page 126: ...126 4 IP ADDRESS Set the IP address of the unit 5 NETMASK Set the Netmask of the unit...
Page 128: ...128 8 SAVE Save the screen content 9 EXIT Exit menu...
Page 129: ...129 Configuring the Cortex 320 IP Parameters E mail tab 1 Go to the E mail tab...
Page 136: ...136 Configuring Users Go to the Users menu...
Page 142: ...142 Configuring Site ID Go to Site ID...
Page 144: ...144 4 SAVE Save the screen content 5 EXIT Exit menu...
Page 145: ...145 Configuring Date Time and Location 1 Go to Time Date and Location...
Page 150: ...150 7 SYNC NOW Perform a manual clock synchronization 8 SAVE Save the screen content...
Page 152: ...152 Configuring Alarm Call Lists 1 Go to Alarm Call Lists...
Page 165: ...165 Configuring Alarm Parameters Go to Alarm Parameters...
Page 168: ...168 1 Go to the Inputs menu 2 Go to AC Power Fail...
Page 172: ...172 10 Save the configuration 11 Exit the configuration screen...
Page 178: ...178 Configuring Metering Inputs 1 Go to the Inputs menu 2 Go to Metering Inputs...
Page 181: ...181 7 Set the desired Measurement Unit Fahrenheit Celsius For this example we will be using F...
Page 184: ...184 10 Set the Low and High Limits These limits determine when the alarm will go off...
Page 186: ...186 12 Save the configuration...
Page 187: ...187 13 Exit the configuration window...
Page 191: ...191 4 Your setup should look like this You are now ready to move on to the configuration step...
Page 201: ...201 6 Your setup should look like this You are now ready to move on to the configuration step...
Page 213: ...213 3 In the System Status tab select the Log Transfer Type 4 Select the Callout Device...
Page 215: ...215 7 Set the Number of attempts 8 Set the Delay between attempts in minutes...
Page 217: ...217 11 Go to the System Log tab 12 Select the Log Transfer Type...
Page 218: ...218 13 Select the Callout Device 14 Set the Transfer Time...
Page 219: ...219 15 Set how often the transfer will occur 16 Set the Number of attempts...


