Dateq MusiCall Installation Manual Download Page 19

EN

MusiCall Installation manual 

Connecting

4

Connecting the system

Connecting the audio-sources

All sources with a standard line-level outputs on cinch-
connectors can be connected directly to the audio-
inputs.
The MusiCall central is a mono-switch matrix, however two cinch connectors are 
available so that a stereo source can be easily connected. The stereo signal will be 
immediately converted to mono.
When two audio-sources have different output levels this can be adjusted with the 
configuration software. See the chapter ‘Configuration’. 

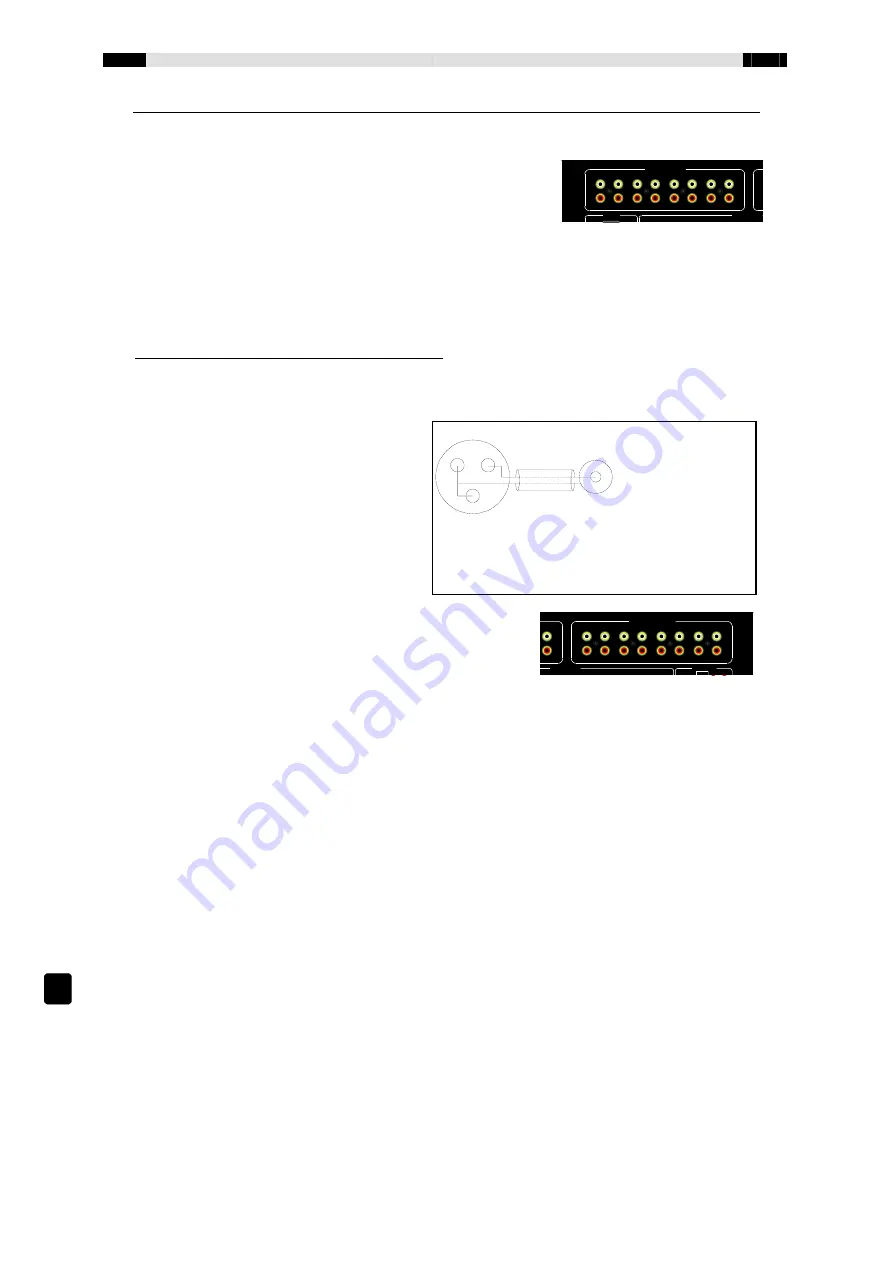
Connecting devices with balanced outputs
Audio-devices with a balanced output on a XLR-connector can be connected with a 
converter-cable.

See the drawing for the
correct connections:

Connecting the amplifiers

The amplifiers are connected to the audio-outputs of 
the MusiCall unit. These (mono) outputs are at 
normal line-level. 
Refer to the amplifiers manual for correct 
connections.

Connecting the Qfm

The Qfm is connected to the MusiCall system with four cinch-cinch cables. Because 
the Qfm is a stereo tuner it is important to connect both the left and the right audio 
channels! The Qfm can be connected to any of the eight audio inputs.
To use all of the Qfm’s features connect the RS232 cable between the Qfm and the 
MusiCall central. This cable makes it possible for the Qfm to communicate with the 
MusiCall unit, so that the RDS information can be showed, and the remote-control 
functions are enabled.

The antenna is connected to the Qfm tuner with a F-connector. The antenna output 
can be used to connect another tuner to the same aerial.

x

The antenna input is galvanically insulated from the rest of the tuner to prevent 
from ground-loops. 

Audio inputs

Controllers

RS232

Power

Mains:

30V/ 50Hz/ 
0VA

use:
15mA slow

Zone 1

Zone 2

Zone 3

Zone 4

Zone 5

Zone 6

Input 1

Z

Input 2

Input 3

Input 4

Input 5

Input 6

Input 7

Input 8

Audio outputs

Controllers

Remotes

Zone 5

Zone 6

Zone 7

Zone 8

Console 1

Console 2

Line

Hybrid

Logic

Zone 1

Zone 2

Zone 3

Zone 4

Zone 5

Zone 6

Zone 7

Input 8

Zone 8

Made by:

!

1

3

2

XLR-Female

Cinch

x

Connect XLR pin 2 to the signal pin of the cinch 
connector

x

Short XLR pin 1 and 3 and connect to the ground pin of 
the cinch connector

Summary of Contents for MusiCall

Page 1: ...MusiCall Installatie handleiding Installation manual ...

Page 2: ......

Page 3: ...ttelijk goedgekeurde rand geaarde netspanningsaansluiting 11 De netspanningskabel of het netspanningssnoer dient zo gelegd dat er redelijkerwijs niet overheen gelopen kan worden of geen voorwerpen op of tegenaan geplaatst kunnen worden welke de kabel kunnen beschadigen Speciaal moet rekening gehouden worden met het punt waar de kabel vast zit aan het apparaat en waar de kabel vastzit aan de netspa...

Page 4: ...k om op de bedieningseenheden RDS informatie van de beluisterde radiostations te ontvangen en eventueel de tuners op afstand te bedienen Product ondersteuning Voor vragen over het Musicall systeem accessoires en andere produkten kunt u contact opnemen met Dateq Audio Technologies B V De Paal 37 Telefoon 036 54 72 222 1351 JG Almere Fax 036 53 17 776 Nederland E mail info dateq nl Internet www date...

Page 5: ...t de Qfm een stereo tuner is moeten zowel het linker als het rechter audiokanaal worden aangesloten De uitgangen van de Qfm kunnen in principe op iedere willekeurige ingang van de centrale worden aangesloten Om de volledige functionaliteit van de Qfm tot zijn recht te laten komen moet ook de RS232 verbinding tussen de Qfm en de centrale worden aangebracht Deze draad maakt communicatie tussen de tu...

Page 6: ...toring op het audiosignaal te voorkomen moet voor de lokale audio ingangen afgeschermde kabel bijvoorbeeld microfoonkabel worden gebruikt De afscherming van de microfoonkabel kan aan de centrale worden bevestigd aan de min pool van het connectorblokje Eventueel kan de afscherming bij de MRA worden bevestigd aan de middelste pen op het aansluitblokje zie aarde figuur op de tekening Let bij het inst...

Page 7: ...van de WallUnit verschijnt de text Musicall Please wait en na enige tijd No data from host in beeld Æ Controleer met behulp van een multimeter de spanning op de aansluitklemmen van de WallUnit met de Wallunit aangesloten Normaal gesproken zal dit 24Vdc zijn Bij een erg lange kabel zal de spanning iets zakken omdat er spanningsverlies over de kabel optreed De WallUnit zal blijven werken tot ongevee...

Page 8: ...kken Druk op Auto search en de computer zal nu zelf de MusiCall centrale proberen te vinden Druk nu op Save om de gevonden comport te bewaren en sluit het scherm door op OK te drukken Verbinding met de centrale maken Druk op Connection Æ Connect of druk op F10 om de verbinding met het systeem actief te maken De instellingen worden gedownload in het geheugen Afhankelijk van de configuratie zullen d...

Page 9: ...rdt gebruikt om geluidsniveau bij het inschakelen van het systeem in te stellen De schuifbalk Main volume geeft de maximale geluidssterkte in een ruimte weer De volumeindicatie op het scherm van de WallUnits blijft altijd van 1 tot 30 lopen het geluid zal echter zachter klinken als de schuifbalk lager wordt ingesteld Iedere uitgang heeft een tweebands equaliser en een loudness instelling Met schui...

Page 10: ...chuifbalk kan de tijd worden ingesteld dat het backlight van het tableau aanblijft zodra een toets is ingedrukt Keyboard layout Het type toetsenbord dat is aangesloten op de console kan hier worden ingesteld Programming Met deze twee selectievakjes kan worden aangegeven welke consoles de centrale mogen configureren Door het vakje uit te schakelen kan het programmeermenu niet worden benaderd Host i...

Page 11: ...rden geselecteerd door de andere zones Als een tuner in een van de scrollijsten is opgenomen is het vakje assign tuner niet selecteerbaar Om de status te kunnen wisselen moet de tuner eerst uit alle scrollijsten worden verwijderd Scrolls In dit scherm staan de scrollijsten per zone weergegeven Iedere zone kan dus een eigen lijst met ingangsbronnen beschikbaar hebben In dit voorbeeld is een tuner t...

Page 12: ...t Door het vakje Keys on front enabled kan de bediening van de Qfm worden in of uitgeschakeld Dit voorkomt dat de instellingen van de tuner per ongeluk worden aangepast Als alle presets zijn ingesteld kan op Upload worden gedrukt om de nieuwe presets op te slaan in de tuner Qfm bediening Met de hoofdtelefoonaansluiting op het front kan een van de vier tuners worden afgeluisterd De actieve tuner st...

Page 13: ...is Dit scherm zal automatisch worden aangepast zodra een van de zones de instelling aanpast WallUnits In dit scherm wordt zichtbaar gemaakt op welke zones de WallUnits zijn aangesloten en welke firmware versie in de WallUnits is geladen Tevens kunnen de master slave koppelingen worden weergegeven Door een master of slave zone aan te wijzen met de muisaanwijzer worden de andere gekoppelde zones wee...

Page 14: ...angs volume instelling 0 50 dB in 20 stapjes van 1 25 dB en 10 stapjes van 2 50dB daarna mute 75 dB THD N 0 08 CCIR RMS 0dBu FREQUENTIEKARAKTERISTIEK Ingang naar uitgang 25 Hz 25 kHz 1 dB WALLUNIT AANSLUITINGEN Uitgangsspanning 24V Maximale uitgangsstroom 110mA met ingebouwde automatische zekering CONSOLE AANSLUITINGEN Uitgangsspanning 24V Maximale uitgangsstroom 350mA met ingebouwde automatische ...

Page 15: ......

Page 16: ......

Page 17: ...e equipment may only be connected to a legally approved earthened mains power supply 11 The power cable or power cord must be positioned such that it cannot be walked on in normal use and objects which might damage the cable or cord cannot be placed on it or against it Special attention must be paid to the point at which the cable is attached to the equipment and where the cable is connected to th...

Page 18: ...Another nice feature is the possibility to remotely control the tuner Product support If you have any questions about the MusiCall system or other DATEQ products please contact Dateq Audio Technologies B V De Paal 37 1351 JG Almere The Netherlands Telephone 31 36 54 72 222 Fax 31 36 53 17 776 E mail info dateq nl Internet www dateq nl www musicall nl Audio inputs Audio outputs Controllers Remotes ...

Page 19: ...ch cinch cables Because the Qfm is a stereo tuner it is important to connect both the left and the right audio channels The Qfm can be connected to any of the eight audio inputs To use all of the Qfm s features connect the RS232 cable between the Qfm and the MusiCall central This cable makes it possible for the Qfm to communicate with the MusiCall unit so that the RDS information can be showed and...

Page 20: ... unit will not get defective Internally a gain trimmer is available to adjust the sensitivity To prevent from interference use shielded cable i e microphone cable to connect the local audio inputs to the MusiCall central unit The shielding must be connected to the minus of the green connector at the MusiCall host At the MRA the shielding can be connected to the middle pin of the XLR connector See ...

Page 21: ...e Wallunit the text Musicall Please wait and after some time No data from host appears Æ Check the voltage on the wallunits connector with the wallunit connected In a normal situation this should be approximately 24Vdc On a very long cable length this could be slightly lower because of the voltage drop over the cable The wallunits will work up to 13Vdc When the voltage without the wallunit is 15Vd...

Page 22: ...y clicking OK Connecting to the host Select Connection Æ Connect or push F10 to establish the connection to the system Some settings will be downloaded to the computers memory Depending on the configuration the menu s MusiCall Host and Qfm will be made active To configure the system the menu MusiCall host Æ Configure host has to be selected The configuration window now appears Adjusting the config...

Page 23: ... output equaliser The output will latch the settings when the Update button is pushed and the box Update outputs after upload is selected Paging and chimes can be disabled for each individual zone besides the paging volume can have an additional boost of 6 or 12dB When the check box add 6dB to local is selected the volume of the local input will be amplified with 6dB to increase the intelligibilit...

Page 24: ...e can be configured here Programming Enable the selection box if the console may configure the MusiCall host Uncheck the box to disable this function Host settings The left box shows the master slave combinations Click with the mouse pointer on a master zone and the slaves will be displayed It is now possible to add or remove slave zones The right box indicates the zones that belong to group A and...

Page 25: ...r can not be selected To change the status the tuner has to be removed from all the scrolls first Scrolls This window shows the scroll list for each zone Each zone can have its own list of inputs In this example a tuner is assigned to this output All 30 presets of the Qfm can be selected as input for the scroll list When no tuner is assigned to the output zone the right window will not be visible ...

Page 26: ...t enabled can enable or disable the four switches on the front to prevent accidental switching the tuner to a different preset Operating the Qfm The headphones output can be used to monitor the signal of the currently selected tuner The tuner number is showed in the display To switch to another tuner simply press the or the key on the Qfm front To select a preset push the PSet key The LCD screen s...

Page 27: ...onitor the output volume This window is automatically updated when any of the settings is changed Wallunits This window shows the connected wallunits and their firmware revisions Another feature is the possibility to show the master slave combinations When the a master or slave zone is selected with the mouse pointer all the combined zones will light up green Consoles The status and the firmware r...

Page 28: ...teps of 1 25 dB Output volume adjustment 0 50 dB in 20 steps of 1 25 dB and 10 steps of 2 50dB then mute 75 dB THD N 0 08 CCIR RMS 0dBu FREQUENCY RESPONCE Input to output 25 Hz 25 kHz 1 dB WALLUNIT CONNECTIONS Output voltage 24V Maximum output current 110mA with internally automatic fuse CONSOLE CONNECTORS Output voltage 24V Maximum output current 350mA with internally automatic fuse COMMUNICATION...

Reviews: