background image

2

I-Class

1.0.1

Standard Features

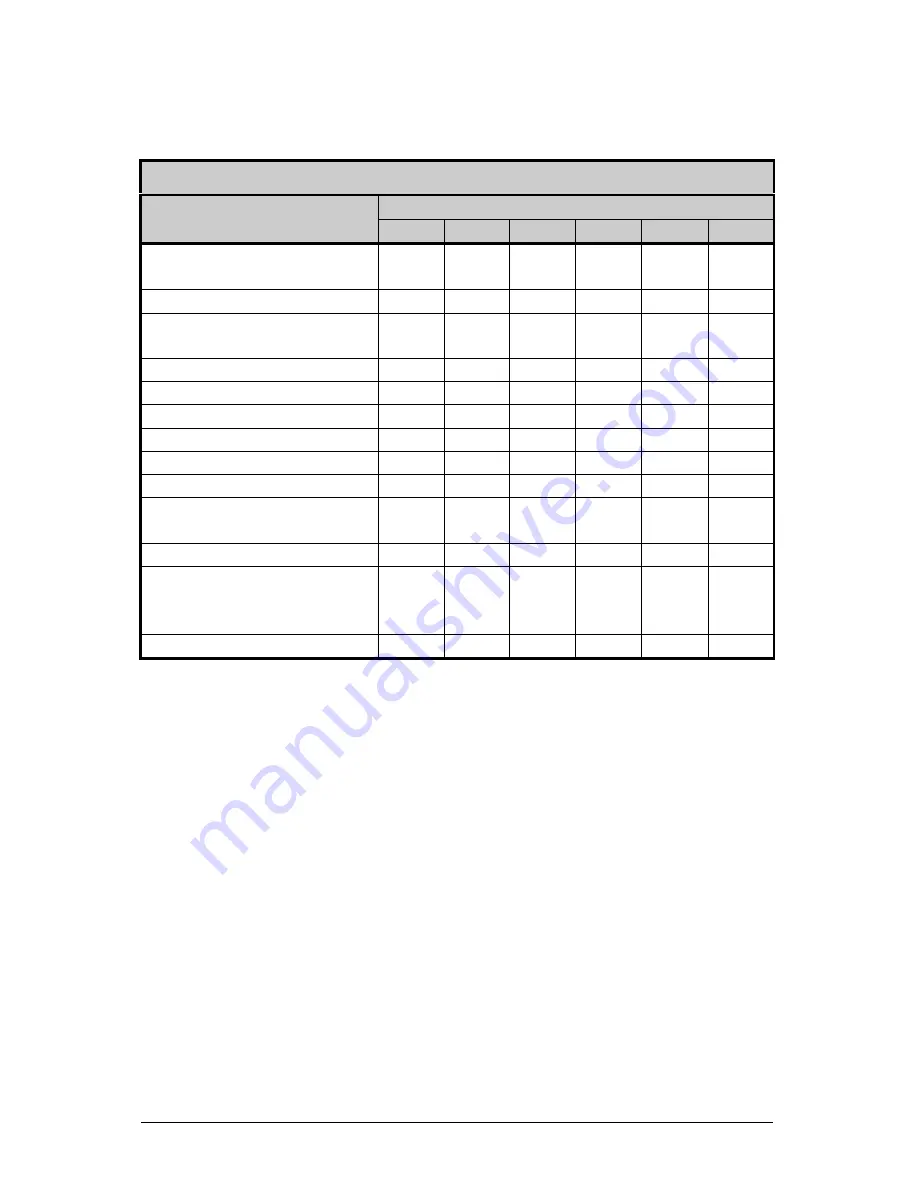
This printer offers the following standard features:

I-Class Standard Features Listing

Model

Feature

4206

4208

4212

4308

4406

4604

Printhead Density (Dots
Per Inch)

203

203

203

300

406

600

Direct  Thermal  Printing

X

X

X

X

X

X

On-Demand and Batch
Printing

X

X

X

X

X

X

Rotating  Media  Hub

X

X

X

X

X

X

Media  Tear  Bar

X

X

X

X

X

X

Fan-fold media capability

X

X

X

X

X

X

Flash memory

1MB

1MB

2MB

2MB

2MB

2MB

SDRAM

8MB

8MB

16MB 16MB 16MB 16MB

RS-232 interface port

X

X

X

X

X

X

IEEE 1284 Compliant
parallel interface port

X

X

X

X

X

X

Liquid  Crystal  Display

X

X

X

X

X

X

EFIGS (multi-language
display and configuration
label support)

X

X

X

X

X

X

AGFA  Scalable  font  engine

X

X

X

X

X

X

1.0.2

Optional Features 

(available except as noted)

The printer offers the following optional features:

Cutter, Light-Duty (Backing-Only)

A rotary-type mechanism to automatically cut material with a maximum
thickness of .005” (.127 mm) into minimum lengths of 1.25 inches (31.8 mm).
An adjustable tray to collect up to 200 cut labels and tags is also available.

Cutter, Standard Duty

A rotary-type mechanism to automatically cut material with a maximum
thickness of .010” (.254 mm) into minimum lengths of 1.25 inches (31.8 mm).
An adjustable tray to collect up to 200 cut labels and tags is also available.

Summary of Contents for I-4206

Page 1: ...innacles Harlow Essex CM19 5FE UK Phone 44 1279 772200 Fax 44 1279 424448 Asia Pacific 19 Loyang Way 01 01 CILC Building Singapore 508724 Phone 65 542 2611 Fax 65 542 3611 Corporate Headquarters 4501 Parkway Commerce Blvd Orlando Fl 32808 Phone 407 578 8007 Fax 407 578 8377 ...

Page 2: ......

Page 3: ... or permit any other person or party to duplicate or copy the Firmware or the information contained in the non volatile or programmable memory The firmware Software is protected by applicable copyright laws and Licensor retains all rights not expressly granted In no event will Licensor or its suppliers be liable for any damages or loss including direct incidental economic special or consequential ...

Page 4: ... responsibility that this product conforms to the following standards or other normative documents EMC EN 55022 1993 Class B EN 50024 1998 Safety This product complies with the requirements of EN 60950 All 1997 Gost R Resolution S I C M No 799 99 FCC This device complies with FCC CFR 47 Part 15 Class A Note This equipment has been tested and found to comply with the limits for a Class A digital de...

Page 5: ......

Page 6: ...ng instruction labels on the printer Install the printer on a flat firm surface Do not place the printer on or near a heat source To protect your printer from overheating make sure no openings on the printer are blocked Never insert anything into the ventilation slots and openings of the printer Do not use the printer near water or spill liquid into it Ensure that the AC power source matches the r...

Page 7: ...tion 10 2 0 2 Additional Requirements 10 2 1 Media and Ribbon Selection 11 2 1 1 Print Quality Controls 11 Setting Up the Printer 3 0 Installation 13 3 0 1 Communications 14 3 1 Loading Media 17 3 1 1 Roll Media 18 3 1 2 Fan Fold Media 19 3 2 Media Sensor Adjustment 20 3 3 Loading Ribbon 21 3 4 Quick Media Calibration 23 3 5 Outputting Labels 24 3 5 1 Rewinding 24 3 5 2 On Demand Dispensing 26 3 5...

Page 8: ...trol 37 4 1 4 Printer Options 39 4 1 5 System Settings 43 4 1 6 Communications 53 4 1 7 Diagnostics 58 4 2 Display Messages 60 4 2 1 User Prompts and Condition Messages 60 4 3 Quick Test Mode 62 4 3 1 Print Quality Label 62 4 3 2 Configuration Label 63 4 3 3 Quick Ribbon Test Label 64 4 3 4 Dot Test Pattern Label 65 4 3 5 Validation Label 66 4 3 6 User Defined Label 66 Adjusting and Maintaining th...

Page 9: ...ible Problems during an Update 86 5 5 Boot Loader Program Updates 87 Troubleshooting 6 0 Problem Resolution 89 6 1 Fault and Warning Messages 93 6 2 Hex Dump Mode 101 Printer Specifications 7 0 General Specifications 103 7 1 Media and Ribbon Requirements 105 Appendix A ASCII Control Code Chart 107 Appendix B Available Fonts and Bar Codes 109 Appendix C Module Assignments 117 Print Resolutions and ...

Page 10: ...iv Appendix E Menu System Multi Language Support 121 Advance File Handling Information 124 Appendix F Saving a Configuration File 127 Warranty Information 129 Glossary 133 ...

Page 11: ...he information necessary for everyday printer operation To begin printing labels refer to the instructions provided with the label creation software you have chosen If you wish to write custom label programs a copy of the I W Class Programmer s Manual is included on the enclosed Datamax Accessories CD otherwise a copy may be downloaded from our web site at http www datamaxcorp com The printer s mo...

Page 12: ...t X X X X X X Liquid Crystal Display X X X X X X EFIGS multi language display and configuration label support X X X X X X AGFA Scalable font engine X X X X X X 1 0 2 Optional Features available except as noted The printer offers the following optional features Cutter Light Duty Backing Only A rotary type mechanism to automatically cut material with a maximum thickness of 005 127 mm into minimum le...

Page 13: ...DDNS Lightweight Directory Access Protocol LDAP Novell YES certified Novell NetWare PSERVER on both bindery based and Novell Directory Services NDS LPR LPD over TCP IP for UNIX platforms and Microsoft s Windows Raw sockets support over selectable TCP IP port with filters for selected UNIX environment IP and IPX SNMP support of MIB 2 proprietary NIC MIB and public and proprietary private Printer MI...

Page 14: ...ont Kanji Gothic B Scalable font Simplified Chinese GB Scalable font Korean Hangul Scalable font ILPC CG Times Firmware The firmware can be upgraded to include the Datamax ILPC International Language Printing Capability CG Times font This supports the Datamax Enhanced Language Code Pages Internal Rewinder An internal mechanism to wind six inch outer diameter rolls of printed labels or the label ba...

Page 15: ...le drop interface hardware to support greater distances from the host at communication rates of up to 38 400 baud Thermal Transfer specify configuration at time of order A printing method that uses ribbon to produce exceptional image clarity as compared to most direct thermal media types This option must be specified for use with either coated side in ribbon or coated side out ribbon Twinax Coax I...

Page 16: ... trays Light Standard Duty Operator DMXNet DMX Certified Technician External Keyboard Operator External Media Rewinder Operator Font Expansion Card DMX Certified Technician ILPC DMX Certified Technician Internal Rewinder Operator I O Expansion Card DMX Certified Technician Linear Scanner Factory only Peel and Present Mechanism Operator Present Sensor Operator RS 422 Serial Interface DMX Certified ...

Page 17: ...I Class 7 1 2 Hardware Components The following drawing highlights the user assessable components of the printer Items denoted with an asterisk are optional equipment ...

Page 18: ...8 I Class ...

Page 19: ...ou will need to remove the tape and foam placed there for shipment Complete the following steps prior to connecting power or attempting to load media n With the arrow on the box pointing up open the box o Remove Accessories Box p Tilt the printer on its side and slide the printer out of its box q Place the printer in an upright position and remove the packing foam plastic bag and tape Note It is a...

Page 20: ...ries CD Any special or additionally purchased items 2 0 2 Additional Requirements The following items are necessary to produce labels Contact your dealer or a customer support representative for advice on which media and software may best suit your needs A serial or parallel interface cable see Section 3 0 1 Applicable media see Section 2 1 for suggestions and Section 7 1 for requirements Applicab...

Page 21: ...ion for the printhead and may also provide an anti static coating For additional printhead protection use ribbon with a slightly greater width than the overall width of the label and backing material 2 1 1 Print Quality Controls The printer provides flexibility with a comprehensive set of print controls Of these the amount of heat applied by the printhead and the rate of media movement will have t...

Page 22: ...at at higher rates of speed it cannot react fast enough To print fine images at higher speed media with lower reaction or release temperatures are required On the slower end of the print rate settings crisper images are possible because the media is not being stretched beyond its limits The following table is intended for reference only for specific application information consult your media speci...

Page 23: ...tch on the Printer is in the Off position p Depending upon your interfacing requirements connect the appropriate interface cable between Host Computer and Printer see Section 3 0 1 q Connect the AC Power Cord to the receptacle on the back of the Printer and then plug the AC Power Cord into a properly grounded outlet The power supply automatically detects and then adjusts to the applied line voltag...

Page 24: ...al mode is forward channel communication and requires a Centronics cable with a 36 pin male connector Bi directional mode is IEEE 1284 Compliant using forward and reverse channel communications In this mode data can be sent to the host provided it is also IEEE 1284 Compliant and has supporting software This mode requires an IEEE 1284 cable with a Centronics 36 pin male connector Serial Port The se...

Page 25: ...ion ports Flow control can be either Xon Xoff or CTS DTR Diagram only provided for reference Not available for the I 4206 and I 4208 NIC Adapter optional The NIC Adapter has several menu selectable modes see Section 4 1 6 for details Refer to the information provided with the option for connection requirements and detailed operational instructions The Status Indicators viewable from the back of th...

Page 26: ...ADY However the NIC Adapter will NOT be able to receive data until its boot up process as denoted by the message DMXNET INITIALIZING is complete This process may take up to two minutes USB Port optional The USB Interface is supported under Windows 95 98 2000 ME XP Depending upon the operating system of your host computer installation may differ slightly Consult the additional documentation supplie...

Page 27: ...t away from the frame and then lower it to the down position q If using roll media the Media Hub can accept 3 0 inch 76mm and 1 5 inch 38mm cores To use 1 5 inch cores first slide off the 3 Inch Hub by grasping and then pulling it firmly outward r Proceed according to the type of media you are using go to Section 3 1 1 for Roll Media or go to Section 3 1 2 for Fan Fold Media ...

Page 28: ...rests lightly against the edge of the media q Position the Media Sensor see Section 3 2 r If your application uses thermal transfer media load ribbon see Section 3 3 otherwise continue s Lower the Printhead Assembly and rotate the Printhead Latch completely back into the locked position Close the Access Cover t Turn On the printer After Ready is displayed press and hold the FEED Key until at least...

Page 29: ...ia under the Media Idler through the Media Sensor and out the front of the printer q Raise and slide the Media Guide over until it rests lightly against the edge of the media r Position the Media Sensor see Section 3 2 s If your application uses thermal transfer media load ribbon see Section 3 3 otherwise continue t Lower the Printhead Assembly and rotate the Printhead Latch completely back into t...

Page 30: ...r Eye Mark into position over media according to the table below o If loading media return to the media loading instructions Media Sensor Selection and Adjustment Media Type Sensor Eye Mark Position Sensing Required Die cut Near the middle of the label Gap Notched Centered over the notch Gap Reflective Centered over the black mark Reflective Continuous Near the middle of the media Continuous See S...

Page 31: ...he Ribbon Supply Hub o Slide the ribbon onto the Ribbon Supply Hub until it rests against the hub s flange p Route the ribbon under the Ribbon Idler out the front of the printer and then up around to the Ribbon Take Up Hub winding it several times in a clockwise direction to secure it in place q If loading media return to the media loading instructions Otherwise lower the Printhead Assembly and ro...

Page 32: ...ub indicate the correct ribbon route Ribbon types are available with the ink coating layer wound in or out These types are NOT interchangeable for use with the printer Ribbon Routing Diagrams Coating Side In Ribbon Supply Hub Coating Side Out Ribbon Supply Hub ...

Page 33: ...dia allow at least one label gap or mark to advance under the sensor during this process Upon successful completion the Calibration Completed message will flash the printer will feed to the next label TOF and Ready will be displayed A Warning Low Backing message may appear if using notched media or media on a transparent liner however the calibration was successful Note Media containing large gaps...

Page 34: ...hen winding labels do not allow the outer diameter of the roll to exceed 6 inches 154 mm on the Media Rewind Hub n Remove the Front Fascia o Remove the Tear Plate by first removing the Thumbscrew p Position the Rewind Plate on the printer and install and tighten the Thumbscrew q If installed remove the Rewind Retainer and Media Clip from the Media Rewind Hub see drawing next page r Load media as d...

Page 35: ...ion the Rewind Retainer lightly against the edge of the media on the Media Rewind Hub Tighten the Thumbscrew to secure the retainer in place v Manually rotate the Media Rewind Hub to remove any slack in the media Close the Access Cover Removal Remove the Rewind Retainer and Media Clip Grasp the end of the hub While pulling outwardly squeeze the hub together to collapse it and then slide off the la...

Page 36: ...the printer pull outward on the Latch and allow the Roller Bracket to swing forward o With media loaded as described in Section 3 1 press the FEED Key to advance approximately 20 inches 51 cm of media Remove all of the labels from the backing material p Route the backing material through the Roller Bracket as shown the backing should go under the top black roller then out q Raise the Roller Bracke...

Page 37: ...ce t Position the Rewind Retainer lightly against the edge of the backing on the Media Rewind Hub Tighten the Thumbscrew to secure the retainer in place u Manually rotate the Media Rewind Hub to remove any slack in the media Close the Access Cover For on demand printing ensure that the Present Sensor has been enabled see Section 4 1 4 Removal Remove the Rewind Retainer and Media Clip Grasp the hub...

Page 38: ...o load media on a cutter equipped printer n Ensure the leading edge of media is clean straight and firmly attached to the liner o Load media according to Section 3 1 except route the media out through the Opening of the Cutter Assembly For label cutting ensure that the Cutter has been enabled see Section 4 1 4 ...

Page 39: ...o normal operation o The FEED Key advances one label and clears any corrected faults Pressing and holding causes the printer to perform a Quick Media Calibration see Section 3 4 p The CANCEL Key pauses the printer and then prompts you for confirmation If yes the current job is cancelled The printer remains paused Pressing and holding four seconds will reset the printer and clear temporary host set...

Page 40: ...o increments numerical values in most menu selections p The ENTER Key selects the function item or displayed value It also moves between selections within multiple parameter fields q The ESCAPE Key moves to the previous menu level and finally back to the Ready Mode r When a print job is in progress pressing the TEST Key will terminate the job The printer will prompt you for confirmation if Yes the...

Page 41: ... selected test label quantity of 2 100 1000 or 9999 except the Configuration Label quantity of one Holding down the key scrolls quantities q The ESCAPE Key will exit the Quick Test Mode without printing r The TEST Key will print the selected test label at the selected quantity During test label printing this key also functions as a cancel key the printer will prompt you for confirmation before can...

Page 42: ... Flashing indicates a Fault See Section 6 1 for a listing of associated messages 4 0 5 LCD n Liquid Crystal Display The display provides several types of information Following a brief power up sequence initialization the Ready message The time and date if the printer has received it from one of the following the host the front panel setting or the Time and Date option A label counter during a batc...

Page 43: ...SYSTEM RESET message flashes Note This reset has the same effect as the System Settings Set Factory Defaults selection in the menu system See Section 4 1 for a listing of the factory default settings and Section 4 1 5 for information about the Factory Setting File 4 0 6 3 Level Two Reset To return the printer to the factory default settings and clear all the calibration and adjustment parameters n...

Page 44: ...ting the menu system and answering Yes to the Save Changes prompt Changes made will be saved When power is removed the new settings will be restored upon power up The same functional commands from your host computer may in some cases override the printer s menu settings In addition as a security feature for the prevention of accidental or unauthorized changes the menu system has a password protect...

Page 45: ...rrect user definable password is required before accessing the Menu Mode functions KEEP HOST CHANGES ENTER YES You are now entering Menu Mode Existing Host commands have affected the configuration of the printer Pressing ENTER will save these changes otherwise the printer will revert to previously saved settings SAVE CHANGES ENTER YES You are now exiting Menu Mode but have made changes to the prin...

Page 46: ...n TOF marks gap or reflective If this limit is exceeded a top of form fault is declared PAPER OUT DISTANCE 00 25in 0 99 99 Sets the length of travel before an Out of Stock condition is declared LABEL WIDTH Sets the maximum limit for the printable surface width Objects extending beyond this limit will NOT print see Appendix C for the default values SENSOR CALIBRATION Adjusts the printer to sense yo...

Page 47: ... present distance see Appendix C ROW OFFSET 00 00in 0 99 99 Shifts the vertical start of print position This is the user setting for row adjustment COLUMN OFFSET 00 00 in 0 99 99 Shifts the horizontal left justified start of print position to the right without shifting the Label Width termination point to the right This is the user setting for Column Adjust PRESENT DISTANCE 0 00 in 0 4 00 Sets the...

Page 48: ...ffect these settings DARKNESS XX 1 64 Controls the printhead strobe time to fine tune the HEAT setting ROW ADJUST XXX DOTS 100 Æ 100 Shifts the vertical start of print position in dots upward or downward to fine tune the ROW OFFSET setting see Appendix C COLUMN ADJUST XXX DOTS 0 128 Shifts both the horizontal start of print position and the LABEL WIDTH termination point to the right in dots to fin...

Page 49: ...user may select from a list of available modules for formatting all data will be erased DELETE FILE The user may select from a list of available files for deleting protected modules will not appear Bytes will not be retrieved until the module that contained the deleted file is packed PACK MODULE Packing the module removes files marked as deleted and defragments existing file structures to recover ...

Page 50: ...u selections NOT INSTALLED No Scanner is detected MODE Enables bar codes to be read by the Scanner PICKET FENCE Reads horizontal bar codes individual bars appear like the pickets in a fence as the label exits the printer DISABLED Disables the scanner BARCODES Enables the scanner to read the respective bar code Also see Appendix B Note To maximize throughput and decoding integrity enable only those...

Page 51: ...the barcode will not pass until it has decoded the same values three times in succession Note Depending upon the print speed higher verification levels may cause erroneous failures when scanning multiple bar codes or bar codes that are small in height READ BARCODE 1X One decode per barcode READ BARCODE 2X Two decodes per barcode READ BARCODE 3X Three decodes per barcode READ BARCODE 4X Four decode...

Page 52: ...bles the GPIO for a Label Applicator BARCODE VERIFIER Enables the GPIO for the Barcode Verifier START OF PRINT Programmable signal input controlling the Start of Print SOP ACTIVE HIGH Signal must go high at SOP ACTIVE LOW Signal must go low at SOP END OF PRINT Programmable signal output for End of Print EOP LOW PULSE Low pulse generated at EOP HIGH PULSE High pulse generated at EOP ACTIVE LOW Sign...

Page 53: ...tivated file can not be deleted FACTORY SETTING FILE Provides a list of available configuration files The selected file will be restored whenever a Level 1 reset is performed see Section 4 0 6 2 INTERNAL MODULE 1024 KB Sets the number of 1K blocks allocated for the internal RAM D module Available memory dependent upon model see Appendix C DEFAULT MODULE D Sets the default module used to store file...

Page 54: ...ode TIME AND DATE Allows the user to set Time and Date MEDIA COUNTERS Internal record of inches printed and time of use ABSOLUTE COUNTER Shows the number of inches printed since being set at the factory Not resettable RESETTABLE COUNTER The number of inches printed since the last reset User may reset RESET COUNTER Resets the Resettable Counter to zero PRINT CONFIGURATION Prints the effective confi...

Page 55: ...l number of the application loaded wwxx represents the hardware software feature level where ww represents the hardware feature level of the main board PA PCB 51 2178 xx TB PCB 51 2301 xx xx represents the software feature level 10 Standard DPL 11 4208 20 Internal CG Times Font The printer will accept software feature levels up to the xx value This feature level requires Datamax authorization to u...

Page 56: ...r codes will not be printed An odd number of overlapping objects will print XOR Intersecting text strings images and bar codes print on top of one another OPAQUE Interacting text strings images and bar codes are obliterated by those formatted last Each character cell is treated as opaque IMAGING MODE Instructs the printer whether to pre image the label format Note This selection can affect the acc...

Page 57: ...nter settings made through the front panel SELECT SECURITY Enable or disable the menu system s security feature ENABLED Password protected DISABLED No protection MODIFY PASSWORD Modify the password required to access the menu system when security is enabled UNITS OF MEASURE Selects the measurement system in which the system s settings are represented in the menu system and on configuration labels ...

Page 58: ...ata Terminator I 2 of 5 Barcodes IDs D J and L the first non numeric character processed will terminate the barcode data field Bar Size I 2 of 5 Barcode ID L when the bar size is specified greater than P 25 the size is automatically decreased to 10 Human Readable Fonts The EAN and UPC barcodes IDs B C F G M and N print a fixed font size Lines and boxes Rotations 2 and 4 are affected by the vertica...

Page 59: ...ter than the printhead width are adjusted back to the printable area and printed DISABLED The above exception is disabled I 4206 I 4208 I 4212 Models DPI EMULATION For users who want to print DPL files intended for a 203 DPI printer DISABLED Label formats interpreted as intended for 406 DPI 203 DOTS PER INCH Label formats interpreted as intended for 203 DPI I 4406 Model DPI EMULATION For users who...

Page 60: ...tically feed two labels to setup the new print position 110 PRODPLUS Emulates the Prodigy Plus printer 220 ALLEGRO Emulates the Allegro printer 250 PRODIGY Emulates the Prodigy printer DISABLED No emulation natural start of print position BACK AFTER PRINT When the present distance is set with the cutter present sensor or GPIO option enabled this setting determines the timing of the label back up E...

Page 61: ...ines the action to be taken by the operator and the printer LEVEL Establishes the required corrective action following a fault 1 Stops and displays a fault message The FEED Key must be pressed to clear the fault and continue after the problem is corrected by the operator 2 Displays a fault message after the printer backs up and prints a VOID Message on the defective label no message will be printe...

Page 62: ...r the last retry the printer will stop and display a fault message Note If the CANCEL Key is pressed when the printer is faulted and the last printed label was not completed the operator has a choice to cancel the reprint of the last label Subsequent pressing of the CANCEL Key will allow canceling the entire label batch Pressing the CANCEL Key while the printer is stopped and faulted will indicate...

Page 63: ...1200 1200 bits per second PROTOCOL Sets the data flow control handshaking method BOTH Uses both handshaking methods SOFTWARE XON XOFF HARDWARE CTS DTR NONE No flow control is used PARITY Sets Word parity NONE No parity ODD Odd parity EVEN Even parity DATA BITS Sets Word length 7 Seven bit Word length 8 Eight bit Word length STOP BITS Sets the number of stop bits 1 One stop bit 2 Two stop bits SERI...

Page 64: ...ss these parameters for example during simultaneous telenet sessions NIC ADAPTER Network Interface Card Adapter optional If not present this displays NOT INSTALLED when accessed After making changes to these parameters save the changes exit the menu system and cycle the printer s power Off and On for the changes to take effect Note The boot process taking up to two minutes must be completed at pow...

Page 65: ...tion if Netware is not needed DISCOVERY This is the address discovery method used by the NIC Adapter if a static address is not utilized If no server for any of the discovery methods is found the static value specified above is used Note For faster NIC Adapter boot times disable any discovery methods not used DHCP Dynamic Host Control Protocol Automatically assign IP address from a DHCP Server ENA...

Page 66: ... SOH command Hex 7E STX command count by Hex 1B ESC Hex 0x0D Carriage Return ALTERNATE CODES 2 Hex 5E SOH command Hex 7E STX command count by Hex 1B ESC Hex 0x7C Carriage Return ALTERNATE CODES 3 Hex 5E SOH command Hex 23 STX command count by Hex 1B ESC Hex 0x0D Carriage Return FEEDBACK CHARACTERS Returns a Hex 1E RS after each label successfully prints and a Hex 1F US after each batch of labels i...

Page 67: ...DISABLED DPL Heat Commands are ignored The heat value is controlled via the menu setting see Print Control Section 4 1 3 SPEED COMMANDS Allows the user to disable the DPL speed commands Print Feed and Reverse ENABLED Normal printer operating mode DISABLED DPL speed commands are ignored The print feed and reverse speeds are controlled via the menu setting see Print Control Section 4 1 3 ...

Page 68: ... Present Sensor circuitry TEST CUTTER Performs a functional test of the optional cutter mechanism and circuitry PERFORM TEST 1 TIME The cutter will cycle 1 10 or 100 times selectable The results of each attempt will be displayed MONITOR GPIO INPUT TEST GPIO OUTPUT TEST SCANNER Performs a functional test of the Scanner SCAN TEST Enters read once mode A bar code is read and the decoded results are d...

Page 69: ...is example thermistor sensor transmissive gap media sensor TRAN is replaced with REFL when the SENSOR TYPE is set to reflective ribbon sensor 24 volt power supply sensor Å PS HD RANK 255 255 255 Present sensor head down sensor printhead ranking resistor RIBBON SENSOR LIMITS Displays ribbon sensor ADC low and high values used for motion detection RIBBON ADC LOW HIGH 070 164 Approximate default valu...

Page 70: ...ssages Displayed Message Description Condition s DMFBSJOH GBVMUT The printer is trying to clear a fault condition Occurs when the FEED Key is pressed after the correction of a fault DBMJCSBUJOH A media calibration is being performed The FEED Key was pressed and held DBODFM SFQSJOU FOUFS LFZ ZFT The CANCEL or TEST Key was pressed during the fault handling process The faulted label will be cancelled...

Page 71: ...nsor Remove the label to continue printing TZTUFN JOJUJBMJ JOH Normal power up and soft reset condition Follows the SYSTEM RESET IN PROGRESS message after a reset or power up TZTUFN SFTFU JO QSPHSFTT Normal power up and soft reset condition Occurs when the user resets the printer via the host or Front Panel VODBMJCSBUFE The media calibration is not set Perform calibration see Section 5 0 YYYY PG Y...

Page 72: ...y or the Key to stop printing 3 Using the Print Test Rate feature Section 4 1 7 a time delay can be set for printing labels in Quick Test Mode 4 3 1 Print Quality Label The Print Quality Label provides an indication of overall print quality at a pre selected heat and speed setting This format consists of compliant bar codes in fence and ladder orientations assorted font sizes and graphic fill patt...

Page 73: ...nfiguration Label n Press the Key o Use the Key to scroll to Print Configuration p Press the Key to print Note The contents of this label may vary with the application version and printer model and equipped options To capture all the information use media at least 2 inches wide 51mm with the Label Width setting matched accordingly see Section 4 1 2 ...

Page 74: ...mpliant picket fence bar code that can be used to verify thermal transfer and print quality functions To print a Quick Ribbon Test Label n Press the Key o Use the Key to scroll to Ribbon Test Label p Use the Key to select a quantity see Section 4 0 3 q Press the Key to start printing ...

Page 75: ...elow To print a Dot Test Pattern Label n Press the Key o Use the Key to scroll to Dot Test Pattern p Use the Key to select a quantity see Section 4 0 3 q Press the Key to start printing Good Test Pattern Label Even pattern consistency indicates correct printhead operation Faulty Test Pattern Label Streaks indicate a dirty or faulty printhead See Section 5 3 1 for cleaning instructions ...

Page 76: ...quantity see Section 4 0 3 q Press the Key to start printing 4 3 6 User Defined Label The User Defined Label reprints the last format printed The format can be any of the Quick Tests a label from the host or a label recalled from a memory module Note If a job was cancelled prior to its completion or if power has been removed since the last print job and the request for this label this selection wi...

Page 77: ...ess to the media and media sensor In addition displayed sensor readings can be used to indicate the best position over the media which is helpful when using small position critical TOF notches or marks Three readings are required Empty No media in the sensor Gap or Mark Only the backing notch or reflective mark in the sensor Paper The label with the liner attached in the sensor To perform a Standa...

Page 78: ...to Sensor Calibration NFEJB TFUUJOHT TFOTPS DBMJCSBUJPO Press the Key to abort this procedure 5 Press the Key TFOTPS DBMJCSBUJPO QFSGPSN DBMJCSBUJPO You are beginning the standard calibration procedure 6 Press the Key Remove the media from the Media Sensor then press any key SFNPWF MBCFM TUPDL QSFTT BOZ LFZ zzz This sets the parameter for the empty value Where yyy is a numerical value representing...

Page 79: ... reflective media TDBO NBSL QSFTT BOZ LFZ zzz This sets the parameter for the gap or mark value Where yyy is a numerical value representing the current sensor reading useful in locating the best sensor position Note Never position the sensor over a perforation when recording a sensor reading Note Do NOT move the position of the Media Sensor after it has been adjusted 8 Position the label and backi...

Page 80: ...upon successful calibration Back out of the menu tree by repeatedly pressing the Key If using gap or reflective media press and hold the FEED Key The printer will begin advancing media allow at least one label gap or mark to advance under the sensor SFBEZ The printer is now ready to begin printing If this calibration was unsuccessful go to Section 5 0 2 Note A Warning Low Backing message indicates...

Page 81: ...s failed To perform an Advanced Entry Calibration Step Operator Action Displayed Message Comment 1 Media should be loaded and the appropriate Sensor Type selected Turn On the printer VODBMJCSBUFE Wait until the printer initializes about six seconds 2 Press the Key Raise the printhead assembly NFOV NPEF NFEJB TFUUJOHT You are entering Menu Mode 3 Press the Key to enter the Media Settings menu NFEJB...

Page 82: ...sembly HBJO USBO zzz 11 1 42 OR HBJO SFGM zzz 11 1 42 If using preprinted media ensure the label area under the sensor is free of preprinted text graphics or borders 10 Press the Key to select the setting denoted by an and then record the sensor reading the yyy value in a table similar to the one shown after Step 12 as a Label Value Next press the Key to increment the Gain Number Repeat this step ...

Page 83: ...center of the facedown black mark Press the Key to select the setting and then record the sensor reading in a table similar to the one shown after Step 12 as a TOF Value Next press the Key to increment the Gain Number Repeat for each of the Gain Numbers 00 32 HBJO USBO zzz 11 1 42 Or for reflective media HBJO SFGM zzz 11 1 42 Where yyy is a numerical value representing the current sensor reading u...

Page 84: ...est algorithm for your media HBJO USBO zzz 11 1 42 Or for reflective media HBJO SFGM zzz 11 1 42 Both sensor readings must be above 20 Gain Number Label Value TOF Value Difference Value 00 255 254 1 01 251 240 11 02 241 213 28 03 231 182 49 04 219 150 69 05 212 119 93 06 200 88 112 07 189 58 131 08 178 32 146 09 167 19 N A 10 156 17 N A 11 146 16 N A 12 136 15 N A 31 116 14 N A For example if your...

Page 85: ...n the Media Sensor Record the sensor reading and label it P paper o Place the backing mark or notch in the Media Sensor Record the sensor reading and label it G or M Gap or Mark p Remove all media Record the sensor reading and label it E Empty HBJO USBO zzz 19 1 42 Or for reflective media HBJO SFGM zzz 19 1 42 Where yyy is a numerical value representing the current sensor reading 15 Press the Key ...

Page 86: ...QUZ TFOTPS MFWFM Q 126 N 292 F 324 The selection will flash and the display heading will change to indicate the item for entry 17 After all entries have been made press the Key to back out of the menu and then press the Keyto save the settings and return to the Ready Mode TBWF DIBOHFT FOUFS LFZ ZFT From Ready press the FEED Key to advance to the next label TOF Note If the Advanced Entry Calibratio...

Page 87: ...ng the printed labels rotate the Leveling Cam counter clockwise to an over adjusted position see Example 1 below p Next rotate the Leveling Cam clockwise one click at a time until the printed labels contain a complete even image see Example 2 When changing to a different width of label readjust the Leveling Cam Example 1 Over adjustment Too much adjustment produces an image that fades across the l...

Page 88: ...tion o Loosen the two Locking Screws approximately turn counter clockwise p Turn the Adjustment Screws counter clockwise until the burn line is past the platen roller vertex Print a Validation Label from the Quick Test menu see Section 4 3 5 The label should look light and uneven q Tighten the Locking Screws just until they are snug tight enough to remove any play in the printhead assembly yet loo...

Page 89: ...nthead latch forward While holding the Printhead raise the assembly Disconnect the two Cables and then remove the old Printhead r While carefully holding the new Printhead connect both Cables s Position the Printhead onto the Locating Pins in the Printhead Assembly and secure in place with the Printhead Mounting Screw do not over tighten Please note that a printhead alignment is normally not requi...

Page 90: ...ean after each roll or box of labels or after each roll of ribbon Platen Roller Using a cotton swab dampened with isopropyl alcohol rotate the platen and remove all build up See Section 5 3 2 Clean after each roll or box of labels or after each roll of ribbon Media Path Tear Plate Compressed air soft bristle brush and isopropyl alcohol Remove all build up along the path that the ribbon and paper f...

Page 91: ...nthead Latch and raise the Printhead Assembly Allow the printhead to cool before proceeding p Move media and ribbon away from the printhead as necessary q Using a cotton swab moistened not soaked with isopropyl alcohol gently wipe away any build up on the Printhead surface paying close attention to the Burn Line Allow the printhead to dry r Replace the ribbon and media Lower the Printhead Assembly...

Page 92: ...tch and raise the Printhead Assembly Remove media and ribbon p Using a Cotton Swab dampened with isopropyl alcohol clean the Platen Roller manually rotate the roller and repeat cleaning the entire surface Allow the Platen Roller to dry q Replace ribbon and media r Lower the Printhead Assembly and rotate the Printhead Latch completely back to the locked position s Close the access cover Plug in and...

Page 93: ...he firmware of the printer can be updated 1 the Ready Mode or 2 the Download Mode Before beginning an update identify the current version of the printer s application program by printing a Configuration Label see Section 4 3 2 Compare that version string to those filenames available from our FTP site and then download the desired file onto your computer s hard drive Proceed with the printer update...

Page 94: ...b 1 zs lpt1 Where lpt1 is the host computer s port however this selection can differ to include a serial or other port as the printer is equipped The Ready Indicator will flash as data is received 2 VQHSBEJOH TPGUXBSF No action required The new application program is being stored and verified 3 5323 4 15 1803703111 No action required The printer has reset automatically and is now displaying the ne...

Page 95: ...Section 5 4 1 The printer is ready to accept the new application version Note The parallel port LPT1 must be used to write to the printer 3 VQEBUF TPGUXBSF SFBEJOH JNBHF No action required The printer is receiving the new image program 4 FSBTJOH GMBTI TPGUXBSF JNBHF No action required The program has been received and verified now memory is being cleared of the previous application 5 XSJUJOH GMBTI...

Page 96: ...successfully erase Flash memory The possible cause is defective Flash memory Try the download again however if the problem continues call for service FSSPS XSJUJOH GMBTI The printer could not successfully write the program into Flash memory A possible cause is defective Flash memory Try the download again however if the problem continues call for service IBSEXBSF NJTNBUDI EBUB SFKFDUFE Application...

Page 97: ...ble from our FTP site Download the desired version onto your computer s hard drive To update the Boot Loader Program Boot Loader Update Procedure Step Displayed Message Operator Action Comment s 1 SFBEZ Using the DOS copy command where filename is the program to be loaded and lpt1 is the selected interface port enter the following copy filename lpt1 As an example this would be entered as copy boot...

Page 98: ...88 I Class ...

Page 99: ...s sent to the printer If it does not flash check the parallel cable type Also check the protocol and port settings of the printer and host Can not load media through the optional cutter WARNING Use extreme care Turn Off and unplug the printer before proceeding Ensure that the cutter and cutter cable are properly installed Plug in and turn On the printer You should hear the cutter blade rotate and ...

Page 100: ...tion 5 3 2 Missing information in the printed label Check the label format for character placement outside the dimensions of the label all row column values must allow enough space for the height length of the characters and bar codes to be printed within the format size The available memory may have been exceeded by the memory requirement of the label format Try reducing the memory allocated to e...

Page 101: ...n was used To verify the inked side press the adhesive backing of a label against the ribbon surface Ink will only lift from the coated side of the ribbon Clean the printhead see Section 5 3 1 then replace the ribbon with the correct type for the printer Section 3 3 If there is no image on the used ribbon Run any Quick Test Label see Section 4 3 If an image printed then check the protocol and port...

Page 102: ...override the menu settings see Section 4 1 6 The media ribbon combination may not be compatible see Section 2 1 The Printhead Leveling Cam may be incorrectly adjusted see Section 5 1 1 The Platen Roller may be dirty or worn see Section 5 3 2 The Printhead Burn Line may need adjusting see Section 5 1 2 Skips labels when printing Quick Media Calibration may be needed see Section 3 4 The Media Sensor...

Page 103: ...must be corrected and then the FEED Key must be pressed to clear the condition Printer Fault Messages Displayed Message Description Possible Solution s 35W PVU PG UPMFSBODF The printer has detected a drop in the 24 volt power supply Try cycling the printer power Off and On If the fault does not clear call for service BED GBVMU The printer has detected an analog to digital circuit converter failure...

Page 104: ...f the problem persists try the Advanced Entry Calibration see Section 5 0 2 HBQ NPEF GBVMUZ TFOTPS Consistently high sensor readings were detected Press any key to continue Ensure that media was removed from the media sensor during the appropriate calibration steps also ensure that no labels are stuck in the media sensor Retry the calibration If the problem persists call for service PVU PG TUPDL T...

Page 105: ... detected a problem within the print logic Try cycling the printer power Off and On If the fault does not clear call for service SBN GBVMU The system has detected a RAM failure Try cycling the printer power Off and On If the fault does not clear call for service SFGMFDUJWF NPEF DBOOPU DBMJCSBUF Consistently low sensor readings were detected Press any key to continue Ensure that the reflective mark...

Page 106: ... Retry the calibration If the problem persists call for service SJCCPO GBVMU The ribbon sensor values have changed or the printer detects no or only sporadic ribbon supply hub movement Try the following 1 Ensure that ribbon is correctly loaded and that the printhead assembly is latched 2 Check the ribbon supply and ribbon take up hubs for obstructions that may be stopping movement 3 Ensure that th...

Page 107: ...e list in Appendix B 2 Increase the Heat value 3 Enable only those bar codes to be decoded 4 Decrease the Print Speed or increase the height of the bar code 5 Decrease the Verification Level 6 Ensure the ribbon used contains carbon based inks 7 Ensure that the label stock has a matte finish If the fault does not clear and the bar code is readable on other scanners possible misalignment consult the...

Page 108: ...the printer see Section 5 0 2 The Media Sensor may be out of position Readjust it see Section 3 2 3 The media may not be properly loaded Reload media also ensure that the Media Guide is positioned properly see Section 3 1 4 The Leveling Cam may be improperly adjusted see Section 5 1 1 5 The label may be longer than the default value for maximum length Check the Media Settings Maximum Label Length ...

Page 109: ...as detected defective printhead elements Replace the printhead if the print quality becomes unacceptable HBQ NPEF XBSOJOH MPX CBDLJOH The printer measured only a small difference between the empty and gap sensor readings Transparent backing or notched media typically gives this indication In this case there may be a slight delay in the Out of Stock indication after the media supply is emptied no a...

Page 110: ...tlet When more than 50 black is being printed try reducing the Heat Value or the size of the black image If the condition persists call for service SUD SBN GBJMVSF The printer was unable to save settings in permanent memory Possible faulty Main PCB If the condition persists call for service UFNQFSBUVSF QBVTF A high printhead temperature has been detected No action required Printing will resume aft...

Page 111: ...ing data in the character string To begin go to the Diagnostics menu and enable Hex Dump Mode see Section 4 1 7 Exit the menu and save the changes Now HEX DUMP MODE will be indicated by the display and all data sent to the printer will now be output in hexadecimal code along with the printable ASCII equivalents The figure below is a sample Hex Dump Label After sending a label format to the printer...

Page 112: ...102 I Class ...

Page 113: ...de 11 UPS MaxiCode modes 2 3 PDF417 Data Matrix QR Code Aztec and MicroPDF417 Fonts 9 Bit Mapped Fonts rotatable 0 90 180 270 degrees CG Triumvirate Scalable Font CG Triumvirate Condensed Bold Scalable Font Communications Interfaces EIA RS 232 DB 25 Serial and IEEE 1284 Compliant Parallel Serial Data Rates 1200 2400 4800 9600 19 2K and 38 4K baud Handshaking Xon Xoff CTS DTR Parity Even Odd or Non...

Page 114: ... 4208 2 12 IPS 51 305 mmps I 4212 2 8 IPS 51 203 mmps I 4308 2 6 IPS 51 152 mmps I 4406 2 4 IPS 51 102 mmps I 4604 Printhead Resolution 203 DPI 8 0 dots mm I 4206 I 4208 I 4212 300 DPI 11 8 dots mm I 4308 406 DPI 16 0 dots mm I 4406 600 DPI 23 6 dots mm I 4604 Nominal Dot Size 0043 X 0052 11 mm x 13 mm I 4206 I 4208 I 4212 0027 X 0043 07 mm X 11 mm I 4308 0013 X 0018 05 mm X 07 mm I 4406 0008 X 00...

Page 115: ...06 I 4604 SDRAM Memory 8 MB I 4206 I 4208 16 MB I 4212 I 4308 I 4406 I 4604 7 1 Media and Ribbon Requirements Media Types Roll Fed Die Cut Continuous and Fan Fold Flat on the printable side with no more than 0007 018 mm protrusions on the opposite side Media Roll Capacity 8 203 mm outer diameter Media Core 1 5 or 3 0 38 mm or 76 2 mm inner diameter Ribbon Core 1 010 006 25 6 mm 2 mm inner diameter...

Page 116: ...here the thickness can be no greater than 005 127mm 3 The reflective black mark must be carbon based placed on the backside of the stock and the reflectance shall be less than 10 at wavelengths of 950 and 640 nm 4 The maximum allowable length of the combined label and gap or mark measurement can not exceed 99 99 inches Approved Media To achieve optimum print quality and maximum printhead life DATA...

Page 117: ...0C 44 2C L 76 4C l 108 6C Ctrl M CR 13 0D 45 2D M 77 4D m 109 6D Ctrl N SO 14 0E 46 2E N 78 4E n 110 6E Ctrl O SI 15 0F 47 2F O 79 4F o 111 6F Ctrl P DLE 16 10 0 48 30 P 80 50 p 112 70 Ctrl Q DC1 17 11 1 49 31 Q 81 51 q 113 71 Ctrl R DC2 18 12 2 50 32 R 82 52 r 114 72 Ctrl S DC3 19 13 3 51 33 S 83 53 s 115 73 Ctrl T DC4 20 14 4 52 34 T 84 54 t 116 74 Ctrl U NAK 21 15 5 53 35 U 85 55 u 117 75 Ctrl ...

Page 118: ...139 8B 1 2 171 AB 203 CB Ù 235 EB î 140 8C 1 4 172 AC 204 CC y 236 EC ì 141 8D 173 AD 205 CD Y 237 ED Ä 142 8E 174 AE 206 CE 238 EE Å 143 8F 175 AF 207 CF 239 EF É 144 90 176 B0 Ò 208 D0 240 F0 Æ 145 91 177 B1 D 209 D1 241 F1 Æ 146 92 2 178 B2 Ê 210 D2 242 F2 ô 147 93 3 179 B3 Ë 211 D3 3 4 243 F3 ö 148 94 180 B4 È 212 D4 244 F4 ò 149 95 Á 181 B5 213 D5 245 F5 û 150 96 Â 182 B6 Í 214 D6 246 F6 ù 15...

Page 119: ... formatting command These fonts are non proportional monospaced each character takes the same amount of space for printing The Triumvirate font number 9 is a proportional font each character will take up a different amount of space when printed Font Valid ASCII Characters 0 32 127 1 32 168 171 172 225 2 32 168 171 172 225 3 32 35 38 40 58 65 90 128 142 144 146 153 154 156 157 165 168 225 4 32 35 3...

Page 120: ... 5 1 1 13 7 2 2 18 10 2 3 27 14 2 4 36 18 3 5 52 18 3 6 64 32 4 7 32 15 5 8 28 15 5 Font 0 96 character alphanumeric upper and lower case Font 1 145 character upper and lower case alphanumeric with descenders and ascenders Font 2 138 character alphanumeric upper and lower case Font 3 62 character alphanumeric uppercase ...

Page 121: ...I Class 111 Font 4 62 character alphanumeric uppercase Font 5 62 character alphanumeric uppercase Font 6 62 character alphanumeric uppercase ...

Page 122: ...nt 7 OCR A size I Font 8 OCR B size III Font 9 Internal Triumvirate font The number in the bar code height field sets the point sizes Larger point sizes can be obtained by increasing the height and width multipliers ...

Page 123: ...modulo 10 checksum Varies M 10 48 57 Numeric only 9 K Plessey Up to 14 M 10 48 57 Numeric only Option is last character for second M 11 chksum 9 L Interleaved 2 of 5 with modulo 10 checksum bearer bars 13 M 10 48 57 Numeric only 9 M 2 digit UPC addendum 2 Yes 48 57 Numeric only 1 N 5 digit UPC addendum 5 Yes 48 57 Numeric only 1 O Code 93 Varies No 35 38 42 58 65 90 97 122 9 p Postnet Varies Yes 4...

Page 124: ...9 Bar Code B UPC A Bar Code C UPC E Bar Code D Interleaved 2 of 5 Bar Code E Code 128 Bar Code F EAN 13 Bar Code G EAN 8 Bar Code H Health Industry Bar Code HBIC Bar Code I Codabar Bar Code J Interleaved 2 of 5 w modulo 10 checksum ...

Page 125: ...e L Interleaved 2 of 5 w modulo 10 checksum and shipping bearer bars Bar Code M 2 Digit UPC addendum Bar Code N 5 Digit UPC addendum Bar Code O Code 93 Bar Code p Postnet Bar Code Q UCC EAN Code 128 Bar Code R UCC EAN Code 128 KMART NON EDI ...

Page 126: ...de S UCC EAN Code 128 Random Weight Bar Code T Telepen Bar Code u UPS MaxiCode Bar Code v FIM Bar Code z PDF 417 Bar Code WG USD 8 Bar Code W1c DataMatrix Bar Code W1d QR Code Bar Code W1f Aztec Bar Code W1z MicroPDF417 ...

Page 127: ...fonts and label formats unavailable on the I 4206 and I 4208 models Y 64 KB No Main PCB Flash reserved for EFIGS Z 4 MB No Optional Flash Card reserved for ILPC When power is removed from the printer stored data will be lost Print Resolutions and Maximum Label Widths Resolutions and Widths Maximum Print Width Model Printhead Resolution Inches Millimeters Factory Default Setting I 4206 I 4208 I 421...

Page 128: ... Feed 2 8 51 203 8 0 203 Reverse 2 5 51 127 4 0 102 I 4212 Print 2 12 51 305 8 0 203 Feed 2 12 51 305 8 0 203 Reverse 2 5 51 102 4 0 102 I 4308 Print 2 8 51 203 6 0 152 Feed 2 10 51 254 6 0 152 Reverse 2 5 51 102 4 0 102 I 4406 Print 2 6 51 152 5 0 127 Feed 2 6 51 152 6 0 152 Reverse 2 5 51 102 4 0 102 I 4604 Print 2 4 51 102 3 0 76 Feed 2 4 51 102 4 0 102 Reverse 2 5 51 102 4 0 102 Consult the I ...

Page 129: ... a 9 pin Mini DIN female type e g Kycon KMDG 9S BS requiring a 9 pin Mini DIN plug e g Kycon KMDA 9P Each GPIO pin function is detailed in the table below GPIO Pin Functions Pin Signal Name Signal State Signal Direction Description 1 Vcc 5 VDC Output Printer 5 VDC 2 Ribbon Fault Low Output Goes low when the printer detects a ribbon fault 3 Paper Fault Low Output Goes low when the printer detects a...

Page 130: ...he one shown right For additional interfacing requirements see the table below GPIO Port Specifications Vin max 5 5 VDC maximum input into any pin VIH 3 8 VDC minimum high level input voltage VIL 1 65 VDC maximum low level input voltage IOH 8 mA typical 25 mA maximum high level output current IOL 8 mA typical 25 mA maximum low level output current VOH IOH 8 mA minimum 3 8 VDC VOL IOL 8 mA maximum ...

Page 131: ...B Flash Module located on the Main PCB It is okay to download menu files generated for a lesser firmware revision to new firmware any messages that are not defined are displayed in English For the procedures below the printer will accept the menu downloads from any available port The language creation programs support Windows 95 Windows 98 Windows NT and Windows 2000 Required Software Comment I Cl...

Page 132: ...122 I Class Creating a Menu Language n Invoke Excel and open the gemmsglst xls file Excel opens the file and the following screen appears o Click the Enable Macro box and the following appears ...

Page 133: ...cutting and pasting fields could defeat this warning system B Two Line Messages Some of the message are displayed as two lines These are indicated in the comment fields C Comments This field can be modified with no effect q When editing has been completed highlight all of the columns you desire to create more than one language may be selected by pressing the letter above the column r Press the Gen...

Page 134: ...rror Message Description Please select the entire column s or the desired language s by clicking on the column letter s After pressing the Generate DPL File s radio button the languages to convert were not correctly selected Message text may not exceed MAX xx designated characters for this MID The entered message exceeds the number of characters specified in column C You may not modify this number...

Page 135: ...the memory space Use the Pack Module feature see Section 4 1 4 or reload the FIGS file to free the space y Deletion of the selected language will set the printer to English y The total number of languages that the printer can now accept is limited to 10 but this number is dependent upon the size of each language translation The translation size will vary with the number of messages that are transl...

Page 136: ...126 I Class ...

Page 137: ...rol parameters previously accessible only from the front panel consult the I W Programmers Manual for details Regular host settings can not be saved using the front panel menu Note Configuration files will typically correspond to a particular printer and media application If a file will be shared among printers do NOT include unique parameters such as calibrations and adjustments because those set...

Page 138: ...F SFTUPSF BT DVSSFOU Press the Key to scroll to Save Setting As The Key can also be used 6 DPOGJHVSBUJPO GJMF TBWF TFUUJOH BT Press the Key Press the Key to exit this selection Enter a file name using the Key to scroll through the characters The Key can also be used 7 TBWF TFUUJOH BT Note To change an accepted character select the delete function solid flashing block and press the ENTER Key Use th...

Page 139: ...5 days or three million 3 000 000 linear inches of use whichever comes first from the date of shipment by Datamax Expendable and or consumable items or parts such as lamps fuses labels and ribbons are not covered under this warranty This warranty does not cover equipment or parts that have been misused altered neglected handled carelessly or used for purposes other than those for which they were m...

Page 140: ...f the following locations Datamax Corporate Headquarters 4501 Parkway Commerce Boulevard Orlando Florida 32808 USA Datamax International Herbert House Elizabeth Way Pinnacles Harlow Essex CM19 5FE United Kingdom A Return Material Authorization RMA number must be issued before the product can be returned To open an RMA please call the Datamax Technical Support Department at 407 523 5540 Include you...

Page 141: ...ential damages or lost profits arising out of or relating to Datamax s products or the performance or a breach thereof even if Datamax has been advised of the possibility thereof Datamax s liability if any to the purchaser or to the customer of the purchaser hereunder shall in no event exceed the total amounts paid to Datamax hereunder by the purchaser for a defective product In no event shall Dat...

Page 142: ...132 I Class ...

Page 143: ...w of thermal elements in the printhead that create the images on the media calibration The process through which sensor readings are entered into the printer for correct sensor function for example detection of a given media type and TOF positioning character set The entire complement of alphanumeric symbols contained in a given font checksum An alphanumeric error detection method used in many bar...

Page 144: ... the printhead Also referred to as resolution DPL Datamax Programming Language programming commands used specifically for control of and label production in Datamax printers A complete listing of commands can be found in the I W Class Programmer s Manual EFIGS English French Italian German Spanish and other multi language support as programmed for the printer s menu system and configuration label ...

Page 145: ... media hub Device in the printer used to support roll media media sensor An electronic device equipped with photosensors to detect media and the top of form on die cut notched or reflective media MMPS millimeters per second Metric measurement of printer speeds notched stock Media typically tag stock with holes or notches in the material that is used to signal the top of form The printer must be se...

Page 146: ...ting process that leads to voids on the printed label typically caused by an improper printhead leveling cam adjustment roll media A form of media that is wound upon a cardboard core start of print The position on the label where the printing actually begins tag stock A heavy paper or synthetic printing material typically featuring a notch or black mark for TOF and no adhesive backing thermal tran...

Reviews: