background image


Maintaining the Cutter 


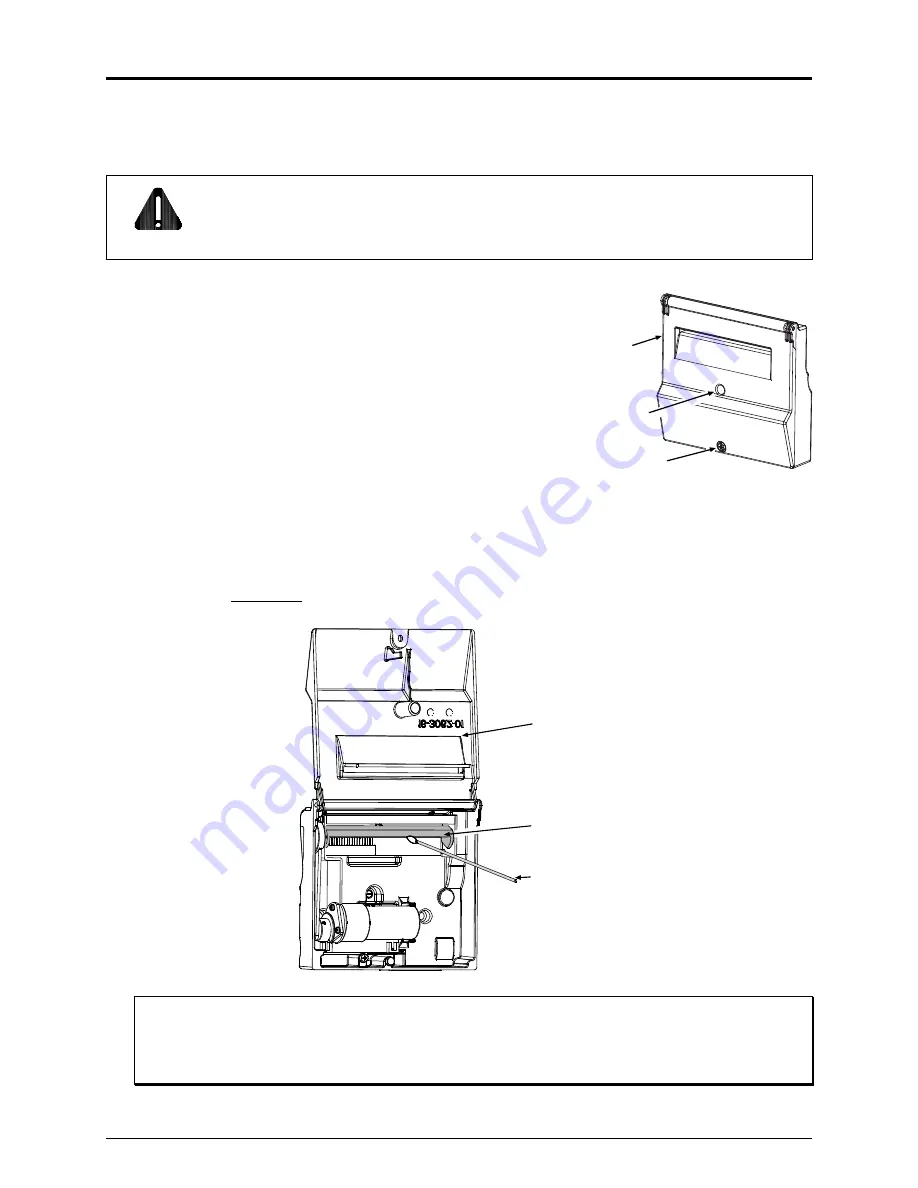
To ensure trouble free operation, the Cutter should be cleaned after printing each roll or box of labels. 

Additionally, if the cutting action becomes sluggish, immediate cleaning is recommended. Clean the 

Cutter as follows: 


CAUTION


Cutter Blades are SHARP: Keep body parts away from the cutting surfaces.  Never use 

metal objects on the cutting surfaces.  Take proper precautions when using isopropyl 

alcohol, a flammable liquid.   


1.

   Turn ‘Off’ the Power Switch and unplug the power cord 

from the AC Receptacle. Raise the Access Cover and 

remove the media from the printer. 


2. 

Loosen the 

Mounting Screw

,


remove the 

Cutter

 from the 

printer, and then remove the 

Cover Screw 

from the


Cutter

.


Cover Screw

Cutter

Mounting Screw


3. 

Open the 

Cover

. Using compressed air, remove any debris inside the mechanism, and then using a 

Cotton Swab


dampened

 with alcohol, wipe the 

Cutter Blade

 surfaces clean. Allow the blade to dry.  


Cutter Blade

Cover

Cotton Swab


 Note:   For cleaning heavy deposits from the blade, WD-40


 or another non-damaging adhesive 

remover can be substituted – provided it is carefully and sparingly applied using a cotton 

swab. Never spray WD-40


 directly onto the assembly; severe damage can result.  


Summary of Contents for H-Class Series

Page 1: ...Cutter Option 92 2421 01 Rev B...

Page 2: ......

Page 3: ...eference CAUTION For your safety and to avoid equipment damage always turn Off power and unplug the printer s power cord before beginning this installation and when performing service Contents of the...

Page 4: ...w and Tear Plate Alternately if equipped with an Arc Plate Present Sensor or Peel and Present option remove that device Tear Plate Thumbscrew Access Cover Step 2 Installing the Cutter Assembly Careful...

Page 5: ...Opening Media C Ensure that READY is displayed on the Front Panel then press the FEED Key and proceed according to your observations If a cut label is dispensed this completes the installation or If t...

Page 6: ...tor s Manual for detailed front panel instructions A Press the MENU Button on the printer s front panel B Using the DOWN Button scroll to PRINTER OPTIONS then press the RIGHT Button C Using the DOWN B...

Page 7: ...rom the AC Receptacle Raise the Access Cover and remove the media from the printer 2 Loosen the Mounting Screw remove the Cutter from the printer and then remove the Cover Screw from the Cutter Cover...

Page 8: ...ll and tighten the Cover Screw 5 Carefully press the Cutter Assembly into the Front Plate Connector and using the Mounting Screw secure the assembly to the printer 6 Reload media and close the Access...

Page 9: ...3 shows the different basis weights for the differing media types which are equivalent in weight when compared to the metric weight Metric Weight to Thickness in Mils Metric Weight to Equivalent Weig...

Page 10: ......

Reviews: