background image

Bluetooth UHF RFID Reader User Manual 


UM001371 

Page 11 / 17 

Rev. 1.0 

 04.12.2019 


5.2


Change operating mode 

To change the operating mode please follow the steps below. 

1.


Connect to thi

link

 to start the 

“Desktop Firmware Loader” 

download and then install it; 

2.


Delete existing BT pairings the reader (from your smartphone and/or PC); 

3.


Launch the “Desktop Firmware 

L

oader”;


4.


Connect the reader to the PC using the supplied micro USB cable; 

5.


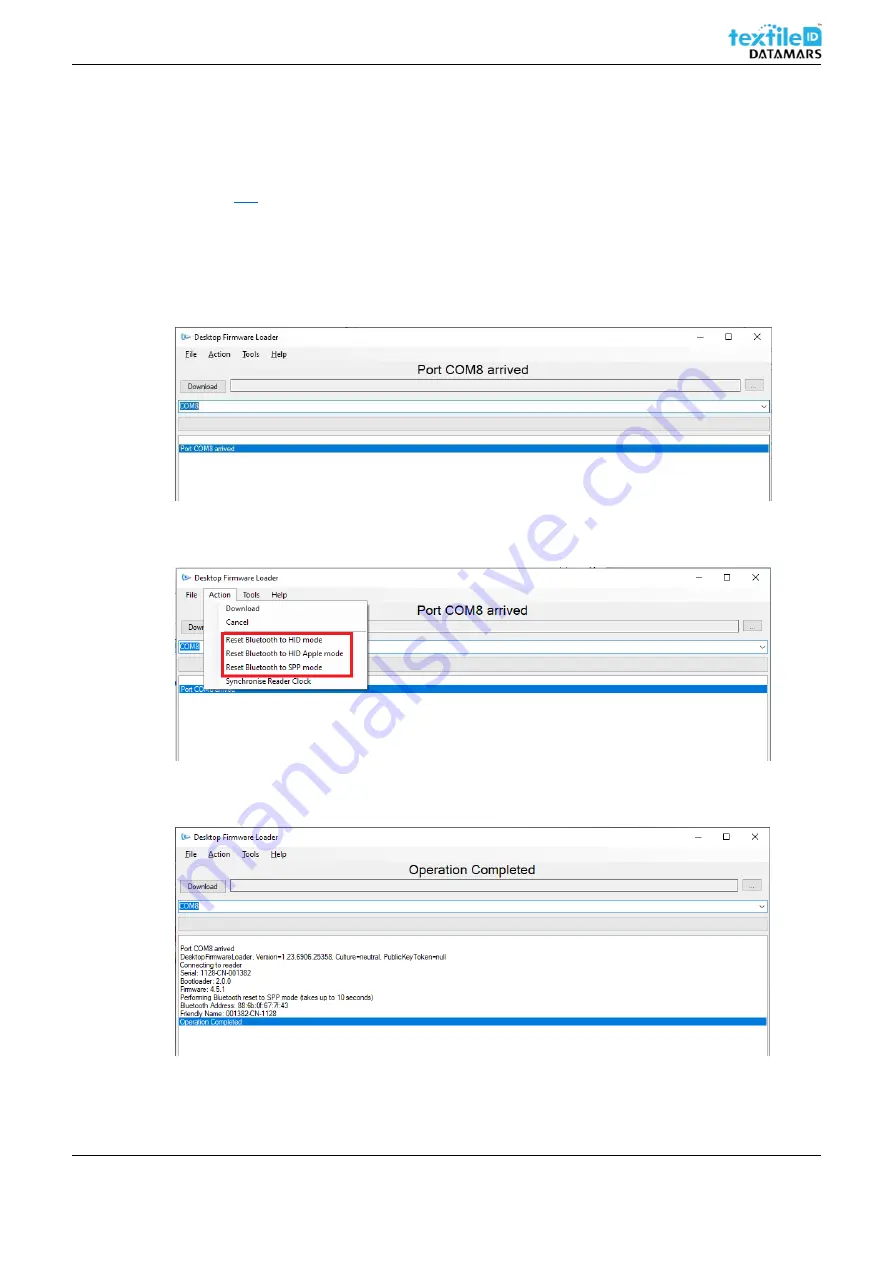
The driver is automatically installed. The loader should prompt as the COM port arrives and select the 

right port automatically (“Port COMn arrived”)


Figure 11 - Desktop Firmware Loader setting 

6.


Select 

Action -> 

Reset Bluetooth to “xx” mode

, where “x” is the 

operating mode you want to switch to; 


Figure 12 - Desktop Firmware Loader setting 

7.


Wait until the 

message “Operation Completed” is shown;


Figure 13 - Desktop Firmware Loader setting 

8.


Unplug the micro USB cable; 

9.


Pair to the reader on your device as explained in the following chapters. 

Summary of Contents for Textile ID R-PO-UHF-BT

Page 1: ...www textile datamars com textile id datamars com BLUETOOTH UHF RFID READER R PO UHF BT Portable UHF Reading solution with Bluetooth connectivity USER MANUAL Version 1 0 ...

Page 2: ...nstallation or removal 6 2 3 Battery charging 7 3 Reading Transponders 8 4 Status indicators 9 4 1 Configuration commands 9 5 Bluetooth operating modes 10 5 1 Differences between the operating modes 10 5 2 Change operating mode 11 5 2 1 HID Mode 12 5 2 2 SPP Mode 13 5 2 3 Use with smartphone 14 6 Micro SD card 15 6 1 Autorun file AUTO txt 15 6 2 Log file LOG txt 15 6 3 SD card installation or remo...

Page 3: ...r Manual UM001371 Page 3 17 Rev 1 0 04 12 2019 1 Introduction This manual is intended to give a brief introduction to the portable UHF reader with its different operating modes 1 1 Location of controls Figure 1 Location of controls ...

Page 4: ... with the reader 2 1 Battery installation or removal The battery is charged using the supplied micro USB cable In the unlikely event that the battery need to be replaced proceed as follow 1 Pull up the handle release latch Figure 2 Handle release latch 2 Slide the handle off Figure 3 Handle off ...

Page 5: ...019 3 Remove the battery cover Figure 4 Battery cover off 4 Place the battery into the compartment make sure to place the battery in the right position by checking the contacts position Figure 5 Battery insertion 5 Re place the battery cover 6 Slide the handle into position ...

Page 6: ...e 6 17 Rev 1 0 04 12 2019 2 2 Antenna installation or removal To detach the antenna from the main body of the reader please proceed as follows 1 Pull the antenna release latch Figure 6 Antenna release latch 2 Lift down the antenna Figure 7 Antenna off ...

Page 7: ...tant to fully charge it before using your portable reader for the first time To charge your device connect the supplied micro USB cable to the micro USB connector placed at the back of the unit and to a wall power outlet When charging the reader it is important to rest the device in an orientation that does not put pressure on the cable or port Figure 8 Charging position ...

Page 8: ... 12 2019 3 Reading Transponders The reader can read and write UHF RFID transponders when they are in range of the antenna which is located on the front of the reader The reading range depends on the transponder type size and quantity in the field Figure 9 Reading Area ...

Page 9: ...cted to a host Short green flash The reader has successfully read a transponder barcode or executed the alert command Green slow flash Antenna error Orange slow flash Battery low warning battery level 10 Orange short single slow flash Battery charging battery level 33 Orange short double flash Battery charging battery level 66 Orange short triple flash Battery charging level 66 Orange rapid flash ...

Page 10: ...compatible with Android Windows and Apple devices and HID Apple mode which is compatible only with Apple devices The following table should help you understanding the differences between the two operating modes SPP Mode HID Mode Apps need to be written with specific support for the Reader Apps can use the Reader without modification The reader can be paired in the Bluetooth settings or directly fr...

Page 11: ...eader to the PC using the supplied micro USB cable 5 The driver is automatically installed The loader should prompt as the COM port arrives and select the right port automatically Port COMn arrived Figure 11 Desktop Firmware Loader setting 6 Select Action Reset Bluetooth to xx mode where x is the operating mode you want to switch to Figure 12 Desktop Firmware Loader setting 7 Wait until the messag...

Page 12: ...e reader s trigger button 3 Open the Bluetooth other devices settings and click on Add Bluetooth or other device Figure 14 HID Mode setting 4 Click on Bluetooth and select the reader Usually It appears with a keyboard icon Figure 15 HID Mode setting 5 If the device is correctly paired the following message is shown Figure 16 HID Mode setting 6 Your device is now connected and ready to use The scan...

Page 13: ... on the reader s trigger button 3 Open the Bluetooth other devices settings and click on Add Bluetooth or other device Figure 17 SPP Mode setting 4 Click on Bluetooth and select the reader Figure 18 SPP Mode setting 5 If the device is correctly paired the following message is shown Figure 19 SPP Mode setting 6 Your device is now connected and ready to use Launch an application that supports Serial...

Page 14: ...oceed as follows example made with IOS 1 Download the app RFID explorer on your smartphone 2 Delete existing pairings to the reader from your smartphone and or PC 3 Go to your smartphone s Bluetooth settings and pair the reader with your smartphone Figure 20 reader and smartphone pairing 4 Launch the RFID explorer Figure 21 RFID explorer homepage ...

Page 15: ...tomatize the reader set up to your own application constraints The Autorun file should be located at the root folder of the card and called AUTO txt If no card is inserted or no Autorun file is created the reader will automatically use the default parameters To set up your customized AUTO txt file please contact support tid datamars com 6 2 Log file LOG txt If a SD card is installed a log file is ...

Page 16: ...o insert a SD card proceed as follows 1 Remove the battery as explained before chapter 2 1 2 Place a SD card into the compartment 3 Push down the SD card Figure 22 SD card insertion To remove the SD card proceed as follows 1 Remove the battery 2 Push down the SD card 3 Pull up the SD card Figure 23 SD card removal ...

Page 17: ... reader up by pressing the trigger button The reader is out of range Move the reader closer to the host The reader s name has been changed Check the reader s name or restore it to defaults if unsure Opening the Bluetooth virtual COM port does not connect to the reader The host has paired to a different Bluetooth device Pair to the required reader The reader is already paired to another host Delete...

Reviews: