Datalogic Applications
User’s Manual
109
Charging Profile
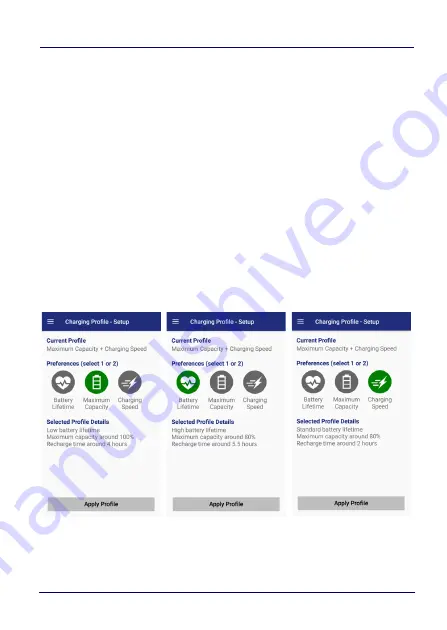
Charging Profile - Setup
This window allows to customize the charging process according to
the user's needs and priorities.
To configure a charging profile, select 1 or 2 of the following
preferences:
•
Battery Lifetime.
•
Maximum Capacity.
•
Charging Speed.
If a third preference is selected, the system will automatically clear
the oldest option.
Tap
Apply Profile
to confirm.
You can configure up to 6 different charging profiles:
Summary of Contents for Memor 10
Page 1: ...Rugged Mobile Computer with 1D 2D Imager User s Manual...
Page 16: ...Introduction 10 Memor 10 CAUTION Do not apply any sticker to the Memor 10...
Page 20: ...Battery 14 Memor 10 3 Rotate the latches to the lock position to lock the cover...
Page 30: ...Battery 24 Memor 10 NOTES...
Page 42: ...Getting Started 36 Memor 10 2 Tap Confirm 3 The battery swap LED lights up solid red...
Page 52: ...Getting Started 46 Memor 10 2 Tap DRM reset The following dialog box will appear 3 4 Tap OK...
Page 64: ...Settings 58 Memor 10...
Page 66: ...Settings 60 Memor 10 5 Tap Save...
Page 73: ...Settings User s Manual 67 Tap Rename to confirm...
Page 78: ...Settings 72 Memor 10...
Page 108: ...Settings 102 Memor 10 NOTES...
Page 110: ...Datalogic Applications 104 Memor 10...
Page 130: ...Tools 124 Memor 10 NOTES...
Page 142: ...Connections 136 Memor 10 NOTES...
Page 148: ...Test Codes 142 Memor 10 High Density Codes continued 0 25 mm 10 mils 80 EAN 13 80 EAN 8...
Page 150: ...Test Codes 144 Memor 10 Medium Density Codes continued 0 38 mm 15 mils 100 EAN 13 100 EAN 8...
Page 152: ...Test Codes 146 Memor 10 Low Density Codes continued 0 50 mm 20 mils 120 EAN 13 120 EAN 8...
Page 154: ...Test Codes 148 Memor 10 NOTES...
Page 176: ...Safety and Regulatory Information 170 Memor 10 NOTES...
Page 178: ...Support Through the Website 172 Memor 10 NOTES...


