background image

LANcat

User Manual

Page A-6

EIA/TIA TSB-67 - Test Limits

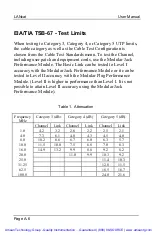
When testing to Category 3, Category 4, or Category 5 UTP limits,
the cable category as well as the Cable Test Configuration is
chosen from the Cable Test Standards menu. To test the Channel,
including user patch and equipment cords, use the Modular Jack
Performance Module. The Basic Link can be tested to Level I
accuracy with the Modular Jack Performance Module or it can be
tested to Level II accuracy with the Modular Plug Performance
Module. (Level II is higher in performance than Level I. It is not
possible to attain Level II accuracy using the Modular Jack
Performance Module).

Table 1.  Attenuation

Frequency

MHz

Category 3 (dB)

Category 4 (dB)

Category 5 (dB)

Channel

Link

Channel

Link

Channel

Link

1.0

4.2

3.2

2.6

2.2

2.5

2.1

4.0

7.3

6.1

4.8

4.3

4.5

4.0

8.0

10.2

8.8

6.7

6.0

6.3

5.7

10.0

11.5

10.0

7.5

6.8

7.0

6.3

16.0

14.9

13.2

9.9

8.8

9.2

8.2

20.0

11.0

9.9

10.3

9.2

25.0

11.4

10.3

31.25

12.8

11.5

62.5

18.5

16.7

100.0

24.0

21.6

Artisan Technology Group - Quality Instrumentation ... Guaranteed | (888) 88-SOURCE | www.artisantg.com


Summary of Contents for LANcat Series

Page 1: ...service in house repair center WE BUY USED EQUIPMENT Sell your excess underutilized and idle used equipment We also offer credit for buy backs and trade ins www artisantg com WeBuyEquipment REMOTE IN...

Page 2: ...LANcat Series Cable Testers User Manual Artisan Technology Group Quality Instrumentation Guaranteed 888 88 SOURCE www artisantg com...

Page 3: ...echnical or editorial errors or omissions contained herein LANcat is a trademark of Datacom Textron P N 13520 Rev F Copyright 1999 by Datacom Textron 11001 31st Place West Everett WA 98204 Telephone 4...

Page 4: ...ED IN DURATION TO THE ABOVE STATED TWO 2 YEAR PERIOD DATACOM TEXTRON SHALL NOT BE LIABLE FOR LOSS OF USE OF THE TESTER OR OTHER INCIDENTAL OR CONSEQUENTIAL DAMAGES EXPENSES OR ECONOMIC LOSS Some state...

Page 5: ...st Standard 2 9 System Integrity Pre Test 2 10 3 AUTOTEST Running Autotest 3 2 Viewing Autotest Results 3 4 Saving Autotest Results 3 8 LinkTalk LANcat TwoWay 3 11 4 QUICK CHECK Running Quick Check 4...

Page 6: ...lts 6 3 Deleting Test Reports 6 8 Viewing Saved Test Reports 6 9 7 TESTING TWISTED PAIR CABLE Types of Twisted Pair Cable 7 1 Twisted Pair Test Descriptions 7 2 Testing Tips 7 33 8 SETUP Changing SetU...

Page 7: ...Configuration A 1 Channel Testing A 2 Basic Link Testing A 4 EIA TIA TSB 67 Test Limits A 6 ISO IEC Test Limits A 8 Enhanced Cable Standards Test Limits A 10 IEEE Twisted Pair Test Limits A 10 Defini...

Page 8: ...LANcat User Manual Page iv Artisan Technology Group Quality Instrumentation Guaranteed 888 88 SOURCE www artisantg com...

Page 9: ...ic Links LANcat OneWay The OneWay System performs one way near end crosstalk NEXT measurements up to 100 MHz Testing of NEXT from both ends of the link as now required by TIA TSB 67 for compliant Cate...

Page 10: ...C 11801 Class D 100 MHz Performs NEXT Length Wire Map Attenuation Noise Traffic Impedance and Resistance tests Performs a preprogrammed suite of certification tests when set to Autotest Performs enhan...

Page 11: ...ay Easy field updates of hardware and software using plug in Performance Modules and flash memory Operates using either replaceable AA batteries AC Mains power or a rechargeable NiMH battery pack opti...

Page 12: ...LANcat User Manual Page 1 4 Figure 1 1 LANcat Overview of Features Artisan Technology Group Quality Instrumentation Guaranteed 888 88 SOURCE www artisantg com...

Page 13: ...NDED FUNCTIONS Individual cable tests unit selftest pair reversal test repeatability test and flash memory download REMOTE Puts LANcat into remote mode for use in TwoWay testing TRAFFIC Monitors traff...

Page 14: ...ction key For example in the figure below you would press F1 to send the results F1 F2 F3 F4 LINKTALK TM FUNCTION TWO WAY SYSTEM The LinkTalk TM function is available with the LANcat TwoWay System Thi...

Page 15: ...ide and slide it out of the opening refer to Figure 1 3 To install a module slide it into the opening until the screws rest against the retainers then hand tighten the screws until the module is prope...

Page 16: ...ving and installing performance modules REMOTE UNIT ONE WAY SYSTEM The Remote Unit is connected at the far end of the cable when testing twisted pair cable The Remote Unit see Figure 1 4 is used durin...

Page 17: ...own occurs MEMORY STORAGE The LANcat memory is powered from an internal long life lithium cell Stored test results and set up conditions will therefore be saved when you replace the AA alkaline batter...

Page 18: ...strument refer to Figure1 5 2 Remove the batteries 3 Install new batteries paying attention to the polarity markings on the inside of the battery well NOTE The FAIL LED on the Remote Unit blinks conti...

Page 19: ...s to make a different selection For example in the figure below the arrows appear next to the word Link on the screen Figure 1 6 Arrows Symbol To change a selection 1 Press the up or down arrow keys t...

Page 20: ...e To use the scroll bar use the arrow keys to move the scroll bar indicator as well as to highlight a new selection Figure 1 7 Sample of Scroll Bar DISPLAY CONTRAST ADJUSTMENT To adjust the screen con...

Page 21: ...o prior cable testing experience are advised to also review Chapter 7 Testing Twisted Pair Cabling before using this instrument Initial Instrument Set Up Before you first use the LANcat you should che...

Page 22: ...t the main unit s dial to the test or function you want to perform 4 Connect the cable 5 Press the main unit s power button on SETTING UP THE ONE WAY SYSTEM To set up the LANcat OneWay System 1 Set th...

Page 23: ...ue must be set in the LANcat A typical NVP value will be automatically selected by the LANcat depending on the test standard that you choose For greater measurement accuracy follow the NVP calibration...

Page 24: ...ault value however may result in cable length measurement errors of up to 7 due to the variation in the signal propagation rate from cable to cable This potential length error usually will not impair...

Page 25: ...Figure 2 1 illustrates a typical test set up using a TwoWay System to test a Basic Link as defined by TIA EIA TSB 67 Figure 2 1 Typical TwoWay Test Set Up For Testing a Basic Link Artisan Technology...

Page 26: ...st Set Up For Testing a Basic Link NOTE To certify a cable link with Level II accuracy you must test the Basic Link using the LANcat Modular Plug Performance Module You must also test the link from bo...

Page 27: ...2 3 illustrates a typical test set up using a TwoWay System to test a Channel as defined by TIA EIA TSB 67 Figure 2 3 Typical TwoWay Test Set Up For Testing a Channel Artisan Technology Group Quality...

Page 28: ...4 Typical OneWay Test Set Up For Testing a Channel NOTE A channel can be certified for conformance to the TIA EIA TSB 67 Link Performance Standard however accuracy will be less than Level II requirem...

Page 29: ...t a different cable test standard 3 When the desired cable test standard is highlighted press SELECT F4 or ENTER The LANcat immediately begins testing using the new cable test standard NOTE Refer to A...

Page 30: ...ng a CAT3 coupler or a patch cable 2 Run Self Test Extended Functions see Chapter 11 3 Run Pair Reversal Extended Functions see Chapter 5 4 Run Repeatability Extended Functions see Chapter 5 5 Run Aut...

Page 31: ...ing a Custom Cable standard see Appendix A Defining Custom Standards Impedance Delay Delay Skew Power Sum NEXT Cable Grading Resistance Refer to Chapter 5 Cable Test Descriptions for a complete descri...

Page 32: ...test test results 5 Press SAVE F4 or ENTER to save the Autotest test results 6 Press TALK F2 to ring the Remote Unit at the other end ONE WAY SYSTEM 1 Connect one end of cable to the LANcat and the ot...

Page 33: ...y test it will stop and display the failure You may continue testing by pressing the CONTINUE F4 softkey Running Autotest F1 F2 F3 F4 F1 F2 F3 F4 Autotest Results Artisan Technology Group Quality Inst...

Page 34: ...eviewing Autotest results including summary screens for Wire Map NEXT Attenuation ACR Length and Propagation Delay tests and detailed test results for NEXT and Attenuation Refer to Chapter 5 Cable Tes...

Page 35: ...o save the Autotest results 4 On a TwoWay System press SEND F1 to send the results to the Remote Unit 5 Press ESC to exit View NOTE If you are using a TwoWay System the Send function appears above the...

Page 36: ...er to resolve link tests with marginal measured results 1 Reduce the measurement uncertainty If you are currently using a Level I rated Performance Module PM replace it with a Level II rated PM and re...

Page 37: ...creen 2 Press SUMMARY F3 to return to the test result SUMMARY screen 3 Press SAVE F4 or ENTER at any time to save the Autotest results 4 For a discussion of GRAPH F2 refer to Chapter 5 Cable Test Desc...

Page 38: ...W screen The LANcat automatically selects the next report number You can change the number by pressing the arrow keys 2 If desired enter a circuit identification number refer to the detailed instructi...

Page 39: ...splays the message In Use beneath the report number The LANcat has no overwrite protection Nothing prevents you from saving a report to the same number as a previous report number and erasing the earl...

Page 40: ...T F4 to move the cursor left or right along the ID line 3 Press PREV F2 or NEXT F3 to enter numeric or alpha characters 4 Press ENTER to save or press ESC to quit without saving F1 F2 F3 F4 After savi...

Page 41: ...its 2 LinkTalkTM can be activated following Autotest Quick Check or from the Extended Functions menu Press TALK F2 from the Autotest or Quick Check summary screen or select TALK from the Extended Func...

Page 42: ...easy for the operators to discuss the result 1 From an Autotest Summary Screen send the test result screen to the Remote using the SEND button 2 On the Main unit press the ESC key to return to the ov...

Page 43: ...be added to the Quick Check suite of tests by defining a Custom Cable standard see Chapter 2 Defining Custom Standards Impedance Propagation Delay Delay Skew Power Sum NEXT Cable Grading Resistance NE...

Page 44: ...it s dial to QUICK The test begins automatically Press the arrow keys to change the cable test standard 4 Press START F1 to re start Quick Check Press VIEW F3 to review Quick Check test results The re...

Page 45: ...s automatically Press the arrow keys to change the cable test standard 3 Press START F1 to re start Quick Check 4 Press TALK F2 to talk to remote unit operator Refer to Chapter 3 for instructions in u...

Page 46: ...idence that the link conforms to the Test Standard The following steps may be taken in order to resolve link tests with marginal measured results 1 Reduce the measurement uncertainty If you are curren...

Page 47: ...is usually recommended to use Autotest for most cable testing individual cable tests may be useful in troubleshooting specific cable problems For example Autotest may reveal a wire map problem requiri...

Page 48: ...r end to the remote unit If you are using a TwoWay System set the remote unit s dial to Remote 2 Set dial to WIRE MAP The test begins scanning immediately Press the arrow keys to select another cable...

Page 49: ...s of the Wire Map test are displayed on the LANcat screen The following illustrations show possible wiring faults Crossed Pair Split Pair Crossed Pair Split Pair Short Reversed Pair Open Artisan Techn...

Page 50: ...UTP cabling It can also be run individually as an Extended Functions test NEXT tests for Excessive crosstalk between pairs Proper pair connections RUNNING NEXT INDIVIDUALLY 1 Connect one end of the c...

Page 51: ...t Descriptions Page 5 5 NOTE When the NEXT test is performed on a TwoWay System both ends are tested F1 F2 F3 F4 Selecting NEXT Artisan Technology Group Quality Instrumentation Guaranteed 888 88 SOURC...

Page 52: ...ency of this measurement the measured value in decibels dB and the test limit To View the details of the NEXT test 1 From the NEXT summary result screen press DETAIL F3 2 On a TwoWay System press SEND...

Page 53: ...esolve link tests with marginal measured results 1 Reduce the measurement uncertainty If you are currently using a Level I rated Performance Module replace it with a Level II rated Performance Module...

Page 54: ...yed below the graph 4 Press PRINT F4 to send a comma separated variable CSV listing of the results to the serial port This outputs a complete listing of all NEXT measurements for all pair combinations...

Page 55: ...surement 1 2 3 6 4 5 M 7 8 Crosstalk Figure 5 1 Power Sum NEXT Measurement As shown above Power Sum NEXT is a sum of the pair to pair NEXT and is always greater than any pair to pair NEXT The Power Su...

Page 56: ...ISO Plus Class D VIEWING POWER SUM NEXT RESULTS At the conclusion of Autotest press VIEW F3 to view the test results and press the arrow keys to display the Power Sum NEXT results The Power Sum NEXT o...

Page 57: ...NEXT summary result screen press DETAIL F3 2 On a TwoWay System press SEND F1 to send the results to the Remote Unit 3 Press SUMMARY F3 or ESC to return to the summary screen F1 F2 F3 F4 Detailed Pow...

Page 58: ...played below the graph 4 Press PRINT F4 to send a comma separated variable CSV listing of the results to the serial port This outputs a complete listing of all Power Sum NEXT measurements for all pair...

Page 59: ...es as shown in Figure 5 2 The LANcat reports the worst grade for each pair Frequency MHz NEXT dB Figure 5 2 Cable Grading Each cable grade is 3dB wide at 100 MHz Higher grade cables exceed the applica...

Page 60: ...rd see Appendix A If you want to grade cable based on pair to pair NEXT performance select either a Cat 5 or Class D Cable Test Standard to create the custom Cable Test Standard If you want to grade c...

Page 61: ...ress VIEW F4 2 Press arrow key until the NEXT results appear The cable grades for individual wire pairs are displayed If Autotest was run using the enhanced Category 5 Plus or Class D Plus Cable Test...

Page 62: ...dular plug connectors or wall plates Length is one of the tests run during Autotest and Quick Check This test can also be run individually Length performs the following tests Measures length of each p...

Page 63: ...nit when performing a Length measurement test except during Autotest or Quick Check VIEWING LENGTH RESULTS At the completion of the Length test the screen displays the summary results 1 Press START F1...

Page 64: ...cables the cable length will probably be greater than the specification test limit This will cause a FAIL Length test result In this case you may ignore the fail message 4 A cable found to have a sho...

Page 65: ...reshold are displayed as anomalies Anom1 and Anom2 Fault Threshold is factory pre set but can be modified in the SETUP menu See Chapter 8 Set Up for Fault Threshold changes When the cable length is le...

Page 66: ...om each wire pair to the shortest wire pair Both Delay and Delay skew are becoming important parameters for emerging high speed LAN standards such as 100BaseT4 622 Mbps ATM and Gigabit Ethernet Figure...

Page 67: ...ary screen is displayed Press to view Delay Skew test summary This screen shows the additional delay time for each pair compared to the shortest pair F1 F2 F3 F4 F1 F2 F3 F4 Delay Test Summary Shortes...

Page 68: ...he tests run during Autotest and Quick Check It can also be run individually Attenuation detects One way attenuation of each cable pair Poor connections terminations Substandard wire Faulty connectors...

Page 69: ...specification values 1 Press SPEC F3 2 Press START F1 to re start the Attenuation test F1 F2 F3 F4 F1 F2 F3 F4 Attenuation Test Summary Attenuation Test Summary Test Specification Shown Test Specifica...

Page 70: ...ph 4 On a TwoWay System press SEND F2 to send the results to the Remote Unit 5 Press PRINT F4 to send a comma separated variable CSV listing of the results to the serial port This provides a complete...

Page 71: ...n in order to resolve link tests with marginal measured results 1 Reduce the measurement uncertainty If you are currently using a Level I rated Performance Module PM replace it with a Level II rated P...

Page 72: ...nt wire pairs ACR is therefore an indication of the expected reliability of data transmissions ACR is automatically computed during Autotest and Quick Check when testing twisted pair cable It can also...

Page 73: ...ss START F1 to restart the test NOTE Minimum ACR is not presently specified in most link test standards such as TIA TSB 67 or network standards such as IEEE 802 3 ISO 11801 requires at least 4 dB of A...

Page 74: ...ir cable segment and provides a report of the results Noise results for all selected cable types are compared to the IEEE 802 3 10BASE T impulse noise specification The default noise threshold setting...

Page 75: ...l to REMOTE 2 Set the main unit s dial to EXTENDED FUNCTIONS Scroll through the list of functions until NOISE is highlighted Press ENTER to select the test The test begins immediately Press the arrow...

Page 76: ...strated by the following figure NOTE When testing a 10BASE T cable per the IEEE 802 3 specification the maximum allowable impulse noise rate is 0 2 impulses per second with a 260 mV noise threshold F1...

Page 77: ...rformed again with the transmit and receive pairs reversed The results should agree within the magnitude of the LANcat NEXT measurement accuracy specification The test is performed automatically on al...

Page 78: ...ompared Differences should be less than the magnitude of the LANcat NEXT measurement accuracy specification RUNNING REPEATABILITY 1 Connect one end of the cable under test to the LANcat and the other...

Page 79: ...able is of the required type RUNNING IMPEDANCE 1 Connect the LANcat to one end of the cable under test 2 Set the LANcat s dial to EXTENDED FUNCTIONS Scroll through the list of functions until IMPEDANC...

Page 80: ...uite of tests by defining a Custom Cable standard see Appendix A Resistance can also be run individually via EXTENDED FUNCTIONS RUNNING RESISTANCE 1 Connect the LANcat to one end of the cable under te...

Page 81: ...F3 to view the test standard specification value 2 Press SHIELD F2 to view the resistance of the cable shield 3 Press START F1 to re start the resistance test F1 F2 F3 F4 Resistance Results Resistanc...

Page 82: ...test to the LANcat 2 Set dial to EXTENDED FUNCTIONS 3 Press the arrow keys to highlight CABLE TONER Selecting Cable Toner 4 Press ENTER Press ESC to abort the test NOTE When the AUTO TONER is ON see C...

Page 83: ...ts Print the last Traffic Report Delete saved reports View saved reports Connecting To a PC or Printer OVERVIEW Connect the single 9 pin connector end of the PC Interface Cable to the SERIAL PORT on t...

Page 84: ...to all serial printers Use only straight through adapters to connect the PC Interface Cable to a printer Connectors with different pin assignments than those mentioned above may affect output operatio...

Page 85: ...NT to display the Print menu 2 Press the arrow keys to highlight the test report you wish to print or upload 3 Press PRINT F4 or ENTER 4 Follow the procedure in Changing Serial Port Settings in this c...

Page 86: ...xt to the report number 4 Repeat steps 2 and 3 above to select all reports to be printed uploaded 5 Press PRINT F4 or ENTER 6 Follow the procedure in Changing Serial Port Settings in this chapter NOTE...

Page 87: ...LECT F1 or ENTER 3 Press PRINT F4 or ENTER 3 Follow the procedure in Changing Serial Port Settings in this chapter NOTE Any selected test reports can be deselected by highlighting report number and pr...

Page 88: ...plete the Autotest individual NEXT or individual Attenuation test 2 Select GRAPH F2 screen from the summary screen 3 Press PRINT F4 NOTE Detailed NEXT and Attenuation test results can only be uploaded...

Page 89: ...RE CTS DTR c NONE for no flow control 3 Press FORMAT F3 to select the output format and choose from the following a TEXT F3 for a pre formatted report ready for printing b COMMA F3 for comma separated...

Page 90: ...for deletion press SELECT F1 when ALL REPORTS is highlighted This selects all of the report numbers 4 Press DELETE F2 A screen displays the selected report numbers and asks you to confirm that you wis...

Page 91: ...ight the number of the test report you wish to view 3 Press VIEW F3 to view the report 4 Press the arrow keys to view different test results 5 Press ESC to return to the Print menu screen NOTE Refer t...

Page 92: ...S Attenuation dB 1 9 1 8 2 0 2 3 Limit dB 19 8 20 0 21 6 20 1 Margin dB 17 9 18 2 19 6 17 8 Frequency MHz 86 4 87 3 100 8 88 2 _________________________________________________________________________...

Page 93: ...00 13 NO LINK 0 00 00 14 NO LINK 0 00 00 15 NO LINK 0 00 00 16 NO LINK 0 00 00 17 NO LINK 0 00 00 18 NO LINK 0 00 00 19 NO LINK 66 00 00 20 260 00 00 21 225 00 00 22 321 00 00 23 299 00 00 24 270 00...

Page 94: ...LANcat User Manual Page 6 12 Artisan Technology Group Quality Instrumentation Guaranteed 888 88 SOURCE www artisantg com...

Page 95: ...pair cable is so called because of the physical make up of the cable Two wires are physically twisted together along the length of the cable to form a pair There are three basic kinds of twisted pair...

Page 96: ...ooting a specific cable problem See Appendix A Cable Test Standards for an explanation of various test standards The TSB 67 UTP Link Performance specification is becoming the benchmark for installed U...

Page 97: ...on the other end pin 2 is connected to pin 2 3 to 3 and so on Figure 7 2 illustrates correct connectivity and pairing per the TIA 568 specification 1 2 3 6 4 5 7 8 1 2 3 6 4 5 7 8 Figure 7 2 TIA 568 C...

Page 98: ...Figure 7 3 Continuity Wiring Errors In addition to continuity the TIA 568 also specifies which pins are associated with specific wire pairs in the cable When pin to pin continuity is maintained but t...

Page 99: ...re split with 3 and 6 Refer to the following section for an explanation of NEXT 1 2 3 6 4 5 7 8 1 2 3 6 4 5 7 8 1 2 splits 3 6 Figure 7 4 Split Pair NOTE A split pair cannot be detected with a simple...

Page 100: ...y If problem continues follow the possible solutions for OPEN on one or more of the pairs below OPEN on one or more of the pairs Perform a length test to locate fault Go to the fault and correct wirin...

Page 101: ...uble check the specification you are testing to and re terminate the segment if necessary to correct the problem If problem continues follow the procedure for OPEN on one or more of the pairs to locat...

Page 102: ...atin untwisted cable will also result in split pairs Check the coloring of the wiring at all termination points for proper pairing Correct the wiring as necessary 4 pair cable with USOC pairing Other...

Page 103: ...s in a telephone when you hear another conversation on your line If crosstalk is severe enough the transmitted signal can interfere with the received signal on another wire pair see Figure 7 6 X T X R...

Page 104: ...TIA 568 A specification states the twists must be maintained to within 0 5 inch 13 mm of the termination for Category 5 and within 1 0 inch 25 mm for Category 4 If the twists are not maintained NEXT...

Page 105: ...Chapter 7 Testing Twisted Pairs Page 7 11 Figure 7 8 Typical Relationship of NEXT and Frequency Freq NEXT dB Artisan Technology Group Quality Instrumentation Guaranteed 888 88 SOURCE www artisantg com...

Page 106: ...r solutions Common Causes of Excessive NEXT Solution Bad or low grade patch cables Patch cables may not be twisted pair A common mistake is to use silver satin untwisted cable for data applications Pa...

Page 107: ...leshooting follow procedure for Split Pair in Wire Map section Use of substandard components termination components cable etc It is common to make the mistake of using couplers or lower grade hardware...

Page 108: ...or 5 components If testing to Category 5 you can only use Category 5 components Check that termination points meet installation standards Reference the specification you are using Re terminate all con...

Page 109: ...b to work area wall plate but the workstation has problems when connected with its patch cord Patch cable may not be a twisted pair cable A common mistake is to use untwisted telephone wire for data a...

Page 110: ...etworks transmit over multiple pairs at once to achieve their high data rates Because they transmit over several pairs simultaneously the normal pair to pair NEXT is not indicative of the coupled nois...

Page 111: ...wer Sum NEXT Pair to Pair NEXT Figure 7 10 Power Sum NEXT Measurement The characteristics of Power Sum NEXT are very similar to those of NEXT They both vary with frequency are measured in decibels a l...

Page 112: ...a twisted pair cable The amount of this loss is expressed in decibels dB refer to Figure 7 11 Sending unit Receiving unit Figure 7 11 Attenuation Attenuation varies with frequency and length Typicall...

Page 113: ...ch cable is data grade Excessive Length If specification is based on a maximum length check length and correct if necessary Poor termination Check all terminations for proper connections Follow troubl...

Page 114: ...uation test fails for one or more pairs Compare actual to expected values to confirm misconformance Check that the length is within specification in applications where attenuation is a maximum limit o...

Page 115: ...s reflected back If the cable is properly terminated that is the terminator is equal to the impedance of the cable there will be no reflection of the signal and you will not be able to determine the l...

Page 116: ...characteristic called Nominal Velocity of Propagation NVP This value can be determined by contacting the cable manufacturer NVP is the speed of signal propagation through a cable expressed as a perce...

Page 117: ...orst case allowable impedance discontinuity specified in IEEE 802 3 for coaxial cable See Chapter 8 Set Up for information on how to change the default threshold value If you do not want to see anomal...

Page 118: ...le bad connection Re terminate the segment to eliminate the problem If the problem continues make sure other parameters such as attenuation are within limits If they are check the specification you ar...

Page 119: ...eet the LANcat indicates the cable is too long to measure The length test reveals OPEN If the Remote unit is connected during the length test the Remote creates an OPEN in order to measure the length...

Page 120: ...er Perform a Wire Map test on the segment If Wire Map shows all pairs are OPEN or SHORT the LANcat can not detect the Remote Unit Thus all pairs are OPEN or SHORT within 5 feet of the LANcat If Wire M...

Page 121: ...ult in data re transmissions ultimately slowing down the network Delay Skew is becoming increasingly important in emerging high speed Networks such as 100BaseT4 622 Mbps ATM and Gigabit Ethernet To tr...

Page 122: ...te the NVP and re run the test Use a higher grade cable which typically have lower propagation delays If your cable is identified as 2 2 or 3 1 cable it may be resulting in excessive Delay Skew Contac...

Page 123: ...ing the same pathway as a data line elevators and industrial type equipment out in UV light fixture Noise Figure 7 14 Noise The IEEE 802 3 standard for 10BASE T includes an impulse noise specification...

Page 124: ...lines are shared with voice lines Keep data lines separate from voice lines Re route voice lines to a different cable The following table discusses some common noise problems and their solutions Test...

Page 125: ...pedances Locations of any significant impedance changes can be found by performing the Length test on a segment Refer to the previous section on Length for more information on finding impedance change...

Page 126: ...used as a method to measure the length of a cable if you know the rated resistance ohm per foot or meter of the cable Resistance of a cable is usually rated on a per 1000 feet or 1 km basis The follo...

Page 127: ...e assured with the use of the 8 position modular plug PM See Appendix A Test Standards for more explanation of the EIA TIA TSB 67 Link Performance Standard CONNECTING THE SEGMENT UNDER TEST CAUTION If...

Page 128: ...gross errors before running the longer Autotest If there is a gross error for example split pair OPEN segment too long you can fix the error before running the extended certification test thus saving...

Page 129: ...ce problem 2 If any of the tests you perform using the LANcat fail use the information from the troubleshooting tables provided earlier in this chapter to determine the cause of the failure 3 If the L...

Page 130: ...LANcat User Manual Page 7 36 Artisan Technology Group Quality Instrumentation Guaranteed 888 88 SOURCE www artisantg com...

Page 131: ...tions Available Selections Default is bold Units Feet Meters Feet or Meters Fault Thresh Default Dec Inc 4 to 10 7 Noise Thresh Default Dec Inc 100 mV to 500 mV 260 mV PowerDown Dec Inc 2 to 30 min or...

Page 132: ...Off On Off Company name MODIFY Left Right Previous Next Co A Z a z 0 9 Blank Circuit Names Blank None Same NEXT Blank None Same NEXT Auto Toner ON OFF ON OFF Reset to defaults SetUp NVPs SetUp NVP NO...

Page 133: ...re not lost when replacing instrument batteries LENGTH MEASUREMENT UNITS The Units parameter selects feet or meters for cable length measurements F1 F2 F3 F4 Switch dial to SETUP Highlight Units using...

Page 134: ...case allowable impedance discontinuity specified in IEEE 802 3 for coaxial cable Anomalies that are greater than this threshold may impair network transmission F1 F2 F3 F4 Switch dial to SETUP Highlig...

Page 135: ...e is 260 mV which corresponds to the impulse noise specification for 10BASE T F1 F2 F3 F4 Switch dial to SETUP Highlight Noise Thresh using the arrow keys Press DEFAULT F1 to change to the factory def...

Page 136: ...disable Power Down set the value to Disabled CAUTION Auto power down is automatically disabled during the Traffic and Noise tests Use the AC mains adapter to power the LANcat for extended Traffic or N...

Page 137: ...requency will avoid display flicker caused by the interaction of the LCD display with room light sources It is also used to filter noise from some measurements F1 F2 F3 F4 F1 F2 F3 F4 Set dial to SETU...

Page 138: ...een the LANcat and the printer or PC The default setting is the HARDWARE flow control setting Other available settings are XON XOFF and NONE F1 F2 F3 F4 F1 F2 F3 F4 Set dial to SETUP Highlight BAUD RA...

Page 139: ...ey to zero the seconds F1 F2 F3 F4 F1 F2 F3 F4 Set dial to SETUP Highlight Date using the arrow keys Press FORMAT F1 to change the date format Press MONTH to change the month Press DAY to change the d...

Page 140: ...ables audible tones that are generated during Traffic and Noise tests as activity indicators Traffic Noise tones are automatically disabled when the Audible Tones parameter is disabled F1 F2 F3 F4 F1...

Page 141: ...hlight CO using the arrow keys Press MODIFY F4 or ENTER to modify the name Press LEFT F1 or RIGHT F4 to move the cursor Press PREV F2 or NEXT F3 to enter alpha or numeric characters Hold down the soft...

Page 142: ...nter Circuit ID starting with nothing SAME User can enter Circuit ID starting with the last ID used NEXT User can enter Circuit ID starting with the last ID used but with the last character incremente...

Page 143: ...eature whenever the unit is set to Quick Check or Autotest and a remote is not attached See Chapter 5 Set dial to SETUP Press ON OFF F4 to enable or disable automatic tone generation F1 F2 F3 F4 Artis...

Page 144: ...settings F1 F2 F3 F4 Set dial to SETUP Highlight Reset to Defaults using the arrow keys Press SETUP F2 to reset all setup parameters to their default values refer to Table 8 1 Press NVPs F3 to reset...

Page 145: ...elected More precise NVP values can be set using one of the following procedures NVP calibration using a section of the actual cable to be tested is the more accurate of the two procedures USING A KNO...

Page 146: ...cy Leave the far end of the cable open 5 Press START F1 6 Press DEC F2 or INC F3 to adjust the cable length on the display to the known cable length 7 Press SAVE F4 or ENTER to save the new value 8 To...

Page 147: ...NVPs are listed in Appendix B Common NVP Values To load a known NVP value 1 Set the dial to CAL 2 Select NVP from the calibration menu and press CALIBRATE F4 or ENTER 3 Press INC F3 or DEC F2 to adju...

Page 148: ...ault value however may result in cable length measurement errors of up to 7 due to the variation in the signal propagation rate from cable to cable This potential length error usually will not impair...

Page 149: ...ed Calibration should be performed whenever a different Handheld Remote combination is used ONE WAY SYSTEM CALIBRATION To calibrate the remote on a OneWay System 1 Connect the Remote to the LANcat usi...

Page 150: ...test is finished the screen returns to the Calibrate menu 7 Turn the dial to Quick Press the UP or DOWN arrow keys to highlight the CAT5 Basic Link test standard Press ENTER or SAVE F4 to select the...

Page 151: ...the other without need for recalibration If a Performance Module is replaced with another of the same type however calibration of the new Performance Module should be performed A Calibration Standard...

Page 152: ...he bottom of the display will show the progress of the calibration Press CANCEL F1 or ESC to cancel the calibration procedure 8 After approximately 45 seconds the LANcat will display the message Conne...

Page 153: ...by using the arrow keys 3 Press CALIBRATE F4 or ENTER The Calibrate Impedance screen will appear with the displayed message Connect to Jack 1 4 Connect the LANcat to JACK 1 of the Calibration Standard...

Page 154: ...ould be performed whenever a different Performance Module is installed To calibrate Resistance 1 Connect the LANcat to the Remote Unit 2 Set the dial to CAL 3 Highlight Resistance in the Calibrate men...

Page 155: ...e without a means to access the Internet may contact Datacom Textron s Technical Support Center for software firmware upgrades Firmware updates are available as a self extracting executable file Follo...

Page 156: ...LANcat User Manual Page 9 12 Artisan Technology Group Quality Instrumentation Guaranteed 888 88 SOURCE www artisantg com...

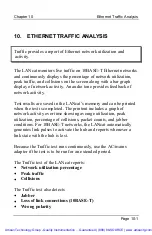
Page 157: ...pleted The printout includes a graph of network activity over time showing average utilization peak utilization percentage of collisions packet counts and jabber conditions For 10BASE T networks the L...

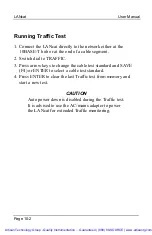
Page 158: ...nge the cable test standard and SAVE F4 or ENTER to select a cable test standard 4 Press ENTER to clear the last Traffic test from memory and start a new test CAUTION Auto power down is disabled durin...

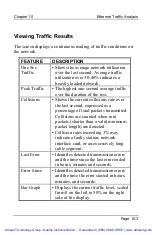
Page 159: ...entage of total packets transmitted Collisions are counted when runt packets shorter than a valid minimum packet length are detected Collision rates exceeding 3 may indicate a faulty station network i...

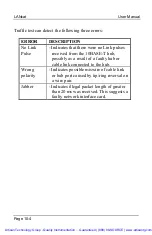
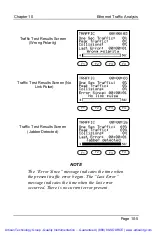
Page 160: ...bly as a result of a faulty hub or cable link connected to the hub Wrong polarity Indicates possible miswire of cable link or hub port caused by tip ring reversal on a wire pair Jabber Indicates illeg...

Page 161: ...message indicates the time when the last error occurred There is no current error present F1 F2 F3 F4 F1 F2 F3 F4 F1 F2 F3 F4 Traffic Test Results Screen Wrong Polarity Traffic Test Results Screen Jab...

Page 162: ...LANcat User Manual Page 10 6 Artisan Technology Group Quality Instrumentation Guaranteed 888 88 SOURCE www artisantg com...

Page 163: ...urs are Monday through Friday 8 AM to 4 30 PM Pacific Time The phone numbers and Internet address are US and Canada 800 468 5557 425 355 0590 International 425 355 0590 FAX 425 290 1600 Internet www d...

Page 164: ...Datacom Textron Technical Support Representative If the LANcat passes the Selftest but still does not perform properly perform the calibration procedure refer to Chapter 9 Calibration then perform the...

Page 165: ...ormance requirements have been established by the industry association EIA TIA in Technical Systems Bulletin 67 TSB 67 also defines two installed cabling test configurations the Channel and the Basic...

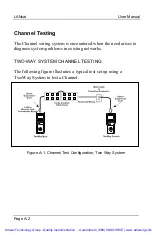
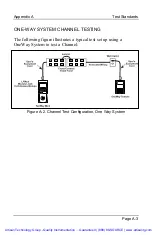
Page 166: ...nose system problems in existing networks TWO WAY SYSTEM CHANNEL TESTING The following figure illustrates a typical test set up using a TwoWay System to test a Channel Figure A 1 Channel Test Configur...

Page 167: ...NNEL TESTING The following figure illustrates a typical test set up using a OneWay System to test a Channel Figure A 2 Channel Test Configuration One Way System Artisan Technology Group Quality Instru...

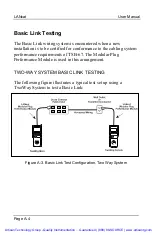
Page 168: ...formance requirements of TSB 67 The Modular Plug Performance Module is used in this arrangement TWO WAY SYSTEM BASIC LINK TESTING The following figure illustrates a typical test set up using a TwoWay...

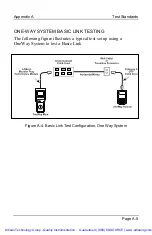
Page 169: ...INK TESTING The following figure illustrates a typical test set up using a OneWay System to test a Basic Link Figure A 4 Basic Link Test Configuration One Way System Artisan Technology Group Quality I...

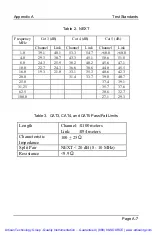
Page 170: ...Level II accuracy with the Modular Plug Performance Module Level II is higher in performance than Level I It is not possible to attain Level II accuracy using the Modular Jack Performance Module Tabl...

Page 171: ...5 6 47 1 10 0 22 7 24 3 36 6 38 6 44 0 45 5 16 0 19 3 21 0 33 1 35 3 40 6 42 3 20 0 31 4 33 7 39 0 40 7 25 0 37 4 39 1 31 25 35 7 37 6 62 5 30 6 32 7 100 0 27 1 29 3 Table 3 CAT3 CAT4 and CAT5 Pass Fa...

Page 172: ...ar Plug Performance Module is recommended If testing of the user patch cords is required the Modular Jack Performance Module can be used with reduced accuracy performance NOTE ScTP Class D and ISO 118...

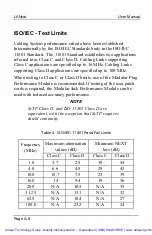
Page 173: ...ass C Class D 1 0 35 3 40 22 4 40 10 0 12 3 35 16 0 5 30 20 0 28 31 25 23 62 5 13 100 0 4 Table 6 ISO 11801 Class C Class D Pass Fail Limits Length 100 meters Characteristic Impedance 100 25 Split Pai...

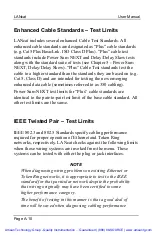
Page 174: ...r to pair test limit of the base cable standard All other test limits are the same IEEE Twisted Pair Test Limits IEEE 802 3 and 802 5 Standards specify cabling performance required for proper operatio...

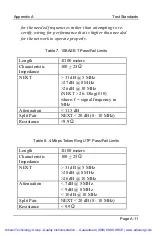
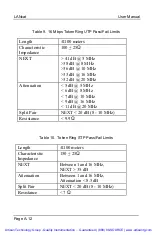
Page 175: ...1 dB 5 MHz 27 dB 8 MHz 26 dB 10 MHz NEXT 26 15log f 10 where f signal frequency in MHz Attenuation 11 5 dB Split Pair NEXT 20 dB 8 10 MHz Resistance 9 9 Table 8 4 Mbps Token Ring UTP Pass Fail Limits...

Page 176: ...MHz 6 dB 8 MHz 7 dB 10 MHz 9 dB 16 MHz 11 dB 20 MHz Split Pair NEXT 20 dB 8 10 MHz Resistance 9 9 Table 10 Token Ring STP Pass Fail Limits Length 100 meters Characteristic Impedance 150 25 NEXT Betwee...

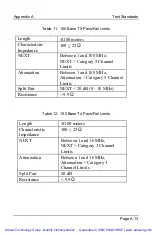
Page 177: ...nuation Category 5 Channel Limits Split Pair NEXT 20 dB 8 10 MHz Resistance 9 9 Table 12 100 Base T4 Pass Fail Limits Length 100 meters Characteristic Impedance 100 25 NEXT Between 1 and 16 MHz NEXT C...

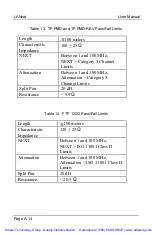
Page 178: ...0 MHz Attenuation Category 5 Channel Limits Split Pair 20 dB Resistance 9 9 Table 14 FTP 120 Pass Fail Limits Length 100 meters Characteristic Impedance 120 25 NEXT Between 1 and 100 MHz NEXT ISO 1180...

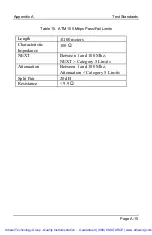
Page 179: ...h 100 meters Characteristic Impedance 100 NEXT Between 1 and 100 Mhz NEXT Category 5 Limits Attenuation Between 1 and 100 Mhz Attenuation Category 5 Limits Split Pair 20 dB Resistance 9 9 Artisan Tech...

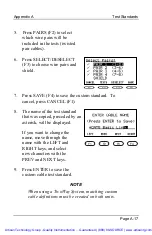
Page 180: ...ch pairs will be included in the tests and which tests will be performed To create a custom standard 1 Set dial to Autotest Quick Wire Map Length or Traffic 2 Press either arrow key to display the cab...

Page 181: ...e test standard that was copied preceded by an asterisk will be displayed If you want to change the name move through the name with the LEFT and RIGHT keys and select new characters with the PREV and...

Page 182: ...LANcat User Manual Page A 18 Artisan Technology Group Quality Instrumentation Guaranteed 888 88 SOURCE www artisantg com...

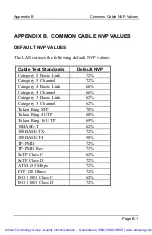
Page 183: ...el 72 Category 4 Basic Link 66 Category 4 Channel 66 Category 3 Basic Link 62 Category 3 Channel 62 Token Ring STP 78 Token Ring 4 UTP 60 Token Ring 16 UTP 69 10BASE T 62 100BASE TX 72 100BASE T4 58 T...

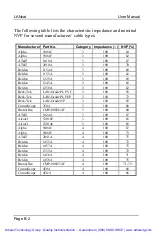
Page 184: ...Berk Tek LAN Grade PL PVC 3 100 58 Berk Tek LAN Grade PL FEP 3 100 72 Berk Tek LAN Grade NP 3 100 69 CommScope 3504 3 100 68 Brand Rex CMP 00026 4F 3 100 60 AT T 1024A 3 100 67 Alcatel 530102 3 100 6...

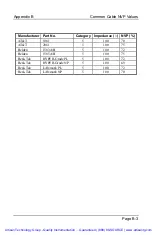
Page 185: ...61 5 100 70 AT T 2061 5 100 75 Belden 1583A B 5 100 72 Belden 1585A B 5 100 75 Berk Tek HYPER Grade PL 5 100 72 Berk Tek HYPER Grade NP 5 100 69 Berk Tek LANmark PL 5 100 72 Berk Tek LANmark NP 5 100...

Page 186: ...LANcat User Manual Page B 4 Artisan Technology Group Quality Instrumentation Guaranteed 888 88 SOURCE www artisantg com...

Page 187: ...n X 1 9 in 15 2 cm X 8 9 cm X 4 8 cm Weight 13 oz 0 37 kg ENVIRONMENTAL Operating Temperature 0 to 50 C 32 to 122 F Operating Humidity non condensing 10 to 90 Storage Temperature 20 to 60 C 4 to 140 F...

Page 188: ...storage life 2 years OneWay Remote Unit Battery Four AA alkaline Battery Life 8 10 hours continuous use or 800 Autotests typical PERFORMANCE MODULES Standard Modular Plug Optional Modular Jack Optiona...

Page 189: ...ft 0 305m 2ft 0 6m 3 NVP Uncertainty 1001 to 2000 ft 306 610m NVP Nominal Velocity of Propagation 0 50c to 0 99c Cable Fault Types Shorts Opens Intermediate Impedance Anomalies Number Of Faults End Of...

Page 190: ...r pairs one way Frequency Range 1 MHz to 100 MHz NEXT Accuracy With Modular plug Performance Module exceeds requirements of TIA TSB 67 for Level II Accuracy Attenuation Accuracy With Modular Plug Perf...

Page 191: ...User defined 100 mV to 500 mV peak 260 mV default CABLE RESISTANCE TWISTED PAIR Range 0 to 1000 Accuracy 0 5 0 to 10 1 0 10 to 20 CABLE IMPEDANCE TWISTED PAIR Range 30 to 200 Accuracy 10 at 100 calibr...

Page 192: ...LANcat User Manual Page C 6 Artisan Technology Group Quality Instrumentation Guaranteed 888 88 SOURCE www artisantg com...

Page 193: ...eries Cable Tester The LANcat instrument uses frequencies up to 100 MHz where 1 inch of wire is a significant part of a wavelength Proper wire preparation and pair twisting is extremely important to p...

Page 194: ...t installation OR EIA TIA T568A Category 5 patch cord 8 ft length cut in two OR 4 ft Category 5 patch cord with one connector removed Tools Required Tie wrap approximately 0 14 inch wide x 3 inch mini...

Page 195: ...ure D 1 Performance Module Disassembly Disassembly 1 Remove the Performance Module from the main body see Chapter 1 Introduction CAUTION Performance Module removal exposes STATIC SENSITIVE electronics...

Page 196: ...t 7 Remove the grommet from cable and save for reuse New Cable Preparation NOTE This procedure assumes you are using EIA TIA T568A type patch cord See Table 1 for other possible configurations If chan...

Page 197: ...pproaches the wire s end 3 Arrange the cable and wire pairs as shown in Figure D 2 Do not untwist the pairs any more than required to strip the wire ends 4 Cut the two inner wire pairs orange and blue...

Page 198: ...strip 2 Check to see that there are no stray wire strands outside terminal clamps and make sure all wires are properly tightened into their terminals 3 Make sure that each pair twist is correct and th...

Page 199: ...en properly installed If necessary change their positions to avoid pinching DRAIN WIRE NOTES CAUTION If using ScTP the drain wire must not short against the circuit shield nor the case if case is copp...

Page 200: ...tions If your assembly fails this test re examine the twisted pairs as they enter the screw terminals Try twisting the wires tighter and make sure the twists extend as close as possible to the screw t...

Page 201: ...a OneWay System or TwoWay System depending on your LANcat configuration 3 SYSTEM CHECK Check your LANcat performance as follows Turn dial to EXTENDED FUNCTIONS Run Self Test All results should read PA...

Page 202: ...air 4 to T568A Green White Green White Orange Orange BLue White BLue White BRown BRown 110 Pair 2 Pair 3 Pair 1 Pair 4 to T568B Orange White Orange White Green Green BLue White BLue White BRown BRown...

Page 203: ...Institute ARCNET Attached Resources Computing Network A token bus developed by Datapoint ATM Asynchronous Transfer Mode a high speed packet switching method Attenuation Reduction in the strength or p...

Page 204: ...the horizontal cross connect Includes equipment cords at each end for connection to test instrumentation see Appendix A Test Standards Figure A 2 BER Bit Error Rate the ratio of received bits in erro...

Page 205: ...by EIA TIA TSB67 the entire horizontal wiring link connecting end devices in the work area to the hub concentrator in the wiring closet Includes user s equipment cords at both ends and horizontal cros...

Page 206: ...er the medium is available and re transmit when collisions occur D DC Direct Current A zero frequency or constant level signal Decibel dB A logarithmic unit of measure used to express the amplitude ra...

Page 207: ...ion FCC Federal Communications Commission FDDI Fiber Distributed Data Interface a network standard ANSI X3T9 5 that defines a 100 Mbps token ring network using optical fiber for data transmission over...

Page 208: ...trator I I O Input Output referring to a device input and output process IDF Intermediate Distribution Frame The distribution point where vertical backbone cable is connected to the horizontal cables...

Page 209: ...ed data bits Jumper Cable Short cable for interconnecting connecting blocks or patch panels Also called patch cord or patch cable L LAN Local Area Network a data communication network that provides hi...

Page 210: ...ice used in Ethernet networks to couple a station or hub to the transmission medium Medium The physical carrier of the data being transmitted for example twisted pair cable coaxial cable or fiber Modu...

Page 211: ...onnecting point on a network A station or device on a network Noise Any random disturbance in a communications system that interferes with the integrity of the transmitted data NVP Nominal Velocity of...

Page 212: ...erconnection of cable segments Physical Layer The layer that provides the mechanical electrical and functional connection over a transmission medium Plenum A air handling space inside a building Plenu...

Page 213: ...ht position telephone type connector Router Attachment device that interconnects two or more LAN subnetowrks and relays packets based upon destination network addresses Runt Packet An Ethernet packet...

Page 214: ...pair wiring error in which pin to pin continuity is maintained but physical pairs are separated Star Physical layout of a LAN that uses a centralized wiring location Starlan LAN network developed by A...

Page 215: ...itted over a Ring or Bus network used to signify permission to transmit TP PMD Twisted Pair Physical Media Dependent A variation of the FDDI standard ANSI X3T9 5 adapted for 100 Mbs data transmission...

Page 216: ...between two points W Wide Area Networks WAN Networks usually in the public domain that tie together widely separated computing devices or LANs Wiring Closet A room used to interconnect horizontal cab...

Page 217: ...ing setup parameters 8 7 Basic Link 1 Basic Link Test Configurations 4 Batteries changing 1 10 information 1 9 low battery message 1 9 specification 2 Baud Rate 6 7 changing setup parameters 8 8 C Cab...

Page 218: ...escription 1 5 setting up 2 1 specifications 1 test results 7 35 upgrading 9 11 Length changing setup parameters 8 3 defined 5 16 definition of 7 21 running 5 17 solutions to test failures 7 24 viewin...

Page 219: ...rameters 8 7 Power Sum NEXT 5 9 7 16 Printing test reports selecting 6 4 Printing Test Reports overview 6 1 Q Quick Check definition of 4 1 running 4 2 viewing results 4 4 R Remote Unit calibration 9...

Page 220: ...21 Token Ring UTP Pass Fail Limits 11 Traffic defined 10 1 Traffic Test results screens 10 5 running 10 2 viewing results 10 3 Traffic Noise Tones Changing setup parameters 8 10 Twisted Pair test desc...

Page 221: ...service in house repair center WE BUY USED EQUIPMENT Sell your excess underutilized and idle used equipment We also offer credit for buy backs and trade ins www artisantg com WeBuyEquipment REMOTE IN...

Reviews: