background image

Datacard CR500 User Reference Guide


Clean the System

 23

22

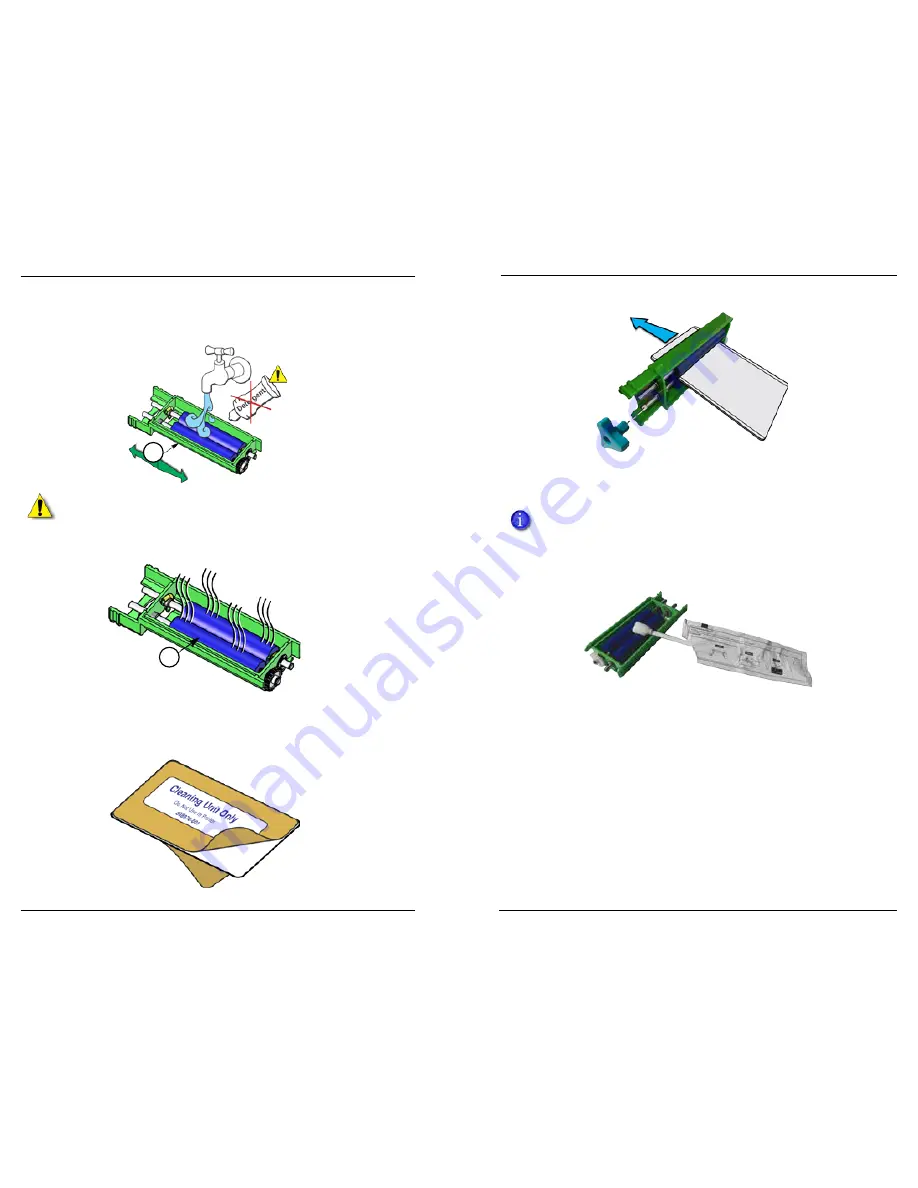
4.  Clean the rollers.

a.  Rinse the blue cleaning rollers with cold water. Gently rub the rollers 

under running water.

Caution:

 Do not use soap or detergents, which can damage the rollers.

b.  Allow the card cleaning rollers to dry thoroughly.

c.  If debris remains on the rollers, use the dual-sided cleaning card. 

i. 

Remove the protective paper from both sides of the cleaning card 

(part no. 508976-001).

ii.  Insert the cleaning card into the rollers of the cleaning unit.

iii.  Move the cleaning card back and forth through the rollers until all 

debris possible is removed.

If you have trouble moving the cleaning card through the rollers, remove a 

jog dial from the printer and use it to turn the rollers with the card in place.

d.  If any debris still remains, use a cleaning swab to clean the rollers until 

no debris is visible.

i. 

When finished using the cleaning swab to clean the rollers, rinse 

the rollers under running water again to remove any traces of 

isopropanol left by the swab. 

ii.  Allow the rollers to dry completely before reinstalling the cleaning 

unit.

5.  Reinstall the cleaning unit with the blue rollers facing to the right. 
6.  Replace the jog dial if it was removed.
7.  If cleaning is complete, close the print unit door and the security enclosure 

door to lock the printer.
or
Continue with “Clean the Multi-Hopper.” 

4a

4b

Jog Dial

Summary of Contents for CR500

Page 1: ...Datacard CR500 Instant Issuance System User Reference Guide November 2015 527495 001 Rev C...

Page 2: ...Unit 26 Clean the Magnetic Stripe Head 30 Clean the Thermal Printhead 32 Clean the Print Unit Fan Filter 34 Prepare the Printer for Use 34 Common Error Messages 35 Printer Error Recovery 35 Message 1...

Page 3: ...is okay Green Ribbon is low less than 10 remains The percent of ribbon remaining required for notification can be changed using Printer Manager refer to the printer s Installation and Administrator s...

Page 4: ...status of the retransfer film and ink ribbon The green bar shows the amount of retransfer film available 100 available 75 available 50 available or 25 available The orange bar shows the amount of ink...

Page 5: ...e print unit front panel and message 165 Ink ribbon out displays on the touch screen The right column of the touch screen supplies gauge shows white not orange Do the following to load the ink ribbon...

Page 6: ...llowing to load the retransfer film cartridge 1 Unlock the printer and open the security enclosure 2 On the print unit slide the door latch up and open the print unit door 3 Press the retransfer film...

Page 7: ...up spool d Turn the take up knob on the underside of the cartridge to remove any slack Gently pull out the take up knob so it turns smoothly If slack cannot be removed check that the supply and take...

Page 8: ...cards Cards can stick together Slide or fan cards to separate the edges Orient all cards the same way Load only ID 1 cards of 0 030 inch 0 75 mm thickness Load up to 70 cards in hopper 1 50 cards in...

Page 9: ...o dispose of them 1 Orient the cards as follows For cards with pre printed images load cards with the front of the card down and the top of the image toward the print unit For cards with a magnetic st...

Page 10: ...printer Task Schedule Description Card Cleaning Rollers Cleaning Unit Every 200 cards or when you change the ink ribbon Wash the blue cleaning rollers with water Then clean using the dual sided clean...

Page 11: ...inside the printer door removes lint and other debris from the cards before printing Clean the card cleaning rollers after every 200 cards or when you change the ink ribbon Use the following procedur...

Page 12: ...ebris possible is removed If you have trouble moving the cleaning card through the rollers remove a jog dial from the printer and use it to turn the rollers with the card in place d If any debris stil...

Page 13: ...e them after cleaning 3 Prepare a cleaning card by folding a magnetic stripe cleaning card Do not apply any type of fluid to the card 4 Clean the tracks a Insert the folded card into hopper 1 and push...

Page 14: ...described in Clean the Multi Hopper on page 24 c If closed unlock and open the security enclosure door and the print unit door d Power off the printer Wait approximately 10 to 20 minutes for the print...

Page 15: ...ng Start OK d Press Return The print unit pulls the cleaning card into the print unit and cleaning begins If the card is not pulled into the unit and no errors display lightly push the card until the...

Page 16: ...eaning card in hopper 3 4 Push the card to the print unit card feed roller Stop when the card is under the roller and engages the print unit 1 2 3 4 5 5 At the print unit front panel a Press Menu to d...

Page 17: ...ct button and remove the ink ribbon cartridge 3 Press the retransfer film cartridge eject button and remove the retransfer film cartridge 4 Locate the thermal printhead and rollers The thermal printhe...

Page 18: ...solve the problem contact your service provider for assistance Note This is the default print unit front panel message when the security enclosure door is open Print Unit Codes A1 20 24 26 27 FB The p...

Page 19: ...t until the cleaning is complete or complete the menu task On the print unit front panel press Reset and then Return to initialize the print unit Print Unit On Setting or Transport Mode DD The print u...

Page 20: ...pen the security enclosure door and look at the print unit front panel for more information about the card jam 3 Look inside the security enclosure or print unit to locate the card 4 Remove the card i...

Page 21: ...If necessary remove the card pick roller to make it easier to pull the card out Replace the roller after removing the card 4 If the card is in the middle of the card track remove all cards and card w...

Page 22: ...ion of the jam 3 Power off the printer and open the print unit door 4 If part of the card is in the multi hopper a Remove the cards and card weight from hopper 3 b Place a jog dial on the lower shaft...

Page 23: ...ecessary push the card toward the print unit while turning the jog dial c Rotate the turnover unit clockwise to the 4 o clock position to angle the card toward the card reject tray 8 Turn the card cle...

Page 24: ...1187 Park Place Shakopee Minnesota 55379 952 933 1223 952 933 7971 Fax www datacard com id 2014 2015 Entrust Datacard Corporation All rights reserved November 2015 527495 001 Rev C...

Reviews: