background image

CE870 Instant Issuance System Installation and Administrator’s Guide

39


Configure Network Settings

Use Printer Manager to configure your network settings and complete the setup of your system. 
Refer to 

Chapter 3: "Printer Manager”

 for a complete discussion about using Printer Manager.

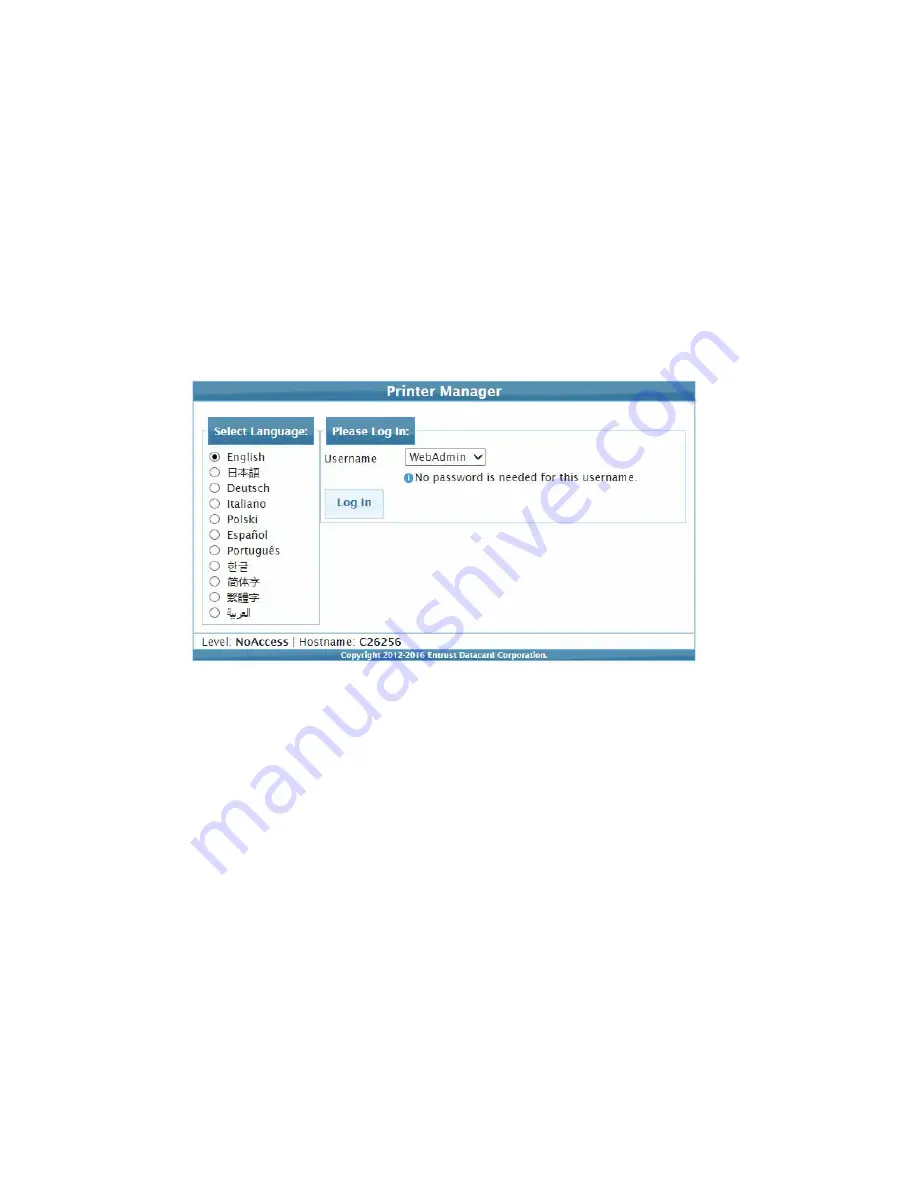
Log in to Printer Manager:

1. 

Open an Internet browser and enter the IP address of the printer. Refer to 

“Access Printer 

Manager” 

on 

page 63

 for complete information about how to access Printer Manager.

2. 

Log in to Printer Manager as WebAdmin.


Summary of Contents for CE870

Page 1: ...Datacard CE870 Instant Issuance System Installation and Administrator s Guide January 2017 Part No 527263 001 Rev H...

Page 2: ...tries MasterCard is a registered trademark of MasterCard International Incorporated Visa is a registered trademark of Visa International Service Association All other product names are the property of...

Page 3: ...nt to a grounded power source Do not defeat or bypass the ground lead Place the equipment on a stable surface table and ensure floors in the work area are dry and non slip Know the location of equipme...

Page 4: ...n is subject to the following two conditions 1 This device may not cause harmful interference and 2 this device must accept any interference received including interference that may cause undesired op...

Page 5: ...red to take adequate measures WEEE The model RX10 retransfer printer uses a lithium coin cell battery Refer to the service manual for battery removal instructions Notice for Australia This is a Class...

Page 6: ...is made in compliance with the State of California Safe Drinking Water and Toxic Enforcement Act of 1986 which requires warning labels on products that may contain elements that the State of Californi...

Page 7: ...B November 2012 Updates for Card Printer Driver 4 0 C April 2013 Updates for Card Printer Driver 4 1 D March 2014 Updates for Card Printer Driver 5 0 and new supplies and features E February 2015 Adde...

Page 8: ...viii...

Page 9: ...Openings 10 Assemble the Printer and Embosser 13 Connect the Power Cords 15 Load Supplies 16 Load the Indent Ribbon Cartridge 16 Load the Topping Foil Cartridge 18 Load the Cleaning Sleeve 19 Load the...

Page 10: ...47 Print Graphics in Color 47 Monochrome Printing 48 Monochrome Printing with Full Color Ribbon 48 Monochrome Ribbon 48 Ribbon Saver 48 Print Text in Monochrome 49 Print Bar Codes 49 Bar Code Guidelin...

Page 11: ...r Settings 64 Print a Printer Manager Page 65 Use Printer Manager 65 Status Menu 66 Printer Setting Menu 68 Communication 70 ActivityLog 73 Behavior 75 VitalProductData 77 FrontPanel 78 Print 79 Pick...

Page 12: ...Print Ribbon Storage Guidelines 110 Indent Ribbon 111 Topping Foil 111 Supply Storage Guidelines 111 Cards 112 Card Size 112 Card Material 112 Card Surface 112 Card Handling 113 Card Storage 113 Clea...

Page 13: ...thernet cable s and bolt down supplies This chapter provides information about the CE system installation including PC Requirements on page 2 Ethernet Requirements on page 2 Electrical Requirements on...

Page 14: ...ardWizard issuance software Ethernet Requirements The following network components are required An Ethernet network that uses the TCP IP protocol and can run at 100 megabits per second also called 100...

Page 15: ...page 4 for more information Enough space to open all system access doors and to access power cords and data cables Refer to Clearance Requirements on page 5 Enough space around the printer to allow fo...

Page 16: ...System Dimensions The external system dimensions are shown in the following illustrations Single Hopper System Multi Hopper System 15 in 382 mm 28 in 712 mm 19 3 in 490 mm 25 in 635 mm 16 3 in 414 mm...

Page 17: ...open Single Hopper System Multi Hopper System We recommend that you provide a minimum of 3 inches 76 2 mm of additional clearance around the system to maintain access to the power cords and data cabl...

Page 18: ...6 Installation Set Up the System This section provides information about setting up the system Unpack the System 1 Remove the printer from the shipping carton Printer with Multi Hopper...

Page 19: ...CE870 Instant Issuance System Installation and Administrator s Guide 7 Single Hopper Printer 2 Remove the embosser from its shipping carton...

Page 20: ...or 2 Remove the indent ribbon and topping foil cartridges 3 Remove the foam T and block inserts used to secure the topping and transport mechanisms during shipping Save the inserts in case you need to...

Page 21: ...r 1 Unlock the printer and open the printer supplies access door and the multi hopper cover 2 Remove the packing material inserted behind the multi hopper and inside the cover 3 Close the multi hopper...

Page 22: ...low the embosser with the open end toward the embosser 3 Insert the T bar of the cable lock through the opening into the security plate 4 Follow the instructions included with the cable lock to comple...

Page 23: ...Two 1 4 inch 6 mm nuts Lock nuts are recommended a Drill holes in the mounting surface following the dimensions and requirements shown on the following page b Insert the bolts Note Make sure that you...

Page 24: ...12 Installation...

Page 25: ...ft to place the mounting lock in the unlocked position 3 Lift the printer over the embosser and align the pins on the embosser with the holes on the underside of the printer 4 Press down carefully but...

Page 26: ...14 Installation 6 Connect the interconnect cable from the embosser to the lower data port on the printer Data Port Interconnect Cable...

Page 27: ...the Power Cords 1 Connect the printer power cord to the printer and to the printer power supply 2 Plug the power supply cord into the power outlet 3 Connect the embosser power cord to the embosser and...

Page 28: ...nt roll a Unlock and open the embosser supplies access door and remove the indent ribbon cartridge from the embosser The indent ribbon cartridge is on the right b Place the indent ribbon cartridge on...

Page 29: ...s the correct routing pattern IMPORTANT Do not twist the ribbon while routing 5 Secure the take up spool to the spindle a Match the keyed pattern of the take up spool hub with the right side spindle b...

Page 30: ...ch the keyed pattern of the blue supply spool hub with the right side spindle b Push the supply spool into the spindle until it clicks securely into place 3 Roll out and route the foil around the roll...

Page 31: ...printer component uses a replaceable cleaning sleeve to remove dust and other particles from cards before they travel into the printer The cleaning sleeve fits on a spindle that mounts on the print r...

Page 32: ...ndle and slide the spindle into the cleaning sleeve a c Place the spindle with cleaning sleeve onto the ribbon cartridge b d Remove the protective wrapper from the cleaning sleeve c Load the print rib...

Page 33: ...uipped with the optional printhead load the ribbon when you install the printer and when the ribbon runs out 1 Load the ribbon a Load a full roll of print ribbon the blue spool onto the spindle closes...

Page 34: ...r Insert ISO magnetic stripe cards with the stripe back side facing down and to the right A diagram inside the input hopper shows the correct orientation 3 Close the hopper door and lock the printer M...

Page 35: ...on the LCD panel Refer to Activate the System from the LCD Menu on page 24 After the system has been activated Ready displays on the LCD panel Use the Front Panel The front panel of the printer provid...

Page 36: ...activation process Have the printer and embosser serial numbers ready for phone confirmation The printer serial number is located on the printer configuration label on the outside of the shipping box...

Page 37: ...ch character that matches the 8 digit numeric activation code b When the 8 digit activation code displays completely press ENTER again with a blank character entry to submit the code The code you ente...

Page 38: ...et a Static IP Address CardWizard issuance software requires that the printer have the same IP address at all times Because the default communication method is DHCP Dynamic Host Configuration Protocol...

Page 39: ...TER to enter the menu system c Press the down arrow until Configuration displays on line 2 d Press ENTER to enter the Configuration menu e Press the down arrow to display Network IPv4 on line 2 f Pres...

Page 40: ...en it can be changed and the cursor is under the right most digit Press ENTER to navigate to the next section of the address iii When all four sections are correct press ENTER Subnet Mask displays on...

Page 41: ...ress and to test that the system is functioning correctly You might use this procedure if you set up multiple systems in a central location before installing them at individual sites Connect the Syste...

Page 42: ...en the Windows Network and Sharing Center and select Local Area Connection 2 Click Properties on the Local Area Connection Status menu 3 On the Local Area Connection Properties dialog box select Inter...

Page 43: ...the last section of the IP address a value that is at least plus one from the address on the printer front panel b In the Subnet mask and Default gateway fields enter the subnet mask and default gate...

Page 44: ...an Internet browser and enter the IP address of the printer Refer to Access Printer Manager on page 63 for complete information about how to access Printer Manager 2 Select WebAdmin to log in to Prin...

Page 45: ...Select the Emboss check box and one of the following TestCard1 to test emboss character position TestCard3 to test the indent printing and topping quality TestCard5 and TestCard6 to test the emboss c...

Page 46: ...34 Installation v Select any remaining test card options that match the personalization features installed on the system c Click Run to process the test card...

Page 47: ...owing procedures If any of the features are found to be out of specification contact your Datacard dealer distributor or value added reseller for troubleshooting procedures Verify Emboss Topping and I...

Page 48: ...iption Characters All present and flawless Distortion Visible distortion on the opposite side of the card is unavoidable However you should not be able to feel the distortion with your fingers Ink Mak...

Page 49: ...a clean lint free cloth 2 Apply magnetic developer Part No TUL001 014 to the leading edge of the magnetic stripe on an encoded test card The encoding data becomes visible as gray lines 3 Align the sig...

Page 50: ...the system to your network 1 Power off the system and disconnect the Ethernet cable from the computer 2 Connect the system to the network using the Ethernet cable 3 Press the power button on the fron...

Page 51: ...omplete the setup of your system Refer to Chapter 3 Printer Manager for a complete discussion about using Printer Manager Log in to Printer Manager 1 Open an Internet browser and enter the IP address...

Page 52: ...date Password 2 Select the usernames WebUser and WebAdmin and enter passwords to specify a password for the user and administrator levels of Printer Manager access If a current password does not exist...

Page 53: ...uirements 1 Select Printer Setting Behavior 2 Enable and disable ports to match your security requirements Customer security guidelines typically require that the secure port DPCL2Secure is enabled Di...

Page 54: ...ormat you use To change the settings for magnetic stripe encoding 1 Select Printer Setting MagStripeGeneral 2 In the MagStripeGeneral menu select the features to match the magnetic stripe format you a...

Page 55: ...by their edges only Insert ISO magnetic stripe cards with the stripe back side facing down and to the right Insert smart cards with the smart card chip facing up and toward the back of the hopper Sing...

Page 56: ...h hopper 4 Close the multi hopper door and lock the printer when you finish loading cards Verify the Door Open Interlock 1 Unlock and open the secure locked door on the printer or embosser 2 Run a tes...

Page 57: ...ng Design on page 59 Settings for Card Design in Printer Manager on page 60 Basic Card Design Card design includes Color and monochrome printing if the printer is equipped with a printhead The various...

Page 58: ...cludes UV printing Short Panel Ribbon Color print ribbon also is available in a short panel option The color area for short panel ribbon is either 1 57 inches 40 mm or 1 47 inches 37 5 mm depending on...

Page 59: ...nds that are black from printing over colored images use a color that appears black but is not so that all parts of an image print with the YMC panels For example in the RGB color space 0 0 0 is black...

Page 60: ...r for example green or silver also called a K ribbon Refer to Monochrome Print Ribbon Kits on page 109 for a list of available colors Silver Topcoat Black K Topcoat ST KT and Gold Topcoat Black K Topc...

Page 61: ...ode produced Bar codes contain a series of black lines bars separated by white areas spaces Each character of encoded data is represented by a set of bars and spaces A bar code standard specifies the...

Page 62: ...rint cards in batch many cards sent to the printer at the same time use a production sized batch and evaluate cards from the beginning middle and end of the batch Use exactly the same card stock for t...

Page 63: ...d Such areas include a magnetic stripe signature panel or smart card chip Card production software usually manages such non printing areas automatically You also can use the dimensions provided in the...

Page 64: ...al smart card chip The smart card chip can vary in size shape and location Adjust these values based on the card stock you use The non print blocking area must extend outside the smart card chip by 0...

Page 65: ...he printer leaves a small white margin around the edges of the card due to the printhead being lowered and raised as it prints Keep this in mind if your card design includes a full card image You can...

Page 66: ...ge Placement Use the following suggestions to help you locate important images such as a photo logo or bar code When placing images avoid uneven areas and areas of high wear which can result in incons...

Page 67: ...s can use the default format for each track or can use a different combination of tracks and data formats Three Track Option ISO IAT The default data formats for a three track magnetic stripe option a...

Page 68: ...a Japanese edition of a supported Windows operating system also supports Japanese language special characters and 55 Katakana characters They include the following Special characters 45 Katakana chara...

Page 69: ...card step of personalization is controlled by an application that is separate from the rest of card personalization The smart card reader can be factory installed or installed later as a field upgrade...

Page 70: ...l a contactless reader If the Sx value is included in the configuration code the printer has the basic components of an S1 plus the appropriate interface installed Code on Label Type of Smart Card Mod...

Page 71: ...ble on the second wheel Features of the embossing wheel that are determined at time of purchase include multiple font choices and a variety of special characters The embossing wheel with indent charac...

Page 72: ...e card design settings include magnetic stripe setup and smart card testing Printer Manager also contains troubleshooting features such as a log file that can track all processes of a card job Service...

Page 73: ...tion about the printer System administrators and service providers can use Printer Manager to fine tune card appearance set advanced options and troubleshoot printing problems You can access Printer M...

Page 74: ...rinter Setting Maintenance and Log Out WebAdmin WebAdmin access allows an administrator to set up a test card and make minor adjustments to the printer The WebAdmin user has access to configuration op...

Page 75: ...printer network IP address and write it down Refer to the printer s User s Guide for detailed information about how to retrieve the printer IP address b Open a web browser on the PC and enter the IP a...

Page 76: ...s The printer is shipped with recommended settings in Printer Manager You may need to change these settings to customize the printer for your site Printer Manager provides access to the printer settin...

Page 77: ...Print Preview in your Internet browser to scale the image to fit the paper Use Printer Manager The following sections describe how to use the options on the Printer Manager menus that are available t...

Page 78: ...ers Print this page for reference if you need to contact your service provider View View Printer Status Display printer status information including the printer mode the printer state how long the pri...

Page 79: ...ounters and can be useful to track card production activity and problem history View View Adapters Display information about the IP addresses configured for the printer The printer can have an IPv4 ad...

Page 80: ...ActivityLog Set values in the activity log to help isolate card production issues No Change all Current Values Behavior Display printer operation and control methods Change RibbonInitialize Change al...

Page 81: ...ral Set magnetic stripe options including coercivity custom magnetic stripe formats and data formats No Change coercivity custom formats and data formats MagStripeCustomTrack1 Set customized magnetic...

Page 82: ...other procedures This setting is used primarily by financial printers Contact your service provider for more information Requires a password Requires a password Description Default Value Current Valu...

Page 83: ...not used at this time IPMode Specify the IP mode used by the printer The printer can support both IPv4 and IPv6 addressing You can select from the following IPv4 The printer uses IPv4 addressing only...

Page 84: ...s connected and the device ID in the IPv6 manual address starting from the left end The default value is 64 IPv6ManualSelect Enable the printer to use the manual address specified in IPv6ManualAddress...

Page 85: ...ion of a card action with the specified severity and higher to the activity log FilterConfigChanges Write configuration change actions with the specified severity and higher to the activity log Filter...

Page 86: ...Select Printer Setting Activity Log 2 Set FilterJobStates to Error from the drop down list Changes to the state of a job with this severity and higher are written to the activity log 3 Click Set Curre...

Page 87: ...tect Disabled Disabled 4 ContactlessATRMode Legacy Legacy 5 CPX Enabled Enabled 6 DataStorageSecure Disabled Disabled 7 DPCL Enabled Enabled 8 DPCL2 Enabled Enabled 9 DPCL2Secure Enabled Enabled 10 DP...

Page 88: ...data provides extra security in the event the printer is stolen or disassembled and the SD card removed Once data is encrypted there is no impact on performance of the printer Enabled Encrypts the pr...

Page 89: ...Timeout Specify the time period during which card data can be retrieved You can specify from 0 to 120 seconds If the Current Value is 0 data is not retrieved RibbonInitialize Enable or disable initial...

Page 90: ...to 0 cards between cleaning are not tracked We recommend that you clean the printer after every 500 cards to maintain print quality LedPrintheadCyclesToCleaning Set the number of printhead cycles bet...

Page 91: ...B 0 0 0 0 255 4 ColorMatchB 1 0 25 0 255 5 ColorMatchB 2 0 50 0 255 6 ColorMatchB 3 0 75 0 255 7 ColorMatchB 4 0 100 0 255 8 ColorMatchB 5 0 125 0 255 9 ColorMatchB 6 0 147 0 255 10 ColorMatchB 7 0 17...

Page 92: ...0 255 31 ColorMatchR 6 0 163 0 255 32 ColorMatchR 7 0 191 0 255 33 ColorMatchR 8 0 217 0 255 34 ColorMatchR 9 0 240 0 255 35 ColorMatchR 10 0 255 0 255 36 FPower 0 0 100 100 37 FPowerDuplex 0 0 100 1...

Page 93: ...les color management in the printer and allows color management to be handled by the application sRGBColorSpace renders images to look similar to those displayed on PC monitors using the standard Red...

Page 94: ...KT ribbon Increase the value to make single color printing thicker and more defined on the card Decrease the value to reduce the monochrome intensity or to prevent frequent ribbon breaks when printing...

Page 95: ...e K panel and K ribbons Increase the value to make single color printing thicker and more defined on the card Decrease the value for crisp bar codes or to prevent frequent ribbon breaks when printing...

Page 96: ...ntense Decrease the value to reduce the color intensity or to prevent frequent ribbon breaks when printing colors YMCPower600 Modify the print intensity at 600 dpi for the YMC color ribbon panels Incr...

Page 97: ...card travel through the printer Change settings as needed and then click Set Current to apply changes TransMedSpeed The speed at which the transport motor runs when clearing errors You cannot change t...

Page 98: ...e 1 Attempts 3 3 1 5 2 Coercivity HICO HICO 3 DataFormat1 IATA IATA 4 DataFormat2 ABA ABA 5 DataFormat3 TTS TTS 6 NoDataDisableTrack Disabled Disabled 7 ReadTrack1 Enabled Enabled 8 ReadTrack2 Enabled...

Page 99: ...interference The choices are HICO LOCO NTT1 NTT2 NTT3 DataFormat 1 2 3 Specify the names of the data formats used for tracks 1 2 and 3 For single track magnetic stripe encoding set DataFormat1 to JIS...

Page 100: ...CustomCharLength Track 1 6 Tracks 2 3 4 6 4 1 8 3 CustomCharLow Track 1 32 Tracks 2 3 48 32 48 0 255 4 CustomCharMask Track 1 32 Track 2 48 32 48 0 255 5 CustomCharMax Track 1 76 Track 2 37 Track 3 10...

Page 101: ...tinel CustomDensity Specify the number of data bits per inch of magnetic stripe media for the track also called bits per inch or bpi Allowed values are 75 bpi or 210 bpi CustomEndSentinel Specify the...

Page 102: ...the custom track using the settings on the MagStripeGeneral menu 1 To use the defined custom track a Open the MagStripeGeneral menu b Select Custom for DataFormat1 DataFormat2 or DataFormat3 to use th...

Page 103: ...ty of magnetic stripe encoding If you set the number to a higher value it decreases the throughput of the printer but can increase the reliability of magnetic stripe encoding A value of 1 means no ret...

Page 104: ...s as needed and then click Set Current to apply changes MS2CustomCharHigh1 Specify the numeric value of the highest ASCII character supported for input data on the track MS2CustomCharLength1 Set the n...

Page 105: ...r the end sentinel to provide simple error checking MS2CustomParity1 Specify a character level parity bit encoded after each character to provide simple error checking MS2CustomSdsNulls1 The number of...

Page 106: ...erDwell The length of time dwell in which the topping module applies topping foil to the embossed characters Select from 100 to 2000 milliseconds TopperTemperature The temperature in degrees Celsius a...

Page 107: ...ommunity passwords 2 Enter the current password If a current password is not set leave this field blank 3 Enter the new password in the corresponding field To remove a password leave this field blank...

Page 108: ...ly for financial printers Contact your service provider for more information Field Value Description Current Password Enter the currently set password Leave the field blank if no password was previous...

Page 109: ...rint the activity log reset the log reset counters and reset the printer TroubleShooting Menu Option Function WebUser WebAdmin Test Card Print test cards No Change all current values and run a test ca...

Page 110: ...rint Input Hopper Number Select the input hopper from which the test card should be picked Test Card Print Options Description Card Front page 1 Card Back page 2 Input Hopper Number 1 Emboss TestCard1...

Page 111: ...t to check the remaining characters on Emboss wheel 1 without topping and test the front indent characters TestCard7 and TestCard8 Use these tests to check wheel 2 emboss and topping The tests also in...

Page 112: ...ation grid TestPattern6 Use this test to print a marbles image color test card to evaluate general appearance The monochrome test card prints several lines of text TestPatternRegistration and TestPatt...

Page 113: ...196s SYSTEM__WARNING Improper shutdown detected 14 0d 01h 10m 14 135s JOB_____NOTICE Resolved condition 1 JobFailed Notice 637 638 hostname 770962 0 0 Reset Log The Reset Log option allows a WebAdmin...

Page 114: ...d an item to a selected group click Browse select a file path and click Add Item To remove a loaded file select a file in the list of loaded files and click Delete Item To export an item to your PC se...

Page 115: ...to track card production activity and problem history Click Download and specify a location to save the audit log The Audit Log data is saved as a txt file that you can view or print Reset Log The Res...

Page 116: ...an the hopper rollers on all the hoppers or select individual hoppers for cleaning Clean the Printer 1 Unlock the system if necessary 2 Remove the supplies a Open the printer s top cover and remove th...

Page 117: ...Place the cards in the input hopper b Replace the print ribbon if necessary c Replace the cleaning sleeve with a new sleeve and remove the protective cover d Replace the ribbon cartridge and close the...

Page 118: ...file 1 Click Browse and select the file to upload 2 Click Upload File Log Out Menu Use the Log Out option to end the current Printer Manager session and return to the Printer Manager Log In page For...

Page 119: ...lies and Parts This chapter describes the recommended supplies and replacement parts to use with the CE Instant Issuance System This section describes Supplies on page 108 Cards on page 112 Cleaning S...

Page 120: ...esign calls for color printing on the entire card Full panel color print ribbons with an ultraviolet UV fluorescent panel YMCKFT also are available Short Panel Use short panel print ribbon when only a...

Page 121: ...onochrome ribbon prints the entire card in one color Monochrome ribbon can be Alternating black and topcoat panels KT or KTT ribbon Continuous black K ribbon A continuous color such as red or silver S...

Page 122: ...ge Guidelines Store print ribbon in the original package until you load it in the printer Keep the original packaging closed The print ribbon maintains its quality for about one year For optimum card...

Page 123: ...ds per roll Foil silver up to 500 cards per roll Foil copper up to 500 cards per roll Supply Storage Guidelines Store supplies in the original package until you load them into the embosser Keep the or...

Page 124: ...he cards have the following dimensions Actual card thickness can vary by up to ten percent from the sizes listed The card bow must be less than the thickness of the card Card Material Use cards with a...

Page 125: ...rd on the floor clean it using a lint free cloth before using it in the system Card Storage These guidelines apply to both blank card stock and processed cards Use cards that are at room temperature I...

Page 126: ...rds 10 printer cleaning sleeves and 5 cleaning swabs Printer cleaning cards 569946 001 Pack of 10 double sided isopropanol coated cleaning cards used to clean the printer card track and transport roll...

Page 127: ...Clean the printhead following the steps in the printer s User s Guide Print Ribbon Cartridge The ribbon cartridge holds the print ribbon and replaceable cleaning sleeve in the printer Indent Ribbon Ca...

Page 128: ...10 240V 50 60Hz 3 5A Output 24V 10 42A 250W It is self adjusting within the rated input voltage Power Cords The printer power cord connects the facility power and the printer power supply The embosser...

Page 129: ...nistrator s Guide 117 Network Cable Use an Ethernet network cable sometimes called a Category 5 or Cat 5 cable to connect the system to a network port Ethernet cables are not available from Datacard Y...

Page 130: ...118 Supplies and Parts...

Reviews: