background image

dCS 

Network Bridge User Manual 

Software Issue 1.0x 


December 2016 


Network Bridge Manual v1_0x 

Page 6

 English 

version


Safety notice 


In the event of the unit developing a fault, please contact your dealer in the first instance.  

If you decide to remove safety covers for any reason, disconnect the power cable first. Note that 
removing covers voids the warranty. 

To maintain protection from electric shock, the unit MUST be connected to mains earth (ground) via 
the power cable. Also, unearthed systems do not give the best sonic performance. 

To reduce the risk of fire or electric shock, do not expose this apparatus to rain or moisture. Protect 
the product from dripping or splashing liquids. Liquid-filled objects such as vases must not be placed 
on the product. 


This product is not suitable for operation at altitudes above 2000m. 


This product is lead-free and complies with the RoHS directive.  

 
Before connecting the power cable to the unit for the first time, please check that it has been set to the 
correct operating voltage for your mains supply. The unit’s voltage setting is shown on the serial 
number label. If this does not match your local supply voltage, DO NOT attempt to use the unit. 
Contact your dealer to have the unit reset. Using the unit with the wrong mains setting for your local 
supply may result in serious damage to the unit and will invalidate the warranty. Do not attempt to 
reset the voltage yourself. 
 
We do not recommend the use of mains regenerators. However, if you do wish to use a mains 
regenerator with variable voltage and frequency, we recommend that you set the voltage to match 
your local voltage and the frequency to either 50Hz or 60Hz ONLY. 

!


Damage caused to your Network Bridge by misuse of a mains regenerator or by a 
malfunctioning mains regenerator is not covered by the warranty. 


Disposal at end-of-life: the symbol indicates that this product should not be treated as 
normal household waste. It should be recycled, so please take it to an approved 
collection facility. 


Summary of Contents for DCS Network Bridges

Page 1: ... written permission of dCS1 Any person who does any unauthorised act in relation to this publication may be liable to criminal prosecution and civil claims for damages Information contained in this manual is subject to change without notice and whilst it is checked for accuracy no liabilities can be accepted for errors 1 dCS is Data Conversion Systems Ltd Company registered in England No 2072115 d...

Page 2: ...dCS Network Bridge User Manual Software Issue 1 0x December 2016 Network Bridge Manual v1_0x Page 2 English version ...

Page 3: ...g music 15 Current track 17 Playlists 18 Search 19 Playing files from a USB flash drive 19 Playing music with AirPlay 20 Using the Network Bridge with Spotify Connect 20 Using the Network Bridge with Tidal 20 Using the Network Bridge with Roon 20 STEP 5 Using a master clock 21 STEP 6 Using the web client interface 22 Rear Panel 23 AES digital outputs 23 SPDIF digital output 23 SDIF 2 digital inter...

Page 4: ...e occasionally to see if new Network Bridge software is available or consult your dealer What s in the box Check that the box contains the following items dCS Network Bridge Manual Power cable Network Cable 2 spare fuses Notify your dealer as soon as possible if anything is missing or damaged We suggest that you retain the original packaging for possible future use If this is not possible replacem...

Page 5: ...nding type plug has two blades and a third grounding prong The third prong is provided for your safety If the provided plug does not fit into your outlet consult an electrician for replacement of the obsolete outlet Protect the power cord from being walked on or pinched particularly at plugs convenience receptacles and the point where they exit from the apparatus Only use attachments accessories s...

Page 6: ...necting the power cable to the unit for the first time please check that it has been set to the correct operating voltage for your mains supply The unit s voltage setting is shown on the serial number label If this does not match your local supply voltage DO NOT attempt to use the unit Contact your dealer to have the unit reset Using the unit with the wrong mains setting for your local supply may ...

Page 7: ...ed for the SPDIF RCA interface use 75Ω coax cables fitted with RCA Phono plugs for the Network interface use an RJ45 Ethernet cable such as that provided with the unit Connect the power cable to the power inlet on the rear panel plug the other end into a convenient power outlet Please do not use an excessively heavy or inflexible power cable as this may damage the power inlet connector The cables ...

Page 8: ...AES1 AES2 or SPDIF output to the matching input on the DAC rear panel using a suitable cable Set the DAC to the input you connected Note that the Network Bridge app s AES Downsampling SPDIF Downsampling and DSD Downsampling features must be set to suit your DAC see Step 3 Connecting the SDIF 2 interface Check that your DAC is capable of SDIF 2 PCM or DSD operation This interface can output up to 9...

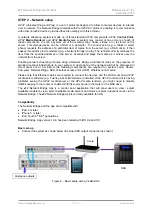
Page 9: ... using a Network Bridge via Ethernet relies on the presence of standard network infrastructure in your system A description of the network will not be discussed in this manual but at a minimum the following components are required for system setup Router Computer Network Bridge NAS Wireless access point WAP Wireless control point Please note that Ethernet cables are required to connect the devices...

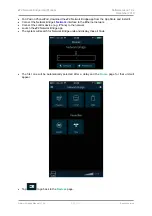
Page 10: ...Store and install it Connect the Network Bridge s Network interface to the Ethernet network Connect the control device e g iPhone to the network Launch the dCS Network Bridge app The system will search for Network Bridge units and display those it finds The first one will be automatically selected after a delay and the Home page for that unit will appear Tap to go back to the Devices page ...

Page 11: ...mation about the unit or change the Network Bridge s settings Tap Information Tap Unit Status to see some useful information about your unit If you are having setup problems we may ask you to tap Copy status to email This gathers information about your unit and sends it to dCS via the email account set on your control device Tap to go back one level in this case to to Information ...

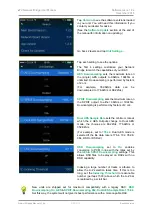
Page 12: ...F output to either 96kS s or 192kS s Downsampling is performed by factors of 2 or 4 Dual AES Sample Rate sets the minimum rate at which the 2 AES Outputs change to Dual AES mode the choices are 88 2kS s 176 4kS s or 352 8kS s For example set to 176 4k Dual AES mode is selected if the file data rate is 176 4 192 352 8 384 DSD or DSDx2 DSD Downsampling set to On enables conversion to PCM in line wit...

Page 13: ...ed changes the absolute phase of both channels to correct a phase error in the track Tap the Channel Swap toggle to temporarily correct for a connection error If you have a Tidal account go back 1 level and tap Online Services Tap Tidal Enter your Username and Password Set Sound Quality to Lossless Tap Add to save your account details Go back to the Devices page and tap Preferences ...

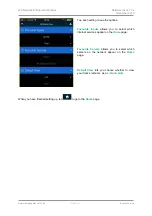
Page 14: ...see the options Favourite Inputs allows you to select which internet services appear on the Home page Favourite Servers allows you to select which servers on the network appear on the Home page Default View lets you choose whether to view your tracks albums as a List or a Grid When you have finished setting up tap to go to the Home page ...

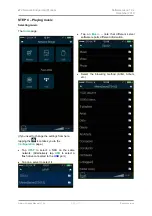
Page 15: ...e If you need to change the settings from here tapping the icon takes you to the Configuration page Tap UPnP to select a NAS on the same network Alternatively tap USB to select a flash drive connected to the USB port Tap on a server to select it Tap on Music note that different server software reports different information Select the browsing method Artist Album etc ...

Page 16: ...ed Tracks and then tap on the tracks you want to play Tap one of the action buttons Cancel the Queue and play now Add to the start of the Queue Add to the Queue after the current track Add to the end of the Queue Add to a Playlist Tap the back icon if you want to return to the previous page Tap the Home icon if you want to return to the Home page Tap the Network icon at the bottom of the screen to...

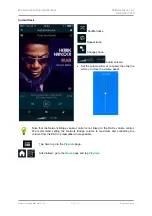
Page 17: ...e Set the volume slider as required then tap the white x to close the volume panel Note that the Network Bridge volume control is not linked to the DAC s volume control We recommend setting the Network Bridge volume to maximum and controlling the volume from the DAC or preamplifier where possible Tap here to go to the Playlists page Alternatively go to the Home page and tap Playlists ...

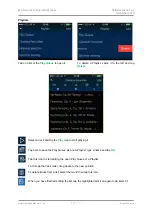
Page 18: ...ap Delete Select a track and tap the Play icon to start playing it Tap here to save the Play Queue as a new Playlist type a name and tap OK Tap this icon to start editing the open Play Queue or a Playlist To change the track order drag tracks to the new position To delete tracks from a list select them and then tap this icon When you have finished editing the list tap the highlighted edit icon aga...

Page 19: ...ag downwards in the list to close the keyboard Select the track you want and either play it or add it to a playlist Playing files from a USB flash drive You can stream music from a flash drive attached to the USB port by selecting the USB icon on the app s home page Tracks can be selected individually by the app and played in the same way as from a NAS drive Unlike a NAS drive the flash drive does...

Page 20: ...nnect icon 5 Pick the Network Bridge from the list For further information on how to set up and use Spotify Connect please visit www spotify com connect Licenses The Spotify Software is subject to third party licenses found here www spotify com connect third party licenses Make sure you have checked Spotify in the Preferences Favourite Inputs page Using the Network Bridge with Tidal If you have a ...

Page 21: ...ter Clock with files at any sample rate Connect the equipment as shown Figure 3 Using the Network Bridge with a Vivaldi DAC and Master Clock Set the Master Clock Freq1 to 44 1kHz and Freq2 to 48kHz Connect one of the Clock Group 1 outputs 44 1kHz to the Network Bridge s Word Clock In1 input and one of the Clock Group 2 outputs 48kHz to the Network Bridge s Word Clock In2 input The Bridge will auto...

Page 22: ...e s IP address The Main Page reports some information about the network Tap Device Settings Here you can Change the Device Name so that you can identify different Network Bridges on the network Enter the AirPlay Password if necessary Load a Network Firmware Update from a file this is rarely necessary Check if an Internet Update is available from the update server on the internet and load it This i...

Page 23: ...sts of two data inputs labelled CH1 and CH2 D The Word Clock Output E must be connected to the DAC to provide clocking for this interface unless a Master Clock is in use High sample rate data is automatically downsampled to either 24 88 2 or 24 96 WiFi antenna connector Antenna socket F for the internal WiFi feature this is for future development Word Clock inputs and output Either of the two Word...

Page 24: ...d when not in use and connecting the RJ45 cable immediately after removal USB interface The USB 2 0 host interface I on an A type connector can stream music files in most popular formats at up to 24 bits 384kS s or DSD 128 from a USB Flash Drive Playback is controlled by the app Low powered USB hard disk drives in FAT16 or FAT32 format may be used in the same way The interface will not read drives...

Page 25: ... PCM at up to 24 bit 192kS s or DSD 64 in DoP format 1x SDIF 2 interface on 2x BNC connectors outputs PCM at up to 24 bit 96kS s or SDIF 2 DSD 64 Word clock I O 2x Word clock Inputs on 2x BNC connectors accept standard word clock at 44 1 48 88 2 96 176 4 or 192kHz The data rate can be the same as the clock rate or an exact multiple of the clock rate Sensitive to TTL levels SDIF 2 Word clock Output...

Page 26: ...e unit risk of fire or electric shock and will invalidate the warranty Fuse failure is rare Referring to the diagram below remove the power cable use your fingernails to catch the two tabs of the fuse holder A push them together to release the clips and pull the fuse holder out Pull out the blown fuse from the lower position B and discard it Either move the Spare Fuse C to the lower position or fi...

Page 27: ...out the product is not used in accordance with the Operating Conditions stated in this manual the product is serviced or repaired other than by dCS or our authorised service agents the product is operated without a mains earth or ground connection the unit is returned inadequately packed dCS reserve the right to apply a service charge if a product returned for warranty repair is found to be operat...

Page 28: ...ry also to increase the capacity of the electronics add extra connectors or extra front panel controls Please note that not all software updates produce an audible improvement We recommend that you keep your software up to date Check the dCS web site occasionally for news of the latest software updates This manual is for Network Bridge software version 1 0x Issue 1 00 The first issue with Network ...

Page 29: ...master clock 21 N NAS drive 9 network interface 9 24 setup 9 now playing 16 17 O operating conditions 27 output AES 8 23 Dual AES 8 23 sample rates 23 SDIF 2 8 23 SPDIF 8 23 word clock 8 23 P playback controls 13 playing music 15 playlists 17 positioning 4 power up 7 preferences 14 R rear panel 23 rename device 22 Roon Ready 20 S safety 5 6 SDIF 2 output 8 23 search 19 serial number 24 service 26 ...

Reviews: