background image


Page 17 of 20 

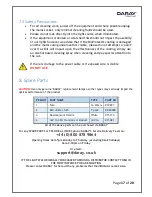
7.4 Safety Precautions


For all cleaning work, power off the equipment and where possible unplug 
the mains socket, only minimal cleaning fluids should be used. 


Please do not look directly into the light source when illuminated. 


If the equipment is dented or scratched this should not impact the usability 
of our lights however we advise that if the BioProtect® coating is damaged 
and the metal casing underneath is visible, please do not attempt to ‘paint’ 
over it as this will impact upon the effectiveness of the coating, simply use 
an alcohol based cleaning spray when cleaning and pay special attention to 
the cut. 
 
If there is damage to the power cable or if exposed wire is visible  

DO NOT USE 


8. Spare Parts


CAUTION: 

Use only genuine ‘DARAY’ replacement lamps as other types may seriously impair the 

optical performance of the product. 

ITEM NO  PART NAME 

TYPE 

PART NO 

Fuse 

1A 20mm  D10873 

Microfibre cloth 

5 pack 

DRK4080 

Replacement Handle 

White 

D15194 

30V 1A LED Transformer Module  30V 1A 

D15081 

All of the above parts can be purchased via DARAY 

 
For any SPARE PARTS or TECHNICAL ISSUES phone DARAY’S Service Delivery Team on: 

+44 (0) 800 878 9864 

Opening times


9am–5pm Monday to Thursday (excluding bank holidays) 

9am-2:30pm on Friday


Or email: 


[email protected]


IF THE LIGHT WAS ORIGINALLY PURCHASED THROUGH A DISTRIBUTOR CONTACT THEM IN 

THE FIRST INSTANCE FOR A RESOLUTION 

Please contact DARAY for help with any problems that the distributor cannot solve. 

Summary of Contents for X210 LED

Page 1: ...X210 LED Examination Light Operating Installation Manual QAM X210 0818 10 X210LW ...

Page 2: ...Page 1 of 20 ...

Page 3: ...0 5 Installation 11 5 1 X210LW Standard Wall Mounted version 11 5 2 X210LE Wall Mounted version flush fit 12 5 3 X210LR Rail Mounted version 13 6 Fuse Replacement 14 7 Maintenance 15 7 1 Maintenance Schedule 15 7 2 Routine Maintenance 15 7 3 Product cleaning care guidelines 16 7 4 Safety Precautions 17 8 Spare Parts 17 9 Warranty Information 18 9 1 Returns Policy 18 9 2 Warranty Details 19 ...

Page 4: ...ted into mounting box and the mounting box itself If you have purchased the standard wall version or the rail mounted version you will also have an IEC cable X210LW X210LR The flexible arm allows the light patch to be placed accurately and stably where it is needed The arm is covered with a PVC sleeve to prevent contamination and allowing easy cleaning The power supply module contains an electroni...

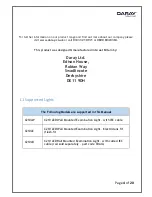
Page 5: ...d in Great Britain by Daray Ltd Edison House Robian Way Swadlincote Derbyshire DE11 9DH 1 1 Supported Lights The Following Models are supported in this Manual X210LW X210 LED Wall Mounted Examination Light with IEC cable X210LE X210 LED Wall Mounted Examination Light Electricians fit flush fit X210LR X210 LED Rail Mounted Examination Light with curled IEC cable rail sold separately part code XRAIL...

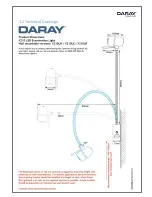
Page 6: ...Page 5 of 20 1 2 Technical Drawings ...

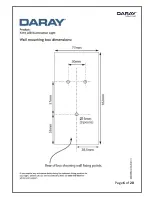
Page 7: ...Page 6 of 20 ...

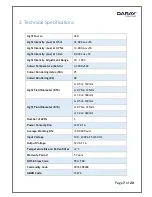
Page 8: ...K 500 Colour Rendering Index CRI 95 Colour Rendering R9 88 Light Field Diameter D50 0 5m 120mm 0 75m 135mm 1 0m 180mm Light Field Diameter D10 0 5m 230mm 0 75m 325mm 1 0m 460mm Number of LED s 3 Power Consumption 12W 0 1A Average Working Life 50 000 Hours Input Voltage 100 240V AC 50 60 Hz Output Voltage 12V DC 1A Temperature Rise on Patient User 2 C Warranty Period 5 Years NHS E Class Code FBU FK...

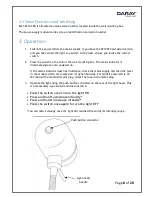
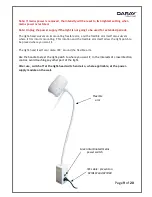
Page 9: ...ed green once powered on If the mains indicator does not illuminate check the mains supply and then the fuses in the module which are located on its right hand side For models powered via an IEC lead with a moulded mains plug check the fuse in the mains plug 3 Operate the light using the push button controller on the rear of the light head This is a momentary type switch and does not latch Press t...

Page 10: ...into its mounting This rotation and the flexible arm itself allow the light patch to be placed where you want it The light head itself can rotate 320 around the flexible arm Use the handle to steer the light patch to where you want it in the interests of cross infection control avoid touching any other part of the light After use switch off at the light head switch and also where applicable at the...

Page 11: ...o curve the gooseneck through its entire range avoiding sharp kinks that will cause irreparable damage Try to avoid bending the neck by pushing and pulling the light head with one hand as it will inevitably cause undue stress on the base of the neck and will subsequently reduce the ability of the neck to hold itself in position We strongly advise that all staff members reading this manual adequate...

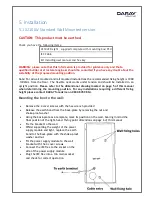
Page 12: ...g located on page 5 of this manual when determining the mounting position For any installations requiring a different fixing height please contact DARAY for advice on 0800 878 9864 Mounting the box to the wall Remove the 4 cover screws with the hex wrench provided Release the earth bond from the back plate by removing the nut and shake proof washer Using the back plate as a template mark its posit...

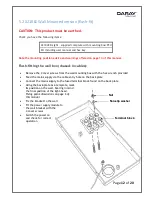
Page 13: ...ox chased in cables Remove the 4 cover screws from the wall mounting box with the hex wrench provided Feed the mains supply via the cable entry hole on the back plate Connect the mains supply to the fused terminal block found on the back plate Using the back plate as a template mark its position on the wall bearing in mind the final position of the light head Fixing point dimensions on page 6 of t...

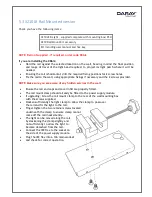
Page 14: ...screws provided NOTE Make sure you are aware of any hidden services in the wall Ensure the rail end caps and cover infill are properly fitted The rail mount clamp should already be fitted to the power supply module If upgrading Screw the rail mount clamp to the rear of the wall mounting box with the screws supplied Slacken sufficiently the light clamp to allow the clamp to pass over the rail and f...

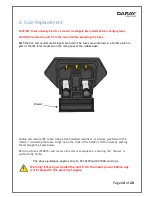
Page 15: ...on the rear panel of the mobile base Unplug and remove IEC cable Using a flat bladed screwdriver or similar pull forward the drawer containing the fuses Hinge down the front of the holder Lift the fuses by pushing them through the holes below Refit new fuses D10873 and reverse the removal sequence ensuring the drawer is pushed fully home The above guidance applies only to X210LW and X210LR version...

Page 16: ... All fixings to be checked and be of sound construction 7 2 Routine Maintenance The X210 is designed and manufactured to stringent quality standards Observing the following procedures will help to maintain the light s optimum performance Light head Clean all exterior surfaces as required consult section 7 3 for guidance Flexible arm Clean all exterior surfaces as required using the directions abov...

Page 17: ...e our BioProtect antimicrobial coating on painted finishes This is designed to assist with infection control and is not a replacement for cleaning CAUTION Our products are NOT waterproof The equipment and accessories included chargers and battery packs MUST NOT at any point be saturated to prevent water ingress Use a damp cloth or saturated wipe if necessary All electrical safety guidelines should...

Page 18: ... is damage to the power cable or if exposed wire is visible DO NOT USE 8 Spare Parts CAUTION Use only genuine DARAY replacement lamps as other types may seriously impair the optical performance of the product ITEM NO PART NAME TYPE PART NO 1 Fuse 1A 20mm D10873 2 Microfibre cloth 5 pack DRK4080 4 Replacement Handle White D15194 6 30V 1A LED Transformer Module 30V 1A D15081 All of the above parts c...

Page 19: ...which is not covered by any of the above We will always try to help but we cannot normally offer a refund For additional clarification please refer to our terms and conditions at www daray co uk terms In a small number of cases we may determine that a replacement would not work any better than the original product we supplied In such cases we will only offer a refund rather than a replacement for ...

Page 20: ...h Daray s instructions Attachment of fittings and accessories not approved by Daray Repairs modifications carried out by service personnel not approved by Daray Damage caused by chemical corrosion from cleaning agents not approved by Daray Failure to use or install the product in accordance with the manufacturer s instructions 5 Nothing in this warranty shall have the effect of restricting or excl...

Page 21: ...Page 20 of 20 Service Notes ...

Page 22: ...Page 21 of 20 ...

Page 23: ...Page 22 of 20 ...

Page 24: ...DARAY Ltd Edison House Robian Way Swadlincote Derbyshire United Kingdom DE11 9DH 44 0 800 878 9864 44 0 333 321 0973 sales daray co uk www daray co uk ...

Reviews: