14
Order code: D1475B/D1476B
EDGE EHS-1/EDGE EBS-1
Setup and Operation
Follow the directions below, as they pertain to your preferred operation mode. Before using the device,
check the regulations regarding the frequency allocation in your country or region. Before plugging the
unit in, always make sure that the power supply matches the product specification voltage.
01)
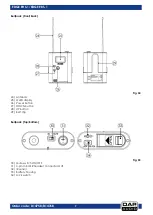
Connect the supplied power adapter to the DC power connector (13) on the rear of the receiver.
02)
Plug the power adapter into a power outlet. Use only the supplied power adapter to connect the
device.
03)
Press and hold down the power button (05) for 2 seconds to turn the device on.
04)
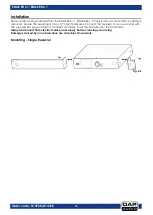
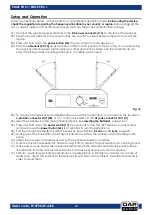
Point the antennas (09/14) away from each other in a 45° position as shown in Fig. 12. Avoid placing
the receiver antennas near metal surfaces or other obstructions. Make sure the antennas do not
cross if stacking or rack-mounting receivers in a multiple-system setup.
Fig. 12
05)
To connect the receiver to an amplifier either use an XLR to XLR cable, to connect via the receiver’s
3-pin XLR connector OUT (08), or a ¼” mono jack cable via the AF jack connector OUT (11).
06)
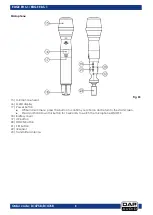
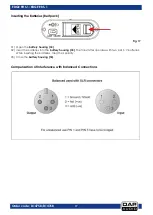
Insert the batteries into the microphone/beltpack. See Inserting the Batteries, pages 16–17.
07)
Press and hold down the power switch (17) for 3 seconds to turn the microphone on and/or press
and hold down the power button (26) for 2 seconds to turn the beltpack on.
08)
Pair the microphone/beltpack with the receiver. See chapters 4. Scan and 5. Sync, page 20.
09)
During use of the transmitter, the AF signal indicators will show the intensity of the incoming audio
signal.
10)
Adjust the volume on the receiver and on the connected mixer or amplifier.
11)
Mute the microphone/beltpack before turning it off, to prevent the occurrence of a popping sound.
12)
Make sure you can always see a receiver antenna from the microphone/beltpack position. Keep
the distance from the microphone/beltpack to the receiver antenna as short as possible.
13)
Perform a walk-through before performance or presentation to identify any dead spots. In case of
dead spots, adjust the location of the receiver. Should this not be sufficient, mark the dead spots in
order to avoid them.
Summary of Contents for EDGE EHS-1
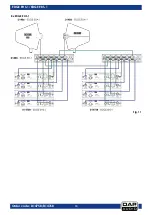
Page 13: ...12 Order code D1475B D1476B EDGE EHS 1 EDGE EBS 1 Setup Examples 4 x EDGE EHS 1 Fig 10...
Page 14: ...13 Order code D1475B D1476B EDGE EHS 1 EDGE EBS 1 8 x EDGE EHS 1 Fig 11...
Page 34: ...33 Order code D1475B D1476B EDGE EHS 1 EDGE EBS 1 Dimensions...
Page 35: ...34 Order code D1475B D1476B EDGE EHS 1 EDGE EBS 1...
Page 36: ...2019 DAP Audio...


