


6
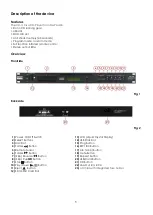
Fig. 3
24)
Select Buttons
32)
Prog (Program) Button
25)
Folder Button
33)
ID3 Button
26)
Folder Button
34)
ESP Button
27)
Repeat Button
35)
(Skip) Reverse Button
28)
Eject Button
36)
(Skip) Cue Button
29)
Mute Button
37)
Func (Function) Button
30)
Play/Pause Button
38)
A-B (Loop) Button
31)
Stop Button
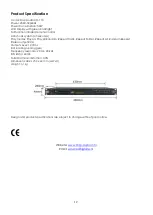
Installation
CD-110 Installation
Remove all packing materials from the device. Check that all foam and plastic padding is removed.
Screw the device player in a 19“ Rack. Connect all cables.
Always disconnect from electric mains power supply before cleaning or servicing.
Damages caused by non-observance are not subject to warranty.
Set Up and Operation
Before plugging the unit in, always make sure that the power supply matches the product specification
voltage. The power supply is printed on the back of the device.
Do not attempt to operate a 120V specification product on 230V power, or vice versa.
Connections
1.
Turn off the
Power (1)
switch.
2.
Connect the
Line Out (22)
to the input of your mixer.
Summary of Contents for CD-110 v2
Page 1: ...CD 110 v2 ORDERCODE D1250...
Page 15: ...2009 DapAudio...


