background image


11

Maintenance 


The 

DAP Audio-CD-Player CD-110 

requires almost no maintenance. However, you should keep the unit 

clean. Disconnect the mains power supply, and then wipe the cover with a damp cloth. Do not immerse 

in liquid. Do not use alcohol or solvents. 
Keep connections clean. Disconnect electric power, and then wipe the audio connections with a damp 

cloth. Make sure connections are thoroughly dry before linking equipment or supplying electric power. 


Replacing a Fuse 

Power surges, short-circuit or inappropriate electrical power supply may cause a fuse to burn out. If the 

fuse burns out, the product will not function whatsoever. If this happens, 

follow the directions below to do 

so.


1. Unplug the unit from electric power source. 

2. 

Insert a flat-head screwdriver into a slot in the fuse cover. Gently pry up the fuse cover. The fuse will 

    come out. 

3. Remove the broken fuse. If brown or unclear, it is burned out. 

4. Insert the replacement fuse into the holder where the old fuse was. Reinsert the fuse cover.  
    Be sure to use a fuse of the same type and specification. See the product specification label for   

    details. 


Troubleshooting 


DAP Audio-CD-Player CD-110 

This troubleshooting guide is meant to help solve simple problems. If a problem occurs, carry out the steps 
below in sequence until a solution is found. Once the unit operates properly, do not carry out following 

steps. 

1. If the device does not operate properly, unplug the device. 
2. Check power from the wall, all cables, connections, etc. 

3. If all of the above appears to be O.K., plug the unit in again. 

4. If nothing happens after 30 seconds, unplug the device. 
5. Return the device to your DAP Audio dealer. 


Summary of Contents for CD-110 v2

Page 1: ...CD 110 v2 ORDERCODE D1250...

Page 2: ...Audio for more excellent audio products We design and manufacture professional audio equipment for the entertainment industry New products are being launched regularly We work hard to keep you our cu...

Page 3: ...eration Names and functions Operations Loading CD s Unloading CD s CD s MP3 discs USB sticks CD Play Mode USB MP3 Play Mode Selecting tracks forward Selecting tracks backwards Selecting folders forwar...

Page 4: ...not use the system To maintain perfect condition and to ensure a safe operation it is absolutely necessary for the user to follow the safety instructions and warning notes written in this manual Pleas...

Page 5: ...nsportation do not switch it on immediately The arising condensation water might damage your system Leave the system switched off until it has reached room temperature If your Dap Audio device fails t...

Page 6: ...description of the symptoms Claims The client has the obligation to check the delivered goods immediately upon delivery for any short comings and or visible defects or perform this check after our ann...

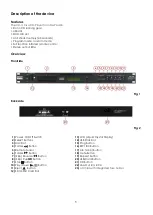
Page 7: ...ig 1 Backside Fig 2 1 Power On Off Switch 13 LCD Liquid Crystal Display 2 Select Buttons 14 USB Stick Slot 3 Disc Slot 15 Prog Button 4 Folder Button 16 ESP ID3 Button 5 Remote Sensor 17 A B Loop Butt...

Page 8: ...astic padding is removed Screw the device player in a 19 Rack Connect all cables Always disconnect from electric mains power supply before cleaning or servicing Damages caused by non observance are no...

Page 9: ...ard Use this slot to connect your SD MMS card for playback 13 LCD 14 USB Use this slot to connect your USB stick for playback 15 32 Prog Program Stop playback and press the Prog button the player will...

Page 10: ...der 4 PLAY ALL Plays the entire music menu in normal order 5 MP3 PLAY MODE Six different play modes are available in USB mode PLAY ALL PLAY ALL RANDOM REPEAT TRACK REPEAT FOLDER and REPEAT ALL When yo...

Page 11: ...sing Press the Play Pause 10 30 button to switch between play and pause Playback resumes when the Play Pause 10 30 button is pressed again 13 Scanning Fast forward Forward Scanning is a function for m...

Page 12: ...tely Before switching off the power CAUTION Do not force the disc in when the power is off Do not switch off the power when the disc is ejecting Switch off the power after the disc holder has been bee...

Page 13: ...rce 2 Insert a flat head screwdriver into a slot in the fuse cover Gently pry up the fuse cover The fuse will come out 3 Remove the broken fuse If brown or unclear it is burned out 4 Insert the replac...

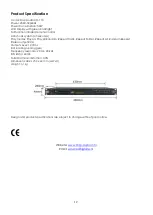
Page 14: ...Play All Play All Random Repeat Track Repeat Folder Repeat All Random Repeat Stereo output RCA Output Level 1 2Vrms Slot loading running gear Frequency response 20 Hz 20 kHz S N Ratio 60 dB Total Har...

Page 15: ...2009 DapAudio...
Reviews: