background image


13 

0

4

5

8

9

3

 •

 V

e

rsi

o

n

 2

.3

 • 

1

6

.0

3

.2

0

1

2


2.3 Power distribution panel 


Introduction 

This section will give you a description of the power distribution panel (PDP) and its 
functionality. 

The power distribution panel (PDP) is located in the mid section in the left bay of the 
MTS4-outdoor enclosure.  


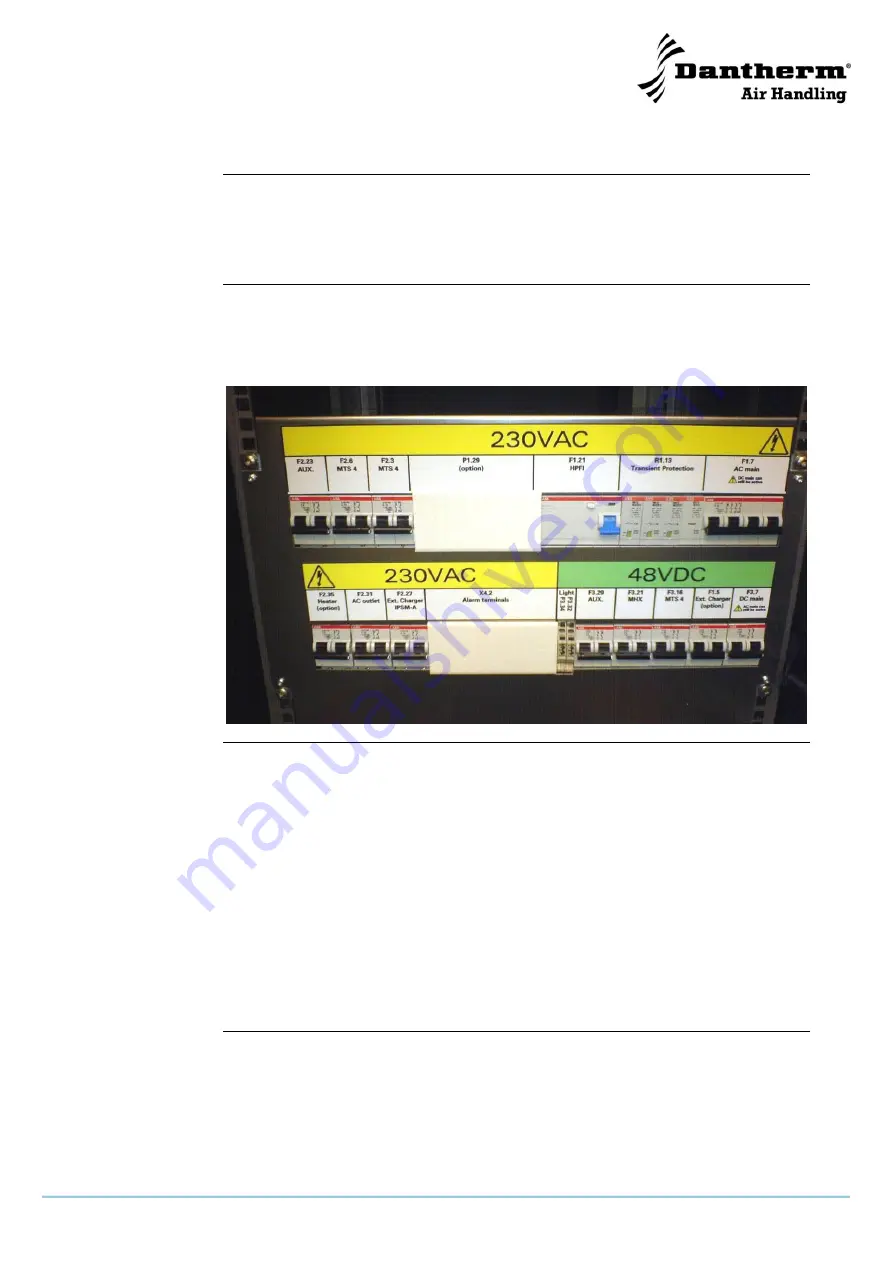
Illustration 


This illustration gives an overview of the power distribution panel which is build into the 
MTS4-outdoor enclosure 
Please see section “5.5 References for the wiring diagrams”, page 73 for further refer-
ences of the power distribution panel. 


Description 

The power distribution panel (PDP) is the electrical centre of the MTS4 outdoor installa-
tion. It connects and distributes power to all functions inside the enclosure. 

Various circuit breakers rated to protect the consumer and further surge protection 
(overvoltage and lightning) as well as a RCCB (Residual Current Circuit Breaker) relay 
are used to protect for potential earth faults. In Scandinavia also known as HPFI relay. 

Optional a power meter can be included. 

Various alarms for i.e open doors, high temperature, smoke etc. is also connected and 
collected from the PDP.  

The circuit breakers can also be used to activate or deactivate the function listed on the 
overlay. 

The basic PDP de

sign is for installation into a19” rack system and offers a 2 row DIN 

rail space each sized for 25 module and it is tested to fulfil the safety regulations in ac-
cordance to EN60950. It also has a CE marking. 

Continued overleaf 

Summary of Contents for MTS4

Page 1: ...DA Betjeningsvejledning DVC styring Side 3 EN User s guide for the DVC controller Page 23 DE FR MTS4 Outdoor Enclosure Service manual EN Dantherm No 045893 rev 2 3 16 03 2012 Motorola No 6866588D43...

Page 2: ...hold for trykfejl og ndringer Dantherm can accept no responsibility for possible errors and changes Irrt mer und nderungen vorbehalten Dantherm n assume aucune responsabilit pour erreurs et modificati...

Page 3: ...00 power backup system should be protected against traffic accidents by a fence or a concrete barrier and obey all other legal requirements for installation and storage of hydrogen high pressure bottl...

Page 4: ...26 3 3 How to install the battery pack backup power 30 3 4 How to install the MTS4 into the outdoor enclosure 34 3 5 How to power up the MTS4 outdoor enclosure cold start 38 4 Service guide 41 4 1 Pr...

Page 5: ...on changed added Dantherm part 046496 description changed added Dantherm part 060575 description changed added Dantherm part 062905 added Dantherm part 064624 added Dantherm part 064627 added Dantherm...

Page 6: ...of machines 2006 95 EC Low Voltage Directive 2004 108 EC EMC Directive Description MTS4 outdoor enclosure is a 2 door steel based outdoor enclosure equipped for accommodating and servicing an MTS4 rad...

Page 7: ...public transportation T2 3 ETSI EN 300 019 2 4 v2 2 2 In use non weather protected locations T 4 1 or T4 1E ETSI ETS 300 753 october 1997 Acoustic noise It is further declared that the installation a...

Page 8: ...the MTS4 outdoor enclosure is to be found on the following pages Illustration This illustrates the MTS4 outdoor enclosure with the MHX 85 heat exchanger unit hanging on the right door Content This se...

Page 9: ...torola part number 6802800U74 MTS2 and MTS4 configuration installation and service manual For more information please con tact Motorola The MTS4 outdoor enclosure is designed to withstand rough enviro...

Page 10: ...4 Basic cable routing for specified equipment 5 Double 19 rack system in left bay 6 Door stop system 7 Internal insulation panels 8 Dismountable painted protection roof 9 RF protection cover 10 Heat E...

Page 11: ...Smoke de tector Detects smoke and sends an alarm signal to the MTS4 controller Regin S65 046122 TG00117AA Cabin Light LED panel light 48VDC installed in both sides activated by door contacts 046132 TG...

Page 12: ...gas sing kit internal wiring and LVD if re quired For longer backup time fuel cell system is available 046137 TG00108AB LVD relay Low Voltage disconnect relay This relay is placed in line with the bat...

Page 13: ...nstalla tion It connects and distributes power to all functions inside the enclosure Various circuit breakers rated to protect the consumer and further surge protection overvoltage and lightning as we...

Page 14: ...might have been damaged and possibly saved the equipment inside Check if the easy replaceable blocks are okay by seeing if the window is still green AC area All 230 VAC loads are connected to the 6 ci...

Page 15: ...ree to use for other door s Smoke detector 3 A 6 Inverter alarm 16 A 7 Spare used if inverter installed Spare A 8 4 A 8 Spare used if flooding sensor in stalled FC malfunction 17 A 9 Defined in 126651...

Page 16: ...PDP operates with a multiple single phase system which means 415VAC live voltage can be found between live phases Operation of Gen erator switch op tional The generator switch has 3 positions 1 When t...

Page 17: ...ide of the door by using 4 long M8 screws 13 mm hex head A gasket is applied between heat exchanger and door duct to seal the airway and maintain the IP55 barrier Illustration This illustration gives...

Page 18: ...Part Function RS 232 To be used for factory testing or to get further information from the controller Alarm LED Gives signal about alarms Flashing minor alarm high temperature Constant major alarm fa...

Page 19: ...Value IR1 Minimum internal fan speed 1100 RPM IR2 Maximum internal fan speed 2100 RPM IT Cut off temperature internal fan 0 C IT0 Cut in temperature internal fan 5 C IT1 Ramp up temperature set point...

Page 20: ...is re inserted in the guide in the same way as it was lifted out Always put the hook back in the guide after it has been disconnected to avoid personal injury and physical damage to the enclosure Rig...

Page 21: ...ics Topic See page 3 1 How to unpack and mount the MTS4 outdoor enclosure 22 3 2 How to install power to the MTS 4 outdoor enclosure 26 3 3 How to install the battery pack backup power 30 3 4 How to i...

Page 22: ...o prevent it from tripping over Lifting the enclo sure All lifting of the enclosure must be done through the plinth The plinth offers multiple ways of applying lifting aids 3 passages going between fr...

Page 23: ...es 5 Install the power according to the section 3 2 How to install power to the MTS 4 outdoor enclosure page 26 NB To avoid condensation and thereby a potential risk of damage to the installed equipme...

Page 24: ...oles that are left open on both sides of the enclosure by two rivets if additional protection towards intrusion is requested The blinds are supplied with the enclo sure 11 Install the protection cover...

Page 25: ...cor ner of the enclosure bottom plate in ac cordance with the R56 requirements Use M10 x 16 mm max screws and washer to connect cabinet 14 Power up within 24 hours to avoid condensation problems Activ...

Page 26: ...with N and L phase a ground stud M6 is next to this serving as main ground The installation must be done by authorized personal only The main circuit breaker is rated 16 A 3 phase N WARNING All work o...

Page 27: ...rd Cover not on Tighten the nut using a 8mm wrench 6a If the generator switch option is cho sen go to step 6b If not continue Insert the N L1 L2 and L3 to the main circuit breaker located at the top r...

Page 28: ...rator switch located on location P1 29 mid top rail Connection to Mains grid starting from right N blue followed by L1 L2 and L3 The 4 wires left are connecting the generator cable located in the plin...

Page 29: ...4 outdoor enclosure Other entry holes 4 Other entry holes are available for other ca bles for i e communication lines or generator power input These are on a loose mounting plate located in the bottom...

Page 30: ...Careful battery handling is described in the separately enclosed Installation Operations and Maintenance Instructions for the battery pack When to replace it It is necessary to replace the battery pa...

Page 31: ...top of the battery so that the 6 holes in side cap match the 6 venting holes on bat tery NOTE Do not remove filter in venting hole on battery 6 Lift slide the batteries in place one by one WARNING Lif...

Page 32: ...afety cap back on Degassing installation 13 Install the tube on battery 4 as shown on the picture to the right Batteries are num bered from left to right 1 2 3 4 Tube length 105 5 mm 14 Install the tu...

Page 33: ...s hose approx 10 cm above the batteries of the upper shelf Insert the extra T connector and connect a piece of hose between the T connector from step 19 and the newly inserted T connector in the hose...

Page 34: ...ensure normal operation Necessary tools The following tools are needed for the installation 10 and 13 mm wrench Torx T30 screwdriver Adjustable pliers Procedure Follow these steps to install the MTS4...

Page 35: ...losure 7 Depending on the site where the mounting of the MTS is taking place some lifting aid might be needed to get the MTS4 into the outdoor enclosure Always follow local regulations regarding perso...

Page 36: ...llation 11 The battery temperature sensors from the MTS should be mounted together with the cables on the teminals of the battery some times only one sensor The plastic cover might need modification i...

Page 37: ...case this output on the PSU is already used you need to connect the existing plug to the spare plug on the Y cable wir ing from the smoke detector and then connect the Y cable plug into the PSU output...

Page 38: ...ther reasons for not powering up the base station If all antennas are NOT installed and connected to a MTS4 base station or if the base stations are not ready for going in the air then only do step 1...

Page 39: ...the MTS4 outdoor enclosure WARNING If the expected reaction is not fulfilled STOP Step Action and reaction 1 Switch off all circuit breakers switch pointing downwards 2 Switch off all one or two power...

Page 40: ...MTS4 PSU LED DC In Status turn green 9 F3 16 MTS4 DC Supply circuit breaker is switched on No reaction should be observed 10 F2 27 External Charger circuit breaker switched on In a battery equipped c...

Page 41: ...3 Version 2 3 16 03 2012 4 Service guide Overview Content This chapter covers the following topics Topic See page 4 1 Preventive maintenance 42 4 2 Spare parts 44 4 3 Fault finding 56 4 4 Service agre...

Page 42: ...e test button on the HPFI is activated regularly every 6 month to test function Make sure Backup is active when doing this to avoid any unplanned downtime on the Radio base station Recommended every 6...

Page 43: ...and the fan blades for cracks exchange the MHX85 if nec essary 4 Check the fans for abnormal noise exchange the MHX85 if necessary Preventive main tenance batteries Please follow this procedure to ca...

Page 44: ...m Part No Motorola Part No Description Illustration 046392 6766500A01 Heater w thermostat 600W PTC type 046393 5166566A01 GPS surge arrestor 046394 5166565A01 Antenna surge arres tor 046395 5166564A01...

Page 45: ...tion 046397 5166563A01 Dataline surge ar restor 046398 4866547A01 Light internal 48VDC 5W LED light 400 LUX 046399 5166562A01 Smoke alarm 046400 6066502A01 Batteries Set of 4x12V155AH VRLA type with d...

Page 46: ...ued Dantherm Part No Motorola Part No Description Illustration 046403 6766500A12 Powermeter 046405 4066557A01 Door contact F79 00A 046457 1566568A01 Cover plate com plete 046458 1566569A01 Right side...

Page 47: ...pare parts continued List continued Dantherm Part No Motorola Part No Description Illustration 046460 1566567A01 Left side cover plate complete 046461 1566566A01 Right door com plete 046462 1566565A01...

Page 48: ...A01 Roof complete 046464 1566563A01 Housing for surge arrestor 046465 0766555A01 Pole for door stopper right side 046466 0766550A01 Pole for door stopper left side 046467 0766556A01 Gate stopper for d...

Page 49: ...covering plate for socket 046474 0766558A01 Battery bracket 046475 3266509A01 Sealing strip 2mm opening door right side 046476 3266510A01 Sealing strip 2mm opening door left side 046477 3266511A01 Sea...

Page 50: ...046482 4066567A01 F1 21 Ground fault circuit inter rupter F204A 40 0 03 046483 4066559A01 F2 3 F2 31 F2 6 Circuit breaker S201 C10 NA 046486 4066558A01 F2 23 2 35 Cir cuit breaker S201 C6 NA 046487 40...

Page 51: ...ption Illustration 046489 3066611A01 Generator cable 046490 4066562A01 F3 7 Circuit breaker S202 C63 046491 4066563A01 F3 16 Circuit breaker S202 C40 046492 4066564A01 F3 21 F3 29 Circuit Breaker S202...

Page 52: ...erm Part No Motorola Part No Description Illustration 046495 5166560A01 Overvoltage pro tection OVR T2 3N 40 275P 046496 6566507A01 10 pcs fuses 1A 046497 0166562A01 Alarm distribution board 046515 97...

Page 53: ...continued Dantherm Part No Motorola Part No Description Illustration 060575 AC DC rectifier 800W 48VDC 060576 Control unit PCC for XS1948 062905 Fan for MHX85 internal or exter nal 064624 Controller M...

Page 54: ...rttaske 064629 Warning smok ing and fire for bidden 064630 Warning remove pressure bottles at fire 064631 Thorsman grommet TET C 5 7 16 5 7 21 064632 Thorsman grommet TET C 14 20 29 14 20 35 064633 Ha...

Page 55: ...55 045893 Version 2 3 16 03 2012 4 2 Spare parts continued List continued Dantherm Part No Motorola Part No Description Illustration 064636 Lock pole for complete door...

Page 56: ...due to the control strategy no fault The external fan runs at low speed The temperature in the enclo sure is below 45 C This is due to the control strategy no fault Fault finding MTS4 outdoor en clos...

Page 57: ...e maintenance Dantherm Air Handling A S offers to do the preventive maintenance on the units so that they at all times will operate according to factory standards Corrective and emergency repair In ca...

Page 58: ...ents This section covers the following topics Topic See page 5 1 Technical data MTS4 outdoor enclosure 59 5 2 Technical data MHX 85 heat exchanger 61 5 3 Wiring diagram MHX 85 heat exchanger 64 5 4 Wi...

Page 59: ...ting range ambient tem perature C 30 to 40 Power supply V AC 3x400 230 Max current main fuse A 3X16 Max cooling capacity with MHX 85 installed W 1700 Temperature range C max 60 C internal at 40 C ambi...

Page 60: ...60 5 1 Technical data MTS4 outdoor enclosure continued Section view Top of enclosure Section view Top of enclosure with right door open...

Page 61: ...essure 1m as stand alone max power When mounted in double walled door significant reduction on this can be achieved Lower max performance will also give lower noise emissions dB A 68 Air flow internal...

Page 62: ...62 5 2 Technical data MHX 85 heat exchanger continued Dimensions This shows the dimensions of the MHX 85 heat exchanger Continued overleaf...

Page 63: ...63 045893 Version 2 3 16 03 2012 5 2 Technical data MHX 85 heat exchanger continued Dimensions...

Page 64: ...64 5 3 Wiring diagram MHX 85 heat exchanger Diagram This is the wiring diagram for the MHX 85 heat exchanger Control board Internal fan External fan...

Page 65: ...65 045893 Version 2 3 16 03 2012 5 4 Wiring diagrams MTS4 outdoor enclosure power distribution panel Surge arrestor Continued overleaf...

Page 66: ...66 5 4 Wiring diagrams MTS4 outdoor enclosure power distribution panel continued Diagram with generator switch installed AC circuit part 1 Continued overleaf...

Page 67: ...67 045893 Version 2 3 16 03 2012 5 4 Wiring diagrams MTS4 outdoor enclosure power distribution panel continued Diagram AC circuit part 2 Continued overleaf...

Page 68: ...68 5 4 Wiring diagrams MTS4 outdoor enclosure power distribution panel continued Diagram DC circuit part 1 Continued overleaf...

Page 69: ...69 045893 Version 2 3 16 03 2012 5 4 Wiring diagrams MTS4 outdoor enclosure power distribution panel continued Diagram with power meter installed Variant AC circuit part 1 Continued overleaf...

Page 70: ...70 5 4 Wiring diagrams MTS4 outdoor enclosure power distribution panel continued E1 Dataline Cable routing in Enclosure Continued overleaf...

Page 71: ...71 045893 Version 2 3 16 03 2012 5 4 Wiring diagrams MTS4 outdoor enclosure power distribution panel continued Gounding points of enclosure Continued overleaf...

Page 72: ...72 5 4 Wiring diagrams MTS4 outdoor enclosure power distribution panel continued Door alarm sche matics...

Page 73: ...ferences to sparepart numbers on sparepart list page 44 Reference Type Reference Type F1 7 S203 C16 NA F3 16 S202 C40 F1 21 F204A 40 0 03 F3 21 S202 C6 F2 3 S201 C10 NA F3 29 S202 C6 F2 6 S201 C10 NA...

Page 74: ...74 5 5 References for the wiring diagrams continued Wire colors This shows the colors of the wires specified in the wiring diagrams...

Page 75: ...3 16 03 2012 Appendix A Mounting template NOTE Reserve extra space if hydrogen bottle compartment may be added later Basic enclosure Hydrogen bottle compartment Rear side Front side Recommended entry...

Page 76: ...l gaskets in place and still undamaged Check 3 Are door handles working properly closing function and door alignment Test 4 Door stop function lock and release all doors Test 5 Lubricate rubber gasket...

Reviews: